


Machine Learning is the subfield of computer science that gives computers the ability to learn without being explicitly programmed.
Machine Learning
Machine Learning is the subfield of computer science that gives computers the ability to learn without being explicitly programmed.
A machine learns from the :
- extraction of knowledge from data
- Learns from past behavior and make predictions or decisions
Basically, Machine Learning is categorized into 3 categories:
- Supervised Machine Learning
- Unsupervised machine Learning
- Reinforcement learning
and having different types of models-
- Classification
- Regression
- Clustering
- Anomaly Detection
Now let’s understand
Microsoft Azure Machine Learning Service
As Microsoft Azure is the cloud service for building, testing , deploying and managing applications and services over cloud. It provides tool such as AzureML studio to create complete Machine Learning solutions in the cloud. One of the best feature of AzureML studio is that studio provides quick model creations and deployments without writing a single a line of code for basic ML experiments. It allows models to be deployed as web services. It provides a large library of Pre-Built Machine Learning algorithm and modules. It allows the developer to extend the existing created models with custom build R and Python code.
Workflow of Azure ML

- Load Data — This simply means making the raw data available for experiment. AzureML provides many ways to load data such as Enter Data Manually for smaller dataset , you can import data to load data from existing cloud services such as Azure Blob storage , Hive Query , Web services via HTTP , On-Premises SQL Databases , AzureDocumentDB etc.. or you can load data from unpacked zipped datasets.
2.Prepare Data — AzureML studio provides various modules to prepare and transform the data. You can apply various filters. You can also manipulate the data either by adding rows or columns to the data or by cleaning missing data values or even editing the metadata.
For any dataset available for experimentation we need to split the data into Training Set and Test Set. AzureML achieves it by providing the split module.
- Feature Selection- AzureML provides variety of ways for Feature Selection such as Filter Based Selection, Fisher LDA as well as Permutation Feature Importance. It does provide us the variety of options such as Pearson Corelation , Mutual Information , Kendall Correlation , Spearman Correlation etc…
- Apply Algorithm — AzureML provides an array of algorithms that we can apply. It also provides a range of parameters that can be tweaked to get better results.
- Training & Evaluate the Model — There are modules for training, scoring and evaluating the experiment and the model that you have. All we need to do is to provide the appropriate input and output connections.
Let’s Start creating Azure ML Studio over Microsoft Azure portal.
First you need to login to your Microsoft Azure Portal then search for Machine Learning in the search Resource panel.

Click on Create to create the AzureML Studio.
We need to provide various information to create our workspace. Provide the following information to configure your new workspace:
Subscription: Select your subscription
Resource Group: Select your already created resource group or you can create the new Resource group by clicking on new in the drop down menu of resource group.
Workspace Name: Provide the unique name to your workspace and then it will validate the workspace name availability.
Region: You need to select the available Region from the available regions option. Closer region will help to transfer huge data faster.
Storage Account : By default it will create a new storage account under the same resource group. You can also create new storage account.
Key Vault: By default it will create the new key vault for you else you can also create other new key vault for yourself too.
Application Insight: It will be created by default.
Container Registry: It is required at the time of deployment but by default it will be None.
Keep all the other options as it is and click on Review + Create option to create the workspace.
Note- Azure Machine Learning service stores metrics and metadata in an Azure Cosmos DB instance where all data is encrypted at rest. By default, the data is encrypted with Microsoft-managed keys. You may choose the other option as customer managed keys too in the Advanced Section in the process of workspace creation.
When the process is finished, a deployment success message appears.
Click on Go to Resource to view the newly created workspace.

We will be having the studio web URL that will help us to launch the AzureML Studio.

So, Let’s start creating our first azure ML Model.
As discussed earlier we need to Load the data, so , here I am creating a new data store with Azure BLOB and will upload the data into it. To create a dataset just navigate to Assets and then click on dataset.

Then you have to manually enter/upload datafile to the datastore.

Now it’s the time to perform the remaining steps but for that you requires a Pipeline.
So, a pipeline is an Automated Workflow of the Machine Learning steps starting from Data Processing till deployment.
To create pipeline in Azure ML Studio navigate to Azure ML Designer.

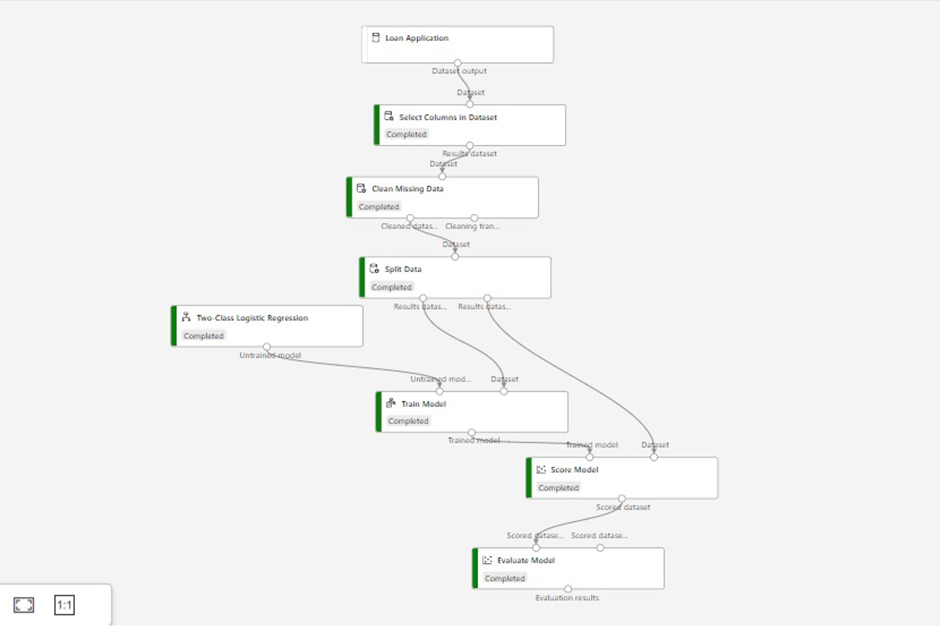
So after creating the Pipeline you will be able to drag and drop all the modules available in the Designer Menu. From here we can load the created dataset, prepare the dataset , train the model and at last will evaluate our model.

And for pipelines and experiments to run, we need some computing power and this is precisely what provided by Compute Resources. We have 2 managed resources-
- Compute Instance
- Compute Cluster
Compute Instance: It’s a workstation for Data Scientists. It is integrated with Azure ML Workspace. It supports R and Python tool environments and also supports Docker and AzureML SDK. The default Azure Storage Account is also mounted on this Instance. This is used as a development Environment as it is fully integrated with the workspace and can be accessed by multiple users connected to a workspace. We can also use this instance for data profiling and summary information of the datasets.
Compute Cluster: It’s a Managed Resource and a group of virtual machines which are integrated with the workspace. It is used for training the pipeline and experiment run.
Compute Target is typically categorized in two parts-
- Remote / Attached Compute — We can use Local machines, VMs, Compute Instance ,clusters as Remote/Attached Compute which can be used for training/test deployment. It can also be used for Batch inferencing.
- Inference Clusters — It is highly recommendable for Production environment where real time predictions can be done with an ease. It can be Azure Kubernetes cluster or AKS clusters. They have Auto _Scaling feature too.
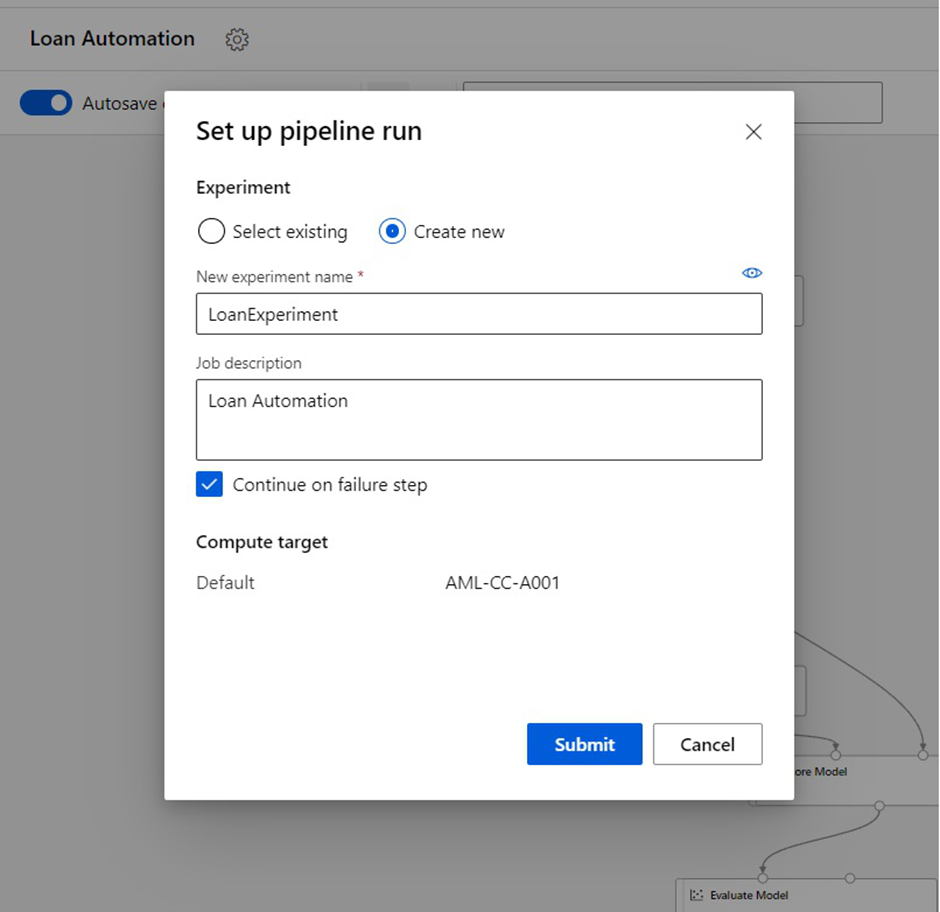
We are ready to submit our created Pipeline run. Let’s create our first experiment with this run.
After the completion of the pipeline run the result will appear somehow like this.
To visualize the result set just right click on any module and click on Preview Data it will showcase the data in the best visualized format.
At last you can check the data files in your datastore, i.e. in your Azure Blob Storage.

Share with your friends and followers
Start blogging about your favorite technologies, reach more readers and earn rewards!
Join other developers and claim your FAUN account now!


User Popularity
34
Influence
3k
Total Hits
1
Posts


Read, Learn, Know, Teach
Hand curated newsletters for Developers, private Slack with like minded people, podcasts, job offers, news and more!

Only registered users can post comments. Please, login or signup.