


Before we start this conversation, we assume you have knowledge on Kubernetes, Istio, Prometheus, Kiali, Jaeger and Grafana.
If you don't, you can check the official documentation by accessing the following links:
- https://kubernetes.io
- https://istio.io
- https://prometheus.io
- https://kiali.io
- https://www.jaegertracing.io
- https://grafana.com
By following this article, we are going to achieve such things:
- Install Istio (using revisions) to a Kubernetes Cluster
- Install Prometheus as an Istio addon so we can retrieve some service mesh custom metrics
- Install Kiali as an Istio addon so we can visualize our service mesh traffic and, if needed, manage and customize our traffic
- Install Jaeger as an Istio addon so we can monitor and inspect all our requests using tracing
- Install Grafana as an Istio addon so we can monitor everything that is going on through dashboards and charts
- Be able to perform Rolling Upgrades on Istio
Starting our tasks!
Let's break everything into tasks, so we can do things step by step.
We may break things into two main parts:
- Installing Istio and addons
Here, we are going to install Istio and then install the previously mentioned tools as addons, each tool is going to be installed in a task, and then we will give a brief introduction about Rolling Upgrades before moving to the next part. - Installing Istio and demonstrating Rolling Updates
Here, we are going to install Istio and demonstrate Rolling Upgrades in a HandsOn task.
Installing Istio and addons
First task: Installing Istio to our Cluster
So, let's start by installing Istio to our Kubernetes Cluster.
To start this task, you may use minikube to create new local cluster.
To access the cluster in an easy way, a very nice to know tool is k9s.
With our cluster running smoothly, checkout the guide to install istioctl here.
To accomplish everything we want, we must have two Istio installations, I’m using Istio 1.11.6 and 1.12.1, and I named my binaries as istioctl11 and istioctl12.
We are keeping two Istio installations so we can demonstrate how to upgrade it from a 1.x version to 1.x+1 version and be prepared to easily rollback/purge our older installations, in cases of success, or remove the new installation in case somethings goes wrong.
To rename your binaries, go to the istiofolder, which varies depending on your Istio version, and rename the binary on the bin folder, just like this:
cd istio-1.11.6/bin
mv istio-1.11.6 istioctl11
ps: don't forget to add the binary to your path!
Remember, you should install only istioctl, the Istio installation we will be performing as follows:
istioctl12 manifest install --set revision=1–12

Right now you might be wondering: what's this revision attribute when installing Istio to my cluster?
That's the icing on the cake, wait for it!
To start injecting Istio sidecars on our Pods, now, we must label the namespace that we want to inject our sidecars, using the same revision used on install.
kubectl label namespace your-namespace-name istio.io/rev=1–12
Then check your namespace to assure it is properly labeled.

If everything is ok, the next deployed Pod will have istio-proxy injected.
Exploring istioctl folder
When you downloaded istioctl binaries, you probably noticed some other folders in it, as below:

istio installation folder
Taking a deeper look at these folders, you'll find some interesting things inside samples/addons.

istio sample addons folder
Shipped with Istio, there are some prepared sample manifests to install some amazing tools as Istio addons.
In this article, we will install all these tools and (very) briefly talk about them.
Second task: Installing Prometheus as Istio addon
To start things up, we now must install Prometheus addon, as follows:
kubectl apply -f prometheus.yaml
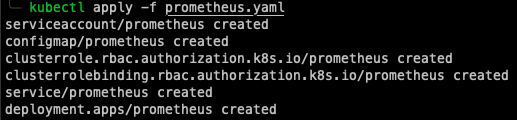
Simple, right?
With Prometheus properly installed, you know have a huge horizon of custom metrics to observe.
Third task: Installing Kiali as Istio addon
As you might me wondering, installing Kiali is as simple and fast as installing Prometheus.
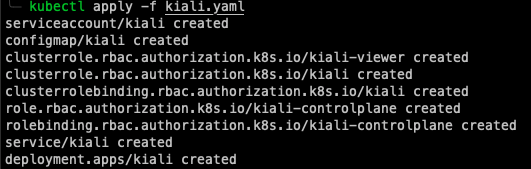
So lets cut the cheap talk and apply things up!
kubectl apply -f kiali.yaml
After everything is up, you might be able to access Kiali by running the following command:
Ps: Run the following command on a new terminal instance cause its going to freeze your terminal
istioctl12 dashboard kiali
Then, the Kiali dashboard will be automatically opened in your browser

With Kiali installed, now you have a powerful tool to understand and observe your service mesh traffic and even add some custom traffic configurations based on istio manifests.
Fourth task: Installing Jaeger as Istio addon
Now I know you are not wondering anymore, and you are pretty sure we will just apply another yaml, right? Right!
kubectl apply -f jaeger.yaml
Now, to start Jaeger UI, run:
istioctl12 dashboard jaeger

With Jaeger, you are now able to trace every request from your cluster.
A friendly reminder is, to Jaeger work as we wish, we must properly propagate headers inside our cluster and applications.
Fifth task: Installing Grafana as Istio addon
Right, I believe you already installed Grafana using the command:
kubectl apply -f granafa.yaml
And I'm pretty sure you already started Grafana dashboard by running:
istioctl12 dashboard grafana

Some friendly reminder
In this article, we will not go deep about the addons we just installed, we installed them just to demonstrate how easy it is to have access to these tools in a sample way and to show that Istio gives those samples for us.
I believe it leaves a nice path to write some new articles about them in the future :)
Although everything seems pretty nice and easy, the examples above are not production recommended, these are just for demonstration purposes and to get you quickly into these tools.
To install these tools on a production environment (Istio included!!!), take a look at the documentations and follow the best practices, like creating new namespaces and configuring log leves, profiles, users, permissions and etc.
Sixth task: Explaining our Istio installation and talking about Istio Rolling Upgrades
As we mentioned earlier, we installed Istio using an attribute called revision.
But what is the point on doing that?
Usually, people tend to install Istio with no revision attribute, which may cause some problems.
In addition with installing Istio without setting a revision, usually Istio is activated on our namespaces by labelling it using the following command:
kubectl label namespace namespace-name istio-injection=enabled
When you do that, Istio will start injecting proxies as sidecars on every Pod you deploy on that namespace, which seems pretty ok, until you need to upgrade Istio to a newer version.
When you label your namespace this way, if you happen to install a new version of Istio in your cluster, every time a Pod restarts on this namespace it will automatically inject the newer version of Istio sidecar to it, which may be a problem if you are not confident about this new version.
In our case, we labeled our namespace using revision, like this:
kubectl label namespace your-namespace-name istio.io/rev=1–12
By doing this, even if new versions of Istio are deployed to our cluster, this namespace will keep attached to the version you installed using the revision attribute as 1–12
Installing Istio and demonstrating Rolling Upgrades
Seventh task: Hands on!!!
Let's make a Hands On demonstration about what we explained before.
Let's create a new local cluster, you may use minikube.
First of all, lets create two namespaces in our cluster:
kubectl create namespace oldistio
kubectl create namespace newistio
As mentioned before, we have two istioctl installations, so let's install Istio 1.11 using the istioctl11 and the revision attribute:
istioctl11 manifest install — set revision=1–11

installing istio 1.11.6 using istioctl11
After Istio 1.11 is completely installed, lets deploy some sample application and check if everything is ok.

sample application deployed and running
With our sample application running on the oldistio namespace, let's label it and then restart the Pod to see if everything is ok.
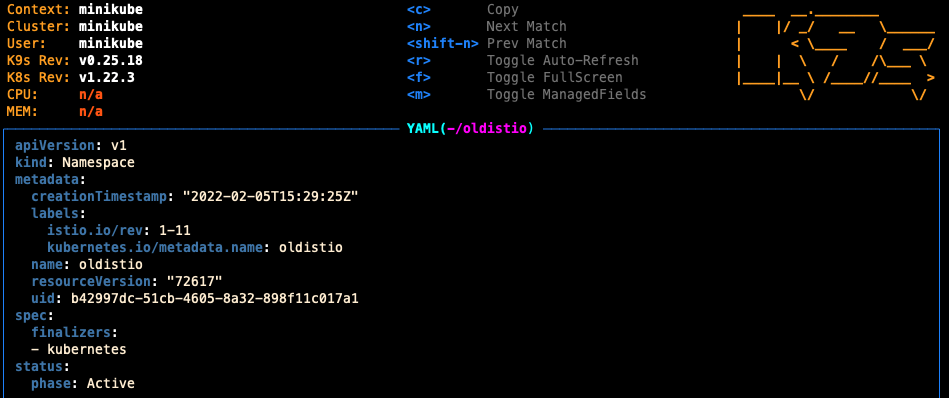
oldistio namespace labeled with istio.io/rev: 1–11

after label and pod restart, proxy is properly injected
Everything seems pretty ok, but lets make things clearer by running:

istioctl11 proxy-status output
Here we can check which pods are using our Istio 1.11.6 installation.
Now, lets install Istio 1.12.1 to our cluster

installing istio 1.12.1 using istioctl12 on a cluster with istio 1.11.6 installed
Istio 1.12 is fully installed and we can pay attention to the first warning, telling us that Istio is being upgraded (remember this part).
First thing that comes to mind is "oh my god, we destroyed our previous installation and the pods with old version will stop working.", but let's check it out.

pods on istio-system namespace
By checking istio-system namespace, we can see that there are two versions of Istio coexisting.
To do a double check, lets restart our pod on oldistio namespace to check if its still receiving istio-proxy for version 1.11.6

restarting our pod on oldistio namespace
Everything seems pretty ok around here!

oldistio namespace pod after restart
Now, lets label our newistio namespace, setting the revision to 1–12
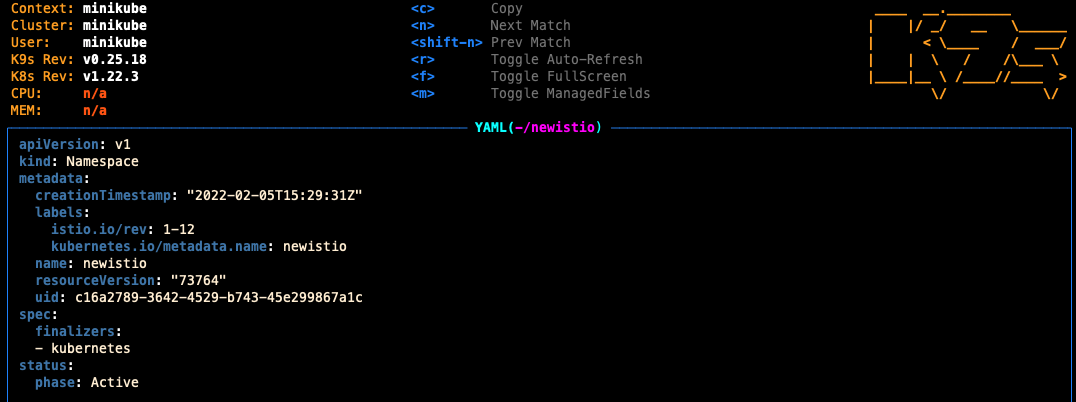
oldistio namespace labeled with istio.io/rev: 1–12
After doing that, lets deploy our sample application to the newly labeled namespace and check which version of istio-proxy it will get

application deployed to newistio namespace
Nice! The newistio namespace is running istio-proxy 1.12 while oldistio namespace is running istio-proxy 1.11
We can check this by running our proxy-status command

isitoctl12 proxy-status output
Here, we can see the side proxies are kept, but the Istio ingressgateeway (remember???) is upgraded right away, as soon as we install the new version.
Another way to check those Istio versions, is to use a tool we just learned about, Grafana!
If you go into Grafana dashboards, there are two dashboard that we can find information about Istio versions.
In the Istio Control Plane Dashboard, we are able to see that there are 2 pilot versions in our cluster.

deployed istio pilot versions
In the Istio Mesh Dashboard, we can see information about Istio Componentes (proxies and pilots) on the bottom of the dashboard panel.

istio components by version
Assuming everything looks fine, we may know patch our oldistio namespace label, and point it to the new version of Istio.

updating our oldistio namespace revision label to 1–12
With our label update done, lets check actual version of our sidecar proxy.

checking pods before restart
Then, after a restart..

restarting pods

after restart, pods are now using 1.12.1 istio proxy
We got new istio-proxy version for our Pods.
After the rollout is done, lets check our proxy status.

istioctl12 proxy-status output
As we have everything on the new version, lets uninstall our old version by running:
istioctl11 x uninstall --revision=1–11
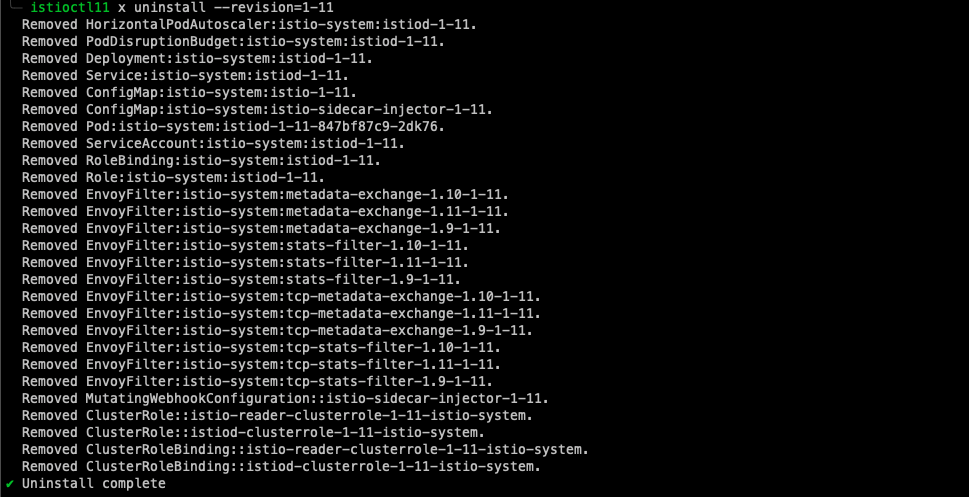
istioctl11 x uninstall — revision=1–11 output
Lets confirm by checking our dashes on Grafana.
Lets start checking our Istio Components by Version on Istio Mesh Dashboard
Pilots information

pilot: 1.11.6

pilot: 1.12.1
Proxies information

proxy: 1.11.6

proxy: 1.12.1
Now, let's check our Pilot Versions on Istio Control Plane Dashboard.

deployed istio pilot versions
By checking our Dashes, we can see clearly that our version 1.11.6 components are no more alive as our 1.12.1 components have taken their place, and our upgrade was nice and smooth.
Final conclusions
What’s so good about this?
The cool thing here is, whenever you want to do a Istio upgrade on your cluster, you can create a new namespace to do things smoothly, kind of thinking in a Canary way, which is awesome.
Also, by having Grafana to aid you on this task, you can monitor everything that is going on during your upgrade.
What’s the big difference against the istio-injection=enabled label method?
If we had labeled our namespaces using istio-injection, in the exact moment we applied the new Istio version, every Pod on namespaces with such label would start to inject the new version sidecar after restart, and then we would lose control on our rolling updates.
What are the downsides?
The downside here is a general downside on Istio upgrades.
Whether using istio.io/rev label or istio-injection, we would get a slight downtime in our istio-ingressgateway during our upgrade (remember when we talked about it earlier? That's it), which may cause some serious problem if not made with proper attention and care.
Saying again
To run such tools on your production environment, don't forget to read the proper documentation and set everything as we discussed before.
For example, when installing Istio in your production cluster you can (and you should!!) use the revision attributes to enable smooth rolling upgrades, but you also have to be extremely careful when configuring Istio profiles, log levels and more.
Thank you!
Thanks for reading this article (which is my first article, btw) and I hope it helps you on your journey!
References
- https://blog.chesterwood.io/2019/11/istio-now-released.html
- https://istio.io/latest/docs/setup/upgrade/canary/
Share with your friends and followers
Start blogging about your favorite technologies, reach more readers and earn rewards!
Join other developers and claim your FAUN account now!

Eduardo Munari
Developer Master, CI&T
@dumunari

User Popularity
36
Influence
4k
Total Hits
1
Posts

Read, Learn, Know, Teach
Hand curated newsletters for Developers, private Slack with like minded people, podcasts, job offers, news and more!

Only registered users can post comments. Please, login or signup.