


In our last post we have seen about Crossplane and its benefits. In this article, lets check how to provision an azure resource using Crossplane.
What is Crossplane?
Crossplane is a tool created by Upbound which has been released in December of 2018. It has been accepted as an incubating project by the CNCF (Cloud Native Computing Foundation) in 2020.
Crossplane is developed as a Kubernetes add-on and extends any Kubernetes cluster with the flexibility to provision and manage cloud infrastructure, services, and applications. Crossplane uses Kubernetes-styled declarative and API-driven configuration and management of infrastructure, on-premises or within the cloud.
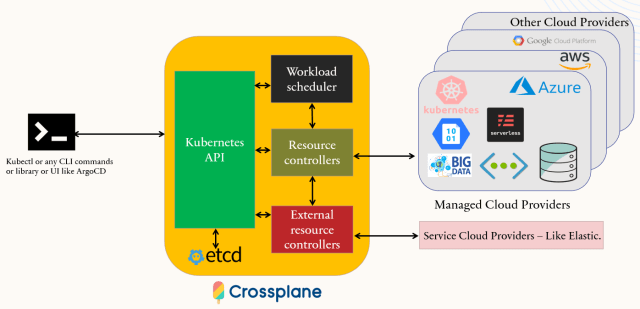
Crossplane can be considered as a Kubernetes add-on, which means that it makes use of custom resources to provide all of its functionality. There are 4 kinds of resources,
Let’s go over the steps to install Crossplane on an existing Kubernetes cluster and install and configure Crossplane to provision Azure resources.
Prerequisites:
- Any Kubernetes or you can create in azure if you like too How to create Azure Kubernetes Service using Terraform — FoxuTech
- Kubectl installed in the VM or machine you are going to manage the AKS.
- Have a kubeconfig file (default location is ~/.kube/config).
- Helm — to install Crossplane on the test cluster.
Install Crossplane
To install the Crossplane core components on the cluster using Helm, You can use separate namespace to install the Crossplane component, as below.
Verify the installation is complete by running the following commands:
Crossplane CLI:
You can use following commands to install Crossplane CLI.
Configure Azure provider
We have successfully installed the Crossplane and its CLI. Now, let’s see how we can create the resources on Azure cloud. For that we need to configure the Crossplane’s Azure provider on the cluster. Please note, before we starting configuration, we need a service principal in Azure, which will used by our Crossplane Azure provider uses to provision a resource.
Here are the commands you can use to add the create a service principle.
For more details, please refer Crossplane documentation .
Once the service principle has been created, you need to create Kubernetes secret for azure authentication.
Install the Crossplane Azure provider, and supply the configuration that includes the secret that was created above for Azure authentication. Here it the file name az-provider.yaml.
The first manifest instructs Crossplane to download and make the Azure provider available. The second manifest creates the ProviderConfig for the Azure provider.
Apply the above manifest with kubectl:
Once the manifest is applied, wait until the Azure provider installs and is in a healthy state.
Continue Reading it on https://foxutech.com/how-to-provision-azure-resources-using-crossplane/
Share with your friends and followers
Start blogging about your favorite technologies, reach more readers and earn rewards!
Join other developers and claim your FAUN account now!

We are Foxutech
@foxutech


User Popularity
303
Influence
30k
Total Hits
11
Posts

Read, Learn, Know, Teach
Hand curated newsletters for Developers, private Slack with like minded people, podcasts, job offers, news and more!

Only registered users can post comments. Please, login or signup.