


[GKE] End to End setup of Multi Region Autopilot Kubernetes Cluster with Application Deployment Example
We are going to deploy an Active-Active Architecture Multi-Region Kubernetes Cluster with Terraform in this story.
This will make our cluster highly available since we have two different clusters to serve the traffic and fault tolerant since we are deploying both clusters in different regions. In the worst case even if one region goes down, we will be able to serve traffic from second region cluster.
In my previous story we configured KEDA on Kubernetes. Today we will configure our Autopilot Kubernetes cluster on Google cloud platform with multi region support, and we will deploy a sample application with ingress to verify that traffic is getting served from both the clusters.
The need of multi region cluster
Why do we really need to setup a multi region cluster ?
The simplest answer to this question is to make our application highly available and fault tolerant, so that if there is some issue with one region our application can still serve traffic using secondary cluster.
We sometimes also setup these multi region cluster to reduce latency by setting up the cluster close to the client’s location. This is more helpful if our clients are from multiple locations across the globe.
You might have heard about the term active-passive architecture, here we will do active-active architecture. Both primary and secondary cluster will serve traffic in this case (we are running the clusters anyway, might as well use it :D)
Use Case for this story
We will write a terraform script to create infrastructure on Google cloud platform mainly Google Kubernetes Engine cluster in two different regions in a way that we can use both of them at the same time, and then we will deploy a sample application on both the clusters.
I will share the github repository url at the end of the story.
Prerequisites
- GCP Account (Free Tier will also work)
- Terraform
- Python 3
- gcloud CLI
- kubectl
- IDE (VS Code or IntelliJ IDEA preferably)
Setup
GCP Account
Click here to go to google cloud platform and click on Get Started For Free button on the top right corner (it might change in future)
gcloud CLI
Click here to go to official gcloud installation guide page and install it as per your machine operating system. (Python 3 is a prerequisite for this)
Let’s now run following commands to configure gcloud cli.
This will initialize your gcloud cli, you will need to login into your google cloud account and also set other details like region, project.
Terraform
Click here to go to official download page of terraform and install it.
Solution
Now that we have all the prerequisites ready, we can start working on our solution. Let’s create a directory ‘k8s-multi-region-cluster’. We will write and run our terraform scripts here. The overall design would like something like below diagram.
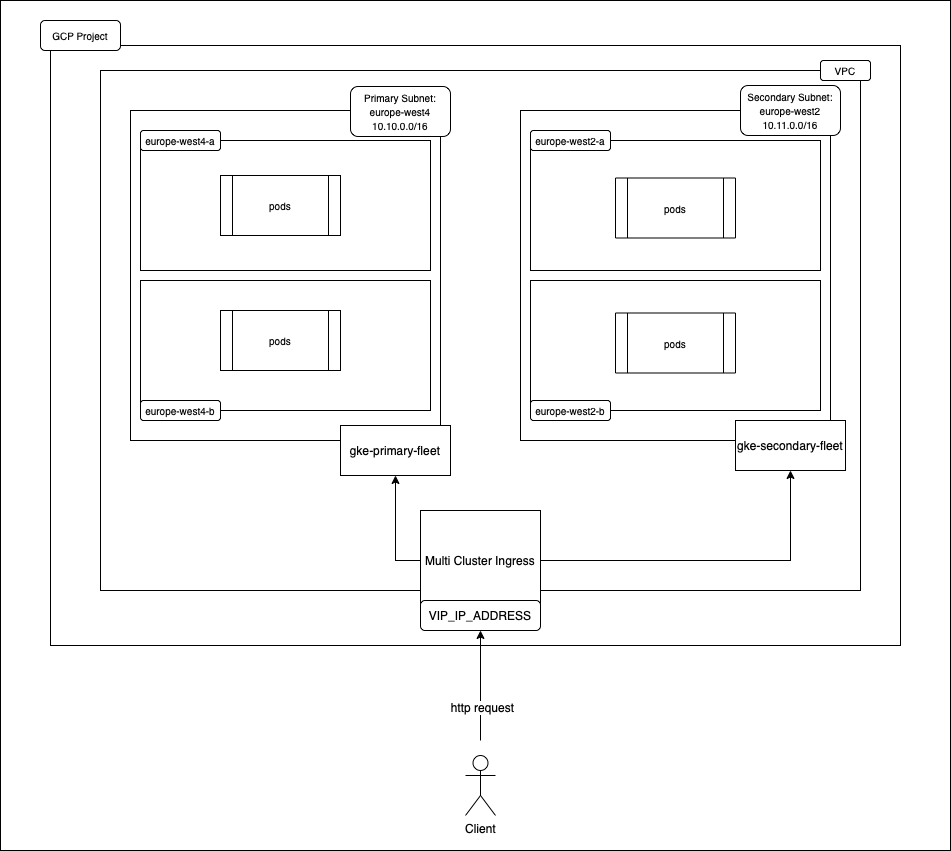
Solution Diagram
VPC and Subnets
We will first create a VPC where we will create all our infrastructure, and there should be two subnets in the VPC since we will be creating our cluster in different regions.
Let’s create a directory ‘vpc’ and then create following three terraform files inside it: main.tf, output.tf, and variables.tf.
- vpc/main.tf
- vpc/variables.tf
- vpc/output.tf
Now that we have our terraform script to create VPC and two subnets, we should try running it and check if the infrastructure is created in our account.
Execute following commands in the vpc directory, and also check if everything is running good (you might need to enable some APIs on google cloud, you will get error message if this is needed) :
We should be able to see the changes in our Google Cloud Account.
GKE — Kubernetes Primary Cluster
Now that we have our networking solution ready, we will create our primary Kubernetes cluster. We will deploy it in the primary region subnet.
Let’s create another directory inside ‘k8s-multi-region-cluster’ called ‘gke-primary’ then create following three terraform files inside it: main.tf, output.tf, and variables.tf.
- gke-primary/main.tf
- gke-primary/variables.tf
- gke-primary/output.tf
Now we will execute the same terraform commands to initialize, plan and apply our script to the cloud.
Once finished we should be able to see the changes in our Google Cloud Account.
GKE — Kubernetes Secondary Cluster
Time to configure our secondary Kubernetes cluster.
Let’s create another directory in the ‘k8s-multi-region-cluster’ called ‘gke-secondary’ and copy all three files from ‘gke-primary’ here. We will only make few modifications here.
We will update following code in gke-secondary/main.tf file:
- gke-secondary/variables.tf
- gke-secondary/output.tf
Now we will execute the same terraform commands to initialize, plan and apply our script to the cloud.
Once finished we should be able to see the changes in our Google Cloud Account.
Multi-Region Configuration
Multi Cluster Ingress
Google Cloud Platform has a very nice feature called Multi Cluster Ingress. It is a cloud-hosted controller for Google Kubernetes Engine (GKE) clusters. It’s a Google-hosted service that supports deploying shared load balancing resources across clusters and across regions.
We will use this feature to distribute traffic between both the clusters.
We will now perform few actions using gcloud cli commands to finish the configurations.
- Enabling the APIs : We will first enable few APIs for our project that we are going to use by executing below command
- Fetch the Kubernetes cluster credentials
- Update kubectl context for simplicity (optional)
- Register our clusters to Fleet
- Enable Ingress on Primary Fleet
Sample Application Deployment — Kubernetes YAML Files Generation
Finally, all our infrastructure configurations are done. We will now deploy a sample application using yaml file and create deployment, service, and ingress.
We will create another directory called ‘deploy’ inside ‘k8s-multi-region-cluster’ and we will store following files there. It will be used in deployment of our application.
- deploy/namespace.yaml
deploy/deployment.yaml
- deploy/mcs.yaml
- deploy/mci.yaml
All our Kubernetes deployment yaml files are now created. We can now apply these yaml configuration using kubectl command.
Sample Application Deployment — Kubernetes YAML Files Deployment
We will deploy our application on both the clusters. We will use kubectl with context option to switch clusters, here the optional step we did above will be helpful.
Let’s now first deploy our application on primary cluster using following commands:
We will now deploy our application on secondary cluster using following commands:
Now that our application is deployed on both the clusters, Let’s configure Service and Ingress on our primary cluster so that we can make requests to validate the response (We will not execute them for secondary cluster).
We will execute following commands for the same:
Let’s now verify our deployment using below command:
You should see response with all the details about the mci, and there will be an IP address field ‘VIP’ in the response.
Let’s now try to access ‘http://<<VIP_IP>>/ping’ either by ping or browser, You should get similar output like this:
If you refresh it multiple times, you might get response from different pods and regions. However, if you are always getting response from same region then you can try a workaround by deleting pod in the region from where you are getting the response (not recommended).
The reason you get response from only one region mostly is because Google Internal Load Balancer used for this setup forwards the requests to the closest location.
More details of this setup can be found here.
Conclusion
We just finished setting up Multi Region Kubernetes Cluster on Google Kubernetes Engine (GKE). We also deployed a sample application and tested out infrastructure.
We used GKE Autopilot mode so that we don’t need to deal with node configuration and management, GKE will take care of that for us.
You can find the code of this example in this Github repository here.
Share with your friends and followers
Start blogging about your favorite technologies, reach more readers and earn rewards!
Join other developers and claim your FAUN account now!

Kumar Prabhash Anand
Software Engineer, Zalando
@prabhash


User Popularity
57
Influence
6k
Total Hits
1
Posts

Read, Learn, Know, Teach
Hand curated newsletters for Developers, private Slack with like minded people, podcasts, job offers, news and more!

Only registered users can post comments. Please, login or signup.