


As promised in the previous post (linked above), here is part 2 of the short series on setting up your machine to help you do wonderful code…things with Github and an IDE (PyCharm). You know, like a professional. If you have followed along the previous post, you should now have the following things ready at your disposal
1. PyCharm and Anaconda installed
2. A Working Directory for your Project
2. A Dedicated Python Virtual Environment for the Project
3. A Remote Repository on Github
Now, let’s move on to some other stuff.
Create Another Branch
This is important. Instead of having a single “master/main” branch it is often preferred to have a secondary branch in the repository. The “main” branch serves as the official release for your code base, while the developers can continue building and testing other upcoming features in a separate branch. Let’s call it the “development” branch and look at how it can be easily created.
Go to your remote repository on Github and you should see only 1 branch for your project which by default is the master branch.

Remote repository with only 1 branch
Click on “1 branch”. Create a new branch based on the master branch by clicking on “new branch”

Create new branch

A new branch called “development” based on “master” as source
A new “development” branch should be created which is up-to-date with “master” branch.

2 separate branches created
Now, open your project on PyCharm. We now want to switch to “development” branch from “master” branch in our local repository as well. For this, find the master branch symbol in the lower right side of the PyCharm window for your project. Click on it. Under the “Remote Branches” option you should find the newly created branch. Select that and click on “Checkout”. Voila! Now your local repo has switched to the development branch.
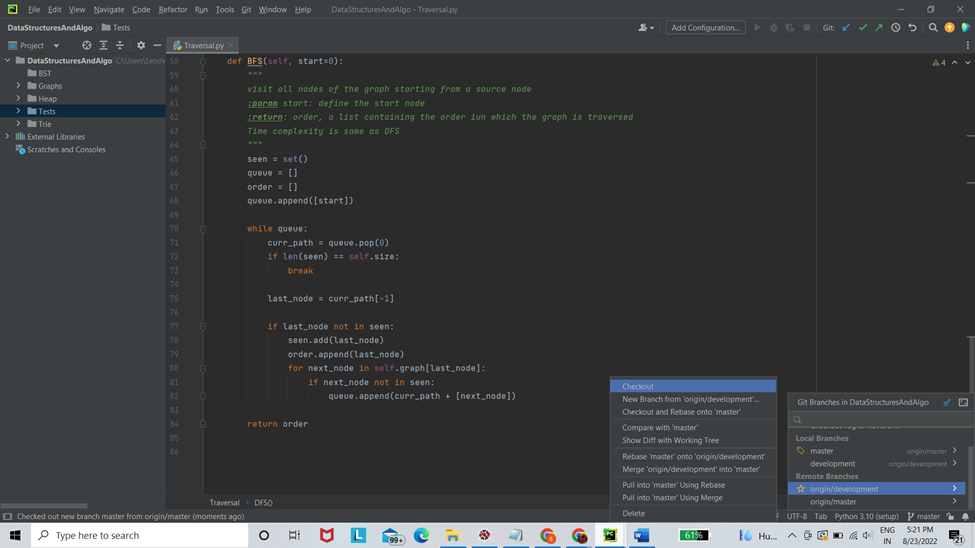
Switching to development branch in PyCharm
For those who are curious, the “Checkout” option essentially performs the git command by the same name. If done through command line, one would usually execute the following to switch from current branch to “development” branch:
Add a README file
Any good code should be readable and understandable without requiring much guidance from the original developer. But oftentimes, it is advised to add a set of directions that make this handoff easy. The README.md file serves the exact purpose with supports like markup, embeddings and such. Github very conveniently will keep on urging the developer to add the file until it’s added. So, let’s oblige.
Firstly, make sure you have switched to “development” branch. Then simply click on “Add a README”. You can add the instructions to navigate through your code base in the file or anything else that you think will be helpful to your end users. We will be updating the file towards the end of the article, so I have kept the information to the bare minimum as of now. Click on “Commit a new file” and you are done.

Create a README file
Dealing With Remote Changes
Notice how the README file was created through the Github UI? One could have easily done that through the IDE and pushed the file into the remote repo. The reason it was done through Github UI was to show how to pull in changes to your local through PyCharm.
Keep in mind that we have made the changes in development branch of the remote repo and currently local project is checked out for development branch. To pull in updates from the remote repo branch, click on “Git” and then “Update Project”.

Pulling in latest commits into local repo (a)

Pulling in latest commits into local repo (a)

Pulling in latest commits into local repo (c)
It is ALWAYS advised to pull in the changes from the remote repo before pushing changes from your local machine to remote. This is particularly necessary when the project is being worked upon by a team of developers who might have committed changes asynchronously.
Writing Test Files
Although you can’t possibly check your code against all possible corner cases and bugs, you CAN write python scripts that check if your code work as intended for at least certain known examples.
There are many popular Frameworks like unittest and nose2 . I prefer using pytest. Use the following pip command for installation
The tests.py file are usually kept in a separate directory under the same root directory of your project. For instance, my project has the following directory structure:
A sample pytest script, called test.py, to test dfs() and bfs() methods inside Traversal.py, should look like this:
Note how the methods start with “test_” suffix? pytest will run all files of the form test_*.py or *_test.py in the current directory and its subdirectories.
To perform testing, I simply used in the terminal of the PyChram IDE.
pytest tells you exactly which of the tests failed and where they failed, instead of simply throwing exceptions.
Adding Environment Setup File(s)
When creating a project, you would want the installation and setup process for the end user to be as breezy as possible. They should not have to download or install install each dependency individually. One easy way to to do this is package your project which the end user can clone. The package usually comes with scripts like a “requirements.txt” file that lists all the python packages used in the project. But they often need installation of individual modules or manual execution of say a bash script to preform installation in a go.
Tools like setuptools achieve the same task with much less burden on the the user end side.
You just need to create two files shown in bold below:
One needs to use the “build” command-line tool that packages your modules for you. As mentioned in the official website of setuptools,
“This <build> tool will automatically download setuptools and any other build-time dependencies that your project might have. You just need to specify them in a pyproject.toml file at the root of your package”
So, for simplicity we keep the pyproject.toml file minimal
All your project related dependencies go in the setup.cfg file. A working example would look like:
So, when the end user wants to install and use your code, all they have to do is execute the following:
Update your README file
Now that we are towards the end of the project, you would want to update your README.md file with all the necessary updates. For reference, the current README.md file for my project looks something this

Updated README.md file
There are so many things which you can add to your README.md file that are customized to your project. Adding a Directory Structure with short descriptions of what each directory and file contain along with an installation guide usually works well as a starting point. Don’t forget to use Markup language efficiently to make the README file , well, more readable!
Merge development branch with main/master branch
Phew! We are almost there, I promise! So far, we have pushed our code to the “development” branch and we are happy with what it looks like. We now need to merge it with the “main/master” branch, because that is the official branch of the project that the user will install and use.
As developers , you would often need to get your code approved by a reviewer which could be your team lead or a collaborator or the original developer of the code. “Pull Requests” are used to let the reviewer know that you have made some changes to the code and would like to merge the updates to the official branch. Once the reviewer accepts them or sees no conflicts with existing working version of the code, your updates will be accepted and merged into the main/master branch .
For instance, if you go to the repository now you should see a button with text “Compare & Pull request”. You can either click on that or create a new pull request by clicking on “Pull requests” .
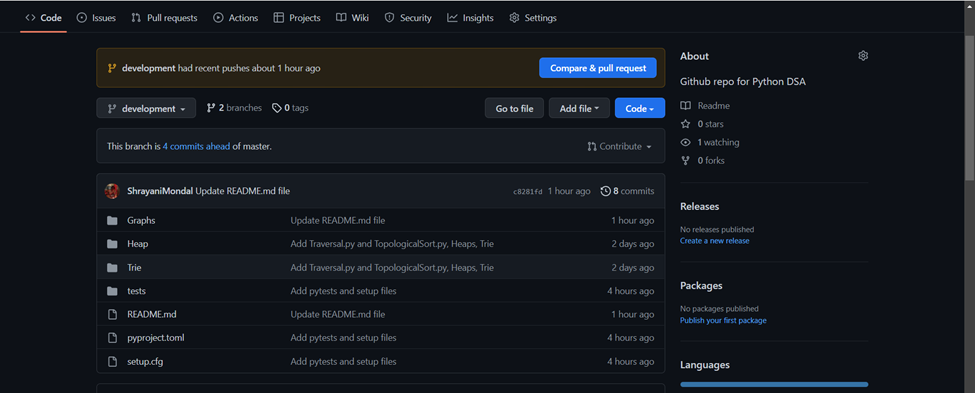
development branch many commits ahead of the master branch
Github allows you to assign reviewers who would check the feasibility of merging your changes with the master branch. In that case, you would add a reviewer and click on “Create pull request”. For this project, I am the only developer, so I will perform the review.

Create pull request
Once you create the pull request, you should see a new notification under “Pull requests” that looks like this.

New Pull request created
With no conflicts, you/your reviewer can go ahead and “Merge pull request” and leave comments too. The “comment” feature is used by reviewers to annotate certain section of the pull request which needs to be worked on by the developers before acceptance.

Merge Pull request
And that’s it! You have now successfully learned how to operate git! Uhh… well mostly, but this will help you out a lot as a beginner.
To summarize, here is what we learned in this article:
1. How to Create another Branch on Github
2. How to Deal with Remote Changes and Pull changes to local repo
3. How to Write Test Files
4. How to Add Setup Files for easy Installation
5. How to Add README file
6. How to Merge development branch with the main branch
I really hope these small explanations come handy especially to beginners who I know feel very intimidated by everything. There are a lot of online resources which deal with more advance stuff should one be interested.
Here is a link to the repo that I created while writing this article. Feel free to use it as you see fit.
And if you liked the content that I shared, kindly support me by commenting, sharing with your peers, and following. That would keep me motivated to share more insights with every one of my readers. Till next time, see ya!
Share with your friends and followers
Start blogging about your favorite technologies, reach more readers and earn rewards!
Join other developers and claim your FAUN account now!

Shrayani Mondal
Master's Student, University of Massachusetts
@shrayanimondal


User Popularity
23
Influence
2k
Total Hits
1
Posts

Read, Learn, Know, Teach
Hand curated newsletters for Developers, private Slack with like minded people, podcasts, job offers, news and more!

Only registered users can post comments. Please, login or signup.