


With WordPress, send email function could be tricky to master. Sure, there’s wp_mail, but it’s unreliable for several reasons.
For example, WordPress web hosting services have different PHP mail configurations. Or they even block sending entirely to prevent spamming. Then, the native wp_mail has very limited capabilities when it comes to the type of emails you can send.
There are WordPress hosting providers that include usable configuration for each WordPress site, but it’s an exception rather than a rule. And if you’re tech-savvy, it’s possible to configure WordPress manually to ensure your emails get delivered.
Either way, this is a developer-minded guide that will lead you through different scenarios and show you how to integrate Mailtrap SMTP (Simple Mail Transfer Protocol) with your WordPress site.
How does WP send emails?
In a nutshell, WP sends emails using PHP. And you have three options to send emails in WordPress – use the native wp_mail function, use a WordPress plugin, or manually set up an SMTP server using wp-config.php.
The following sections give you the steps for each method and tell you about potential downsides. Beyond that, you’ll learn how to test sending on WP, include CC and Bcc, format emails to HTML, and resolve common email service issues.
How to send emails from WordPress using wp_mail() function?
Wp_mail() represents a PHPMailer class wrapper that utilizes the hosting web server when sending emails. But there are 24 more WP functions that use wp_mail(); combine that and web server sending, and it’s not surprising that this method is unreliable.
Here are the steps wp_mail() function takes when attempting to send your emails.
- The code snippet to specify the recipient, subject, message, etc., and prepare an email.
wp_mail( $to, $subject, $message, $headers, $attachments );
- After preparation, wp_mail() calls the PHP mail function, which is in the PHPMailer lib, to give instructions to the server to send emails.
mail(to, subject, message, headers, parameters);
- Your WordPress hosting provider attempts to deliver the email. More specifically, the hosting side servers request to use PHP mail to send emails. Then, these servers typically use SendMail or Postfix to route the emails to their destination, and the receiving host rejects or accepts them.
Rejects are quite often, and it’s not uncommon that your email won’t be sent out at all. As mentioned, this depends on several factors, primarily your WP hosting provider and the limitations of wp_mail() function.
Note that WordPress native function makes it tricky to build HTML templates or add attachments and images without additional tweaks. More importantly, it struggles with email headers, which is one of the reasons emails sent using native wp_mail() may land in spam.
How to send emails using the WordPress SMTP plugin?
Installing a WordPress SMTP plugin resolves many of the native configuration issues.
How?
For starters, a plugin reconfigures wp_mail () function to use SMTP rather than relying on PHP. Then, a plugin routes the outgoing email through an email sending service.
This may mean that you need to set up an account and verify your WordPress site with a third-party sending service.
Of course, there are a few steps to the process, and you’ll need an additional tool to get a reliable SMTP. But a combination of an email delivery platform such as Mailtrap and an email plugin gives you the upper hand to streamline your email delivery and protect your sender and domain reputation.
The following sections guide you through Mailtrap and WP Mail SMTP plugin setup.
1.Set up Mailtrap and verify your domain
Go to Mailtrap and create an account. Then, access Mailtrap in-app homepage and click Setup Domain under Email API.
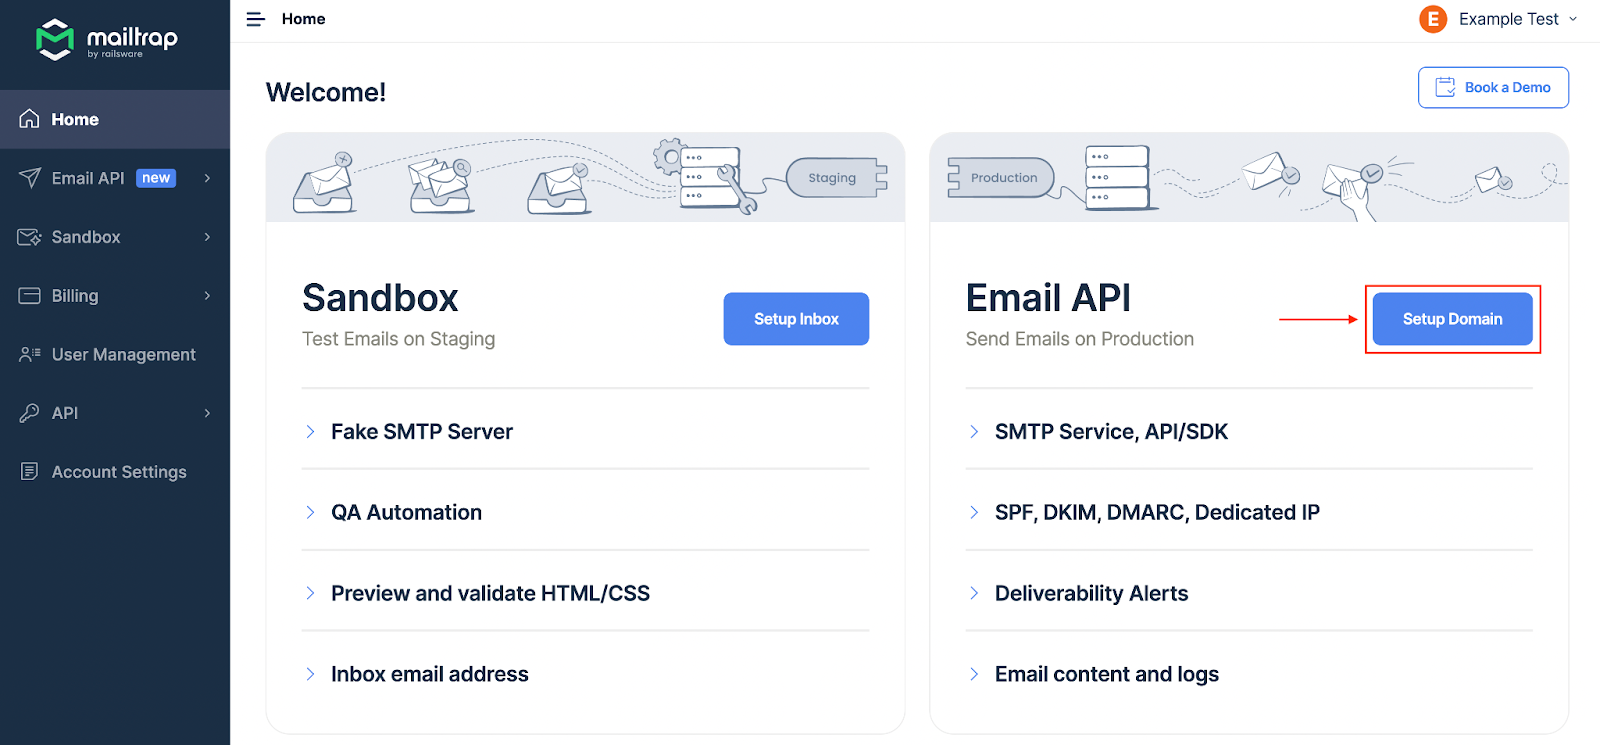
Type your domain name into the designated field and click the Add Your Domain button. Next, copy-paste all DNS records Mailtrap provides to your domain provider’s DNS records.

Ensure all the DNS records are verified before moving to the next step. For more information about domain verification, check our Sending Domain Setup guide.
2.Mailtrap SMTP and Plugin installation
After verifying your domain, go to the next step and choose SMTP under API and SMTP Integrations.

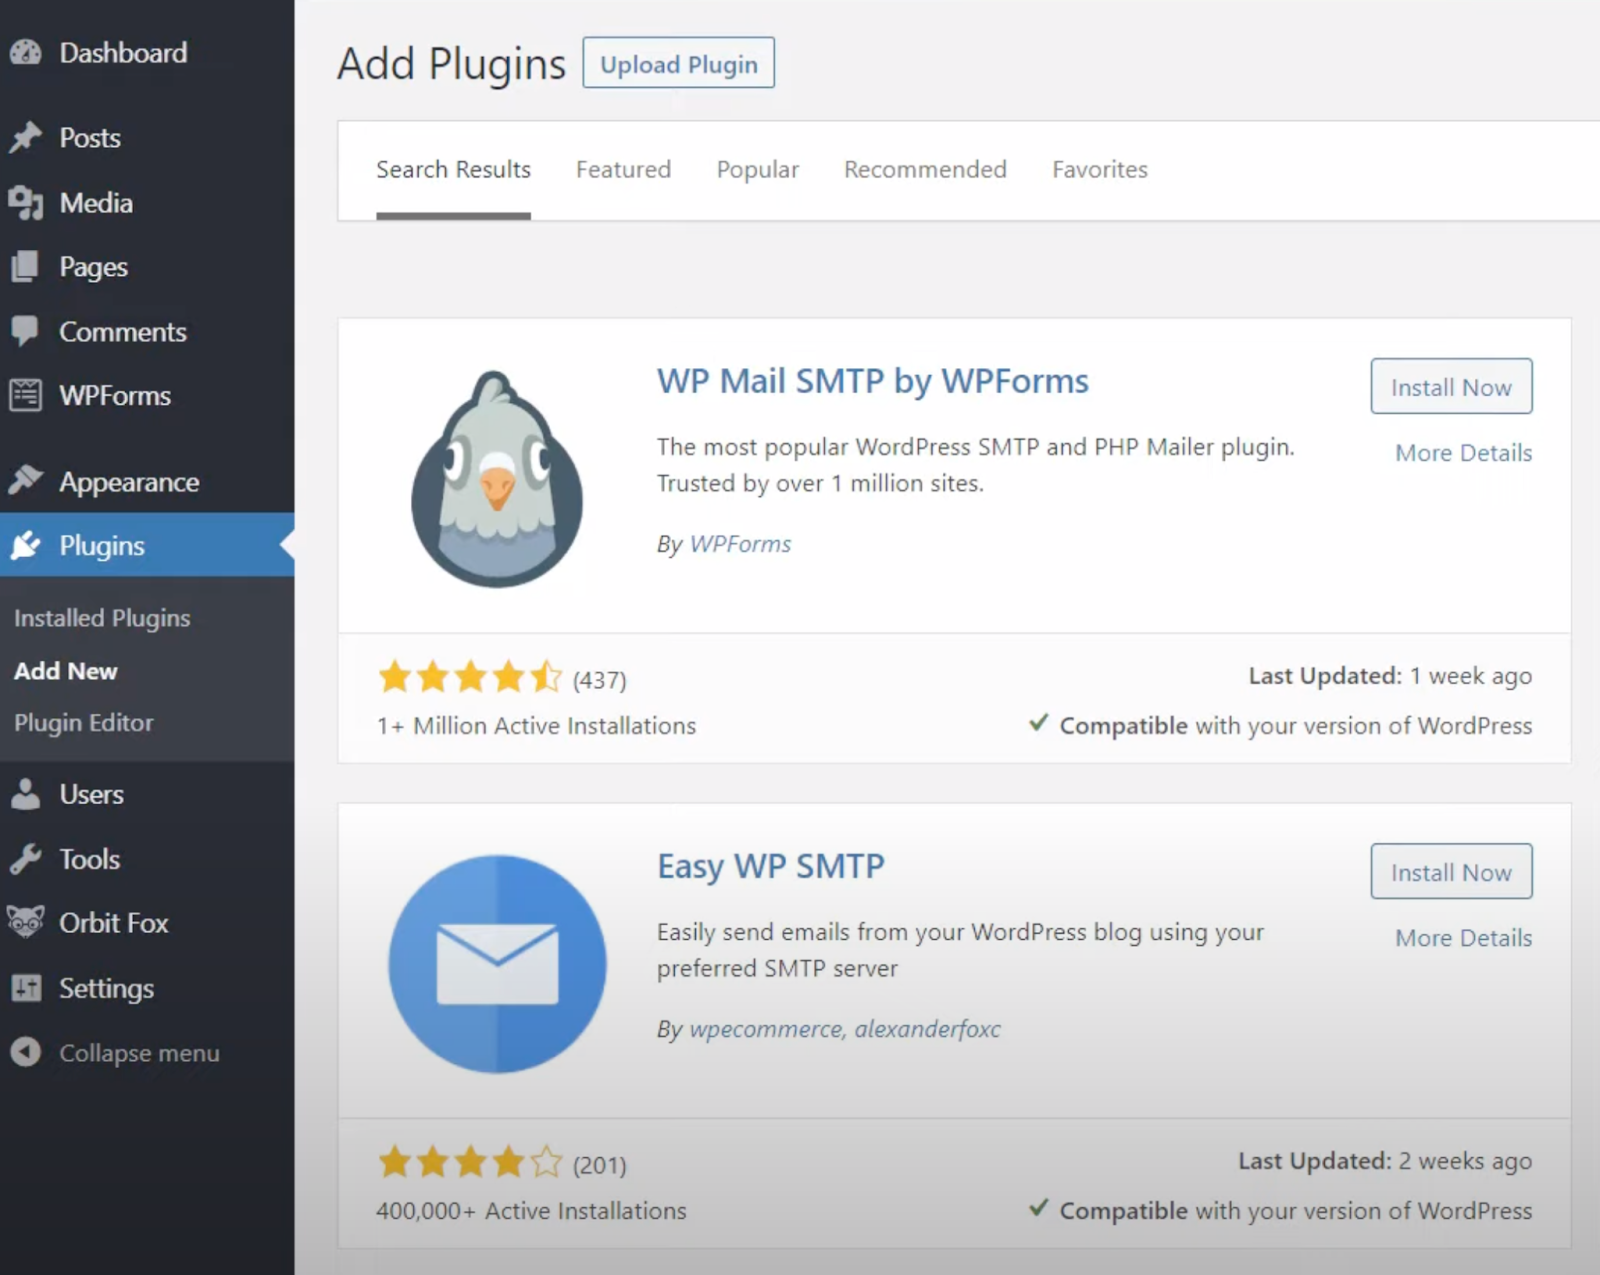
Now, open your WordPress admin dashboard in another window, select Plugins, then Add New and install the WP Mail SMTP by WP Forms plugin.
After installation, hit Activate, go to WP Mail SMTP in the side menu, and then navigate to the plugin’s setting page.
Under the General tab, you can change the From Email (email sender) and From Name. The plugin populates these automatically with the WordPress account email and your domain name, respectively.
Scroll down to the Mailer section of the General tab, and select the Other SMTP to set up Mailtrap SMTP. The Mailer section also features Sendinblue, Mailgun, SendGrid, Amazon SES, Gmail SMTP, etc. Keep the selection at Other SMTP, and note that it’s important not to use PHP, which is selected by default.

3.Set up Mailtrap with WP Mail SMTP
Scroll down to add credentials for Other SMTP, and start copy-pasting Mailtrap SMTP settings into the designated fields.

The SMTP Host is send.smtp.mailtrap.io, as listed in the Integrations box. Then, choose TLS encryption in the plugin settings, and make sure the SMTP Port is 587, as recommended. Beyond that, keep Auto TLS and Authentication toggled on.

Then, copy-paste the Username and Password to the respective fields in the WP Mail SMTP plugin settings.
The default SMTP Username for Mailtrap users is api, and each user gets a unique password. We hide a chunk of the password for security reasons, so just hit the Copy button and paste it into the SMTP Password field.
Lastly, click the Save Settings button; you’ll see the confirmation notifications at the top of the WP Mail SMTP General tab.
Security Tip:
In this setup, the SMTP password gets stored as plain text. So it’s best to introduce another security layer within the wp-confonfig.php file using the two lines of code below.
define( 'WPMS_ON', true );
define( 'WPMS_SMTP_PASS', 'your_password' );
Note that the action disables the password field from the settings. Nevertheless, you’ll be able to securely access and use the SMTP service.
- Test the settings
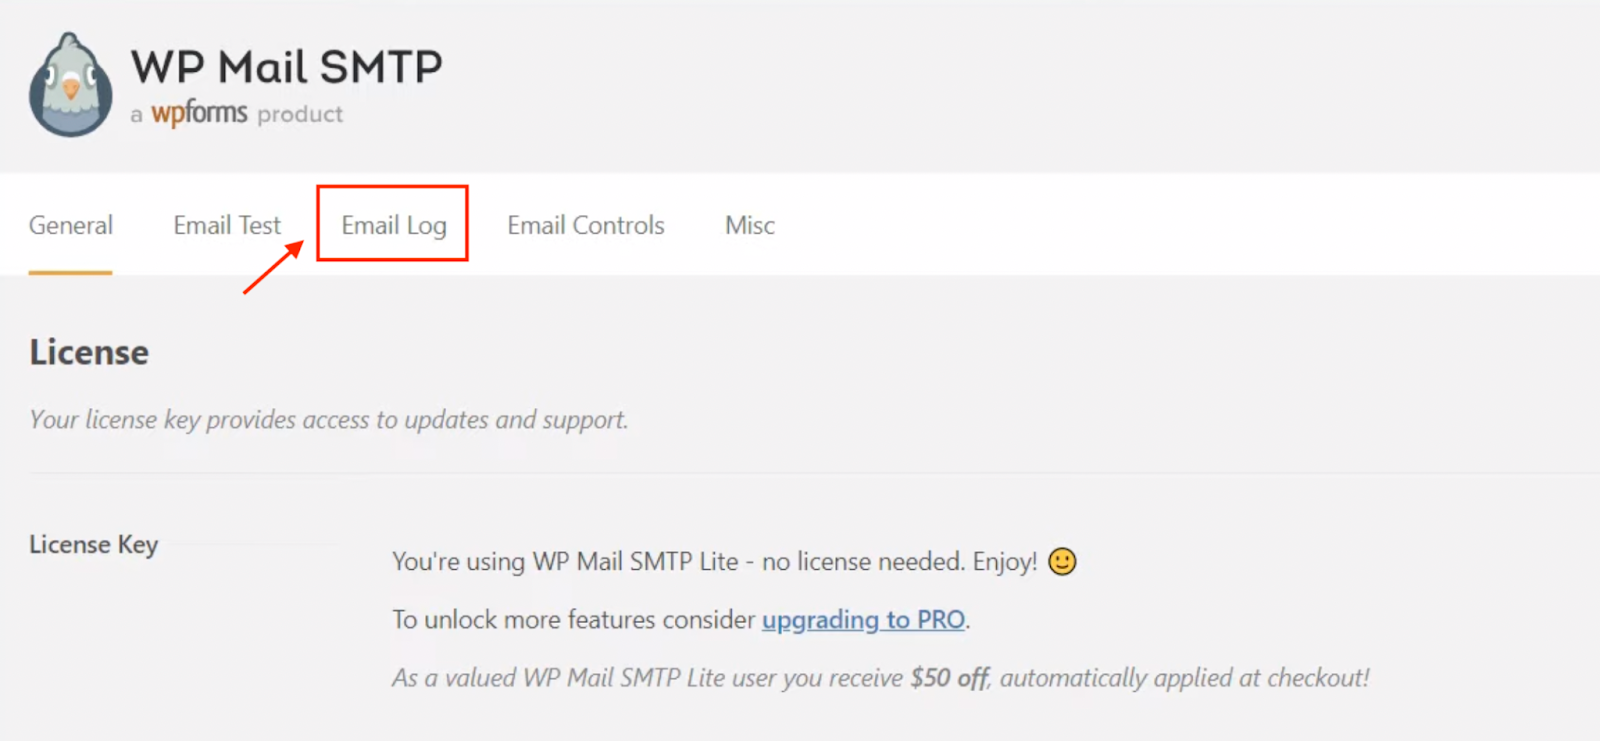
Click the Email Test tab in the WP Mail SMTP plugin menu, type the email to Send To, and hit the Send Email button. Keep the HTML option toggled on; once the test email is successfully sent, you’ll get a notification at the top of the tab.
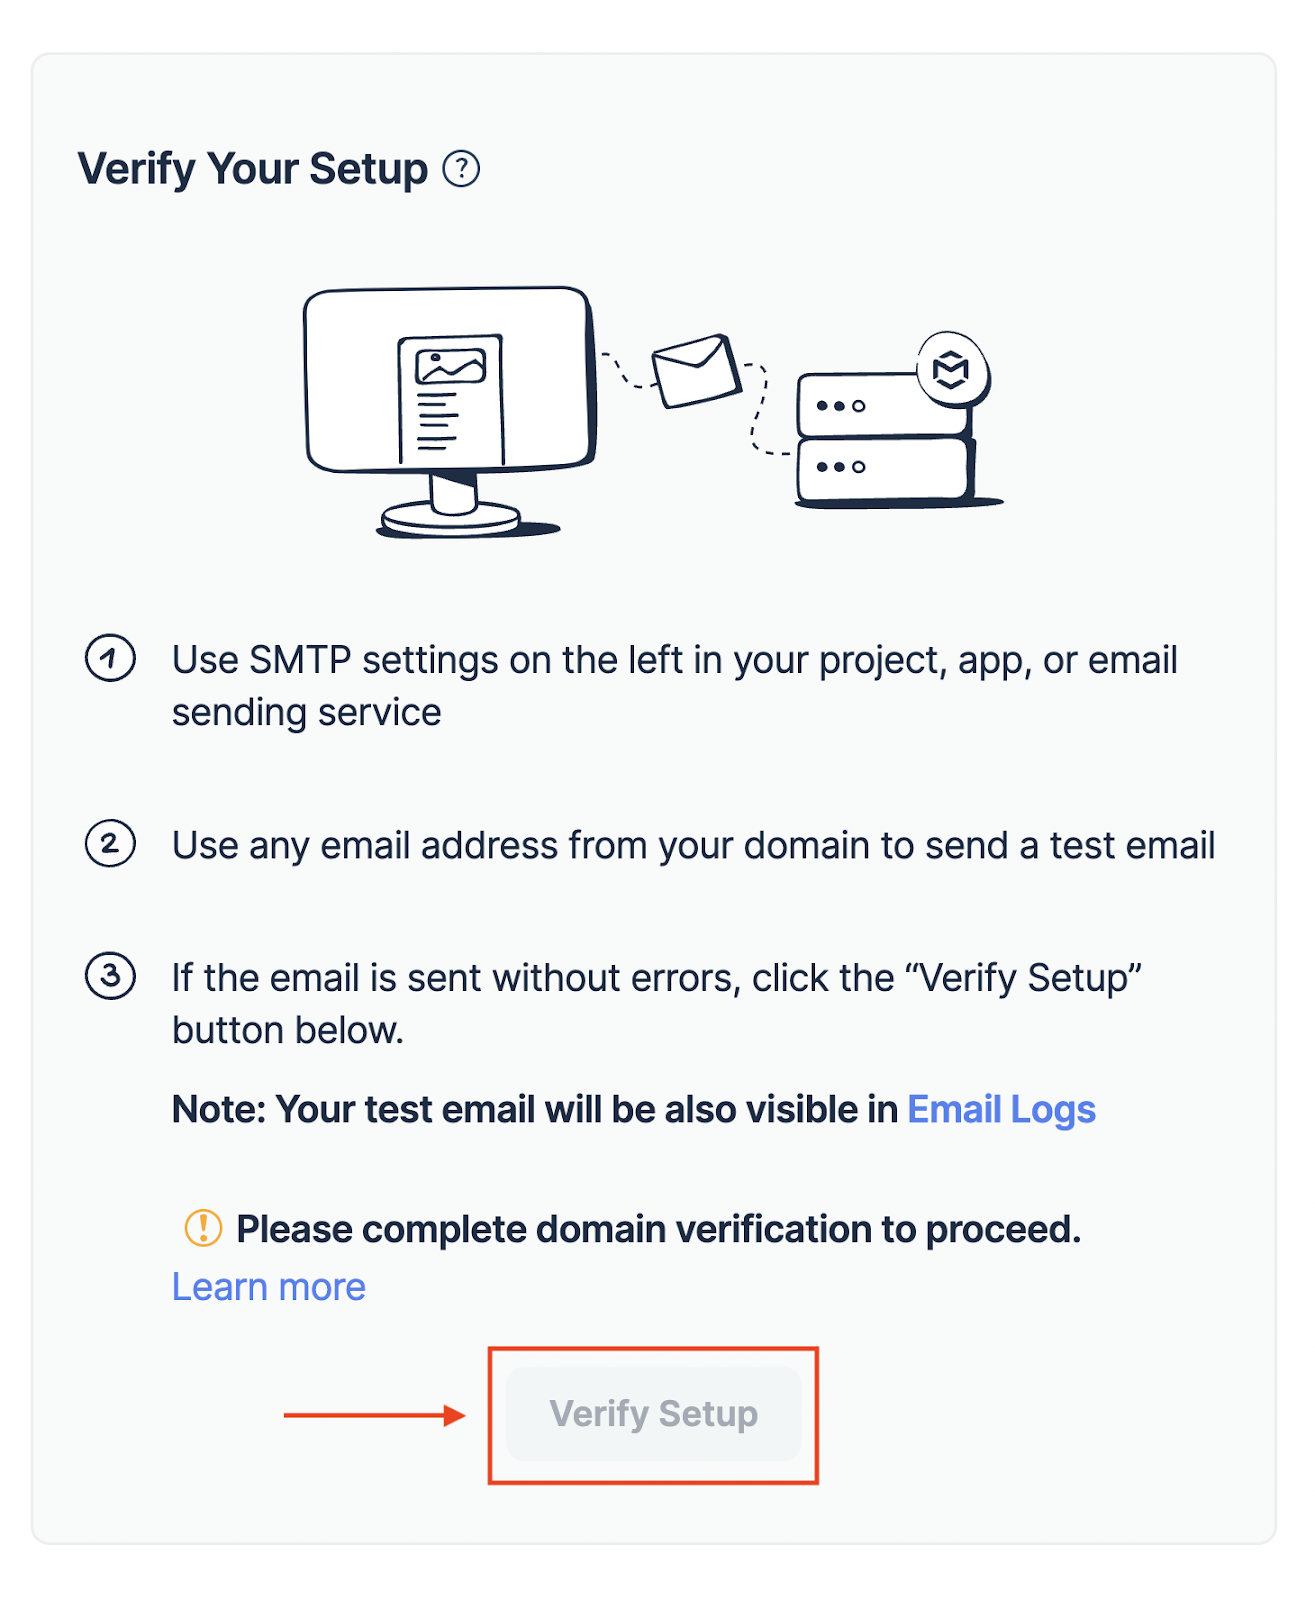
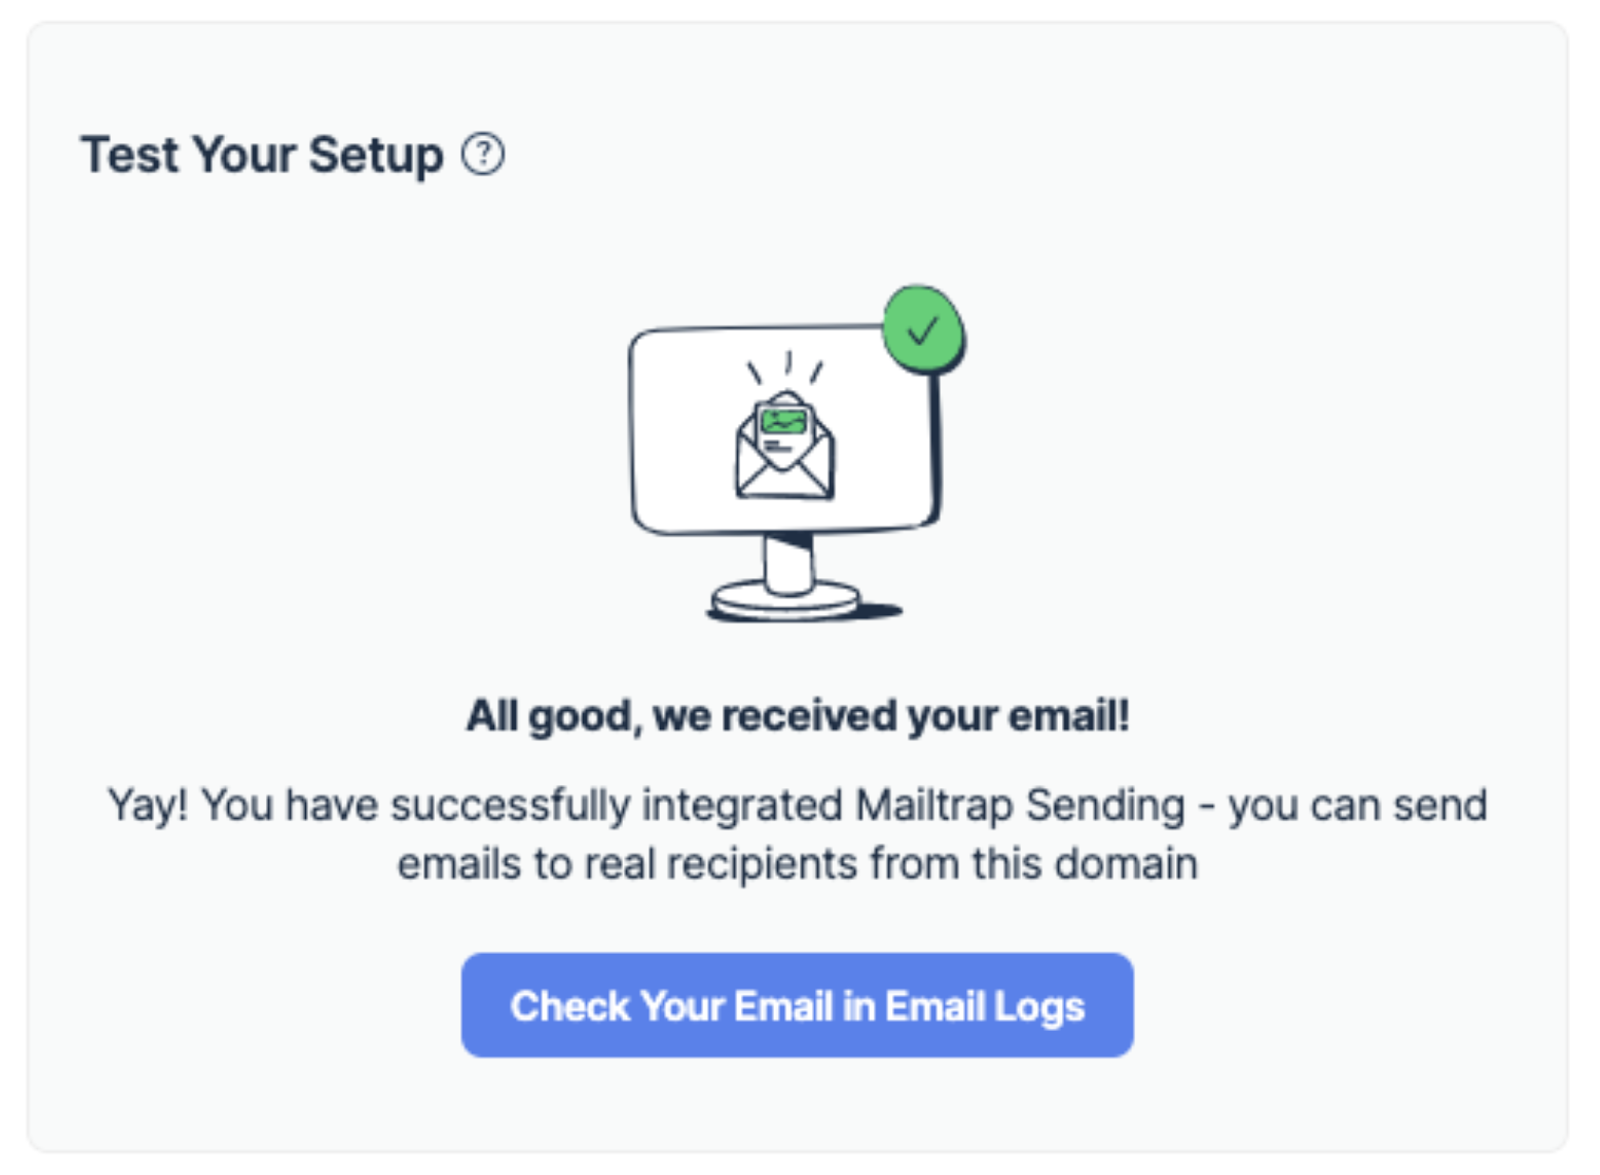
Lastly, go back to Mailtrap and click the Verify Setup button to confirm the sending test. The email you send will also appear under Email Logs in our app.
How do I send an email from WordPress without Plugins?
This is the method for the tech-savvy as it requires manual SMTP configuration on WP via wp-config.php and some tweaks to your WordPress theme. But, when done right, this could be the most straightforward method that doesn’t bloat your WordPress website with additional plugins.
Sure, you’ll need an SMTP service to make it all work. And the following tutorial assumes you’ve set up Mailtrap and verified your domain. If not, check the previous section.
Also, you should be using the child theme of your WP site. Otherwise, the changes will be reverted back to PHP after the main theme update.
- Find the wp-config.php in the website’s root directory, and edit it via SSH terminal or FTP server.
- Paste the settings below into the wp-config.php
Note: the settings should be located under the given file for security, and they’re geared for Mailtrap users. If you’re using Gmail SMTP, for example, the values will be different.
3. After manually configuring SMTP, navigate to the functions.php (the theme functions file) by selecting WordPress dashboard, then Appearance, and finally Theme Editor. Then, you need to copy-paste the snippet below for the changes to take effect. To remind you, it’s best to use the child theme.
4. Add the code snippet below to the functions.php file.
5. Save your new settings, and keep in mind that you can just copy-paste the code, no need to change anything.
6. Lastly, you can test your new configuration and send an email via a contact us form.
How to send HTML email?
By default, all emails sent through WP are formatted to plain text. To show you how to change that, we will proceed with the configured SMTP or plugin, as described above.
Also, we suppose you already have an HTML template under templates/email-template.php, for example. Note that the given hierarchy isn’t necessary. The path to the template doesn’t matter, you can create it anywhere in the theme. And if you don’t have a template, use a plugin such as Email Templates to build it.
With that in mind, proceed to change the content_type header to get HTML formatting. Here are the steps.
- Navigate to wp_mail_content_type and switch from plain text to text/html.
2. As said, you should already have a template at templates/email-template.php, and it might look something like the one below.
3. Afterward, proceed to include your custom template in the email body.
4. Finally, send a test email from your template to inspect the configuration.
How to send an email with an attachment?
There are two ways to send emails with attachments in WordPress – native, using the wp_mail () function, and with a plugin. Here are quick tutorials for each:
1. Wp_mail () method
Save the attachment files to WP locally, so they can be added to the email $attachments. For example, an HTML-formatted email with attachments may look like the one below. And the given method involves setting custom headers.
Tip:
It’s not necessary to set custom headers to send HTML formatted emails with attachments. You can use $phpmailer–>AltBody to set an alternative body and add attachments.
Doing that switches the content type to multipart/alternative instead of multipart/mixed, and the PHPMailer will automatically do the rest without the need to manually set custom headers.
With attachments, your content type will be multipart/mixed. But there’s a multipart/alternative inside, and it has text/html and text/plain parts before the attachments.
2. The plugin method
Before taking the plugin method, think about what kind of attachments you want to send. In most cases, these are PDF invoices after an eCommerce or SaaS customer makes a purchase. So, we’ll quickly guide you through how to do it with WooCommerce PDF Invoices & Packing Slips.
Install and activate the plugin, then follow the setup wizard to customize its actions. The given plugin gives you the option to customize the invoice appearance and select which WordPress transactional emails should include the invoice.
How to send to multiple recipients?
Again, there are two methods if you want to include CC and/or Bcc in your WordPress emails.
- Wp_mail () method
WordPress accepts a comma-separated or an array list of email addresses, and you can define them under $to string|string[]. And here is the code snippet where you can define the multiple recipients array.
Also, it’s possible to include CC and Bcc recipients in an array. Check the code below.
And, there’s an option to get all that programmatically.
2. Plugin method
If you’re using a forms plugin, such as WPForms, it’s pretty straightforward to add multiple recipients to email notifications. But remember that this only works with the paid version of the plugin. And it’s designed to send emails to multiple recipients after a user fills out a form.
Anyway, you need to navigate to WPForms Settings and Enable Notifications by clicking the toggle. Then, type the recipients’ email addresses in the field under Send To Email Address, and make sure to separate them with commas.

Testing email sending on WordPress: why and how?
The sections below cover a few ways to run tests. Either one should give you a clear picture of if your WordPress site can send emails, and if you got the server configuration right.
- Outgoing email logging
Should you choose the plugin method to set up sending on WordPress, the WP Mail SMTP plugin features an email logging function. After you send a test email to inspect your configuration, click the Email Log tab, and your email should appear there.
Mailtrap users can also preview Email Logs within the app for up to 60 days, depending on the plan they get. The key benefit here is that you’ll be able to preview the receiving server response and see whether your emails have been delivered to inboxes or not.

Also, there’s an option to install third-party plugins just to log your emails.
On that note, it’s important to know that email logging plugins don’t actually tell you if an email has been delivered or not. That’s typical with the given plugins – take WP Mail Logging for example. After your email gets passed to the receiving server, the plugin doesn’t track any events. In other words, you can only see if the sending event was successful, but there’s no info if your email has arrived at the desired destination.
Since email deliverability is critical to your success and domain reputation, it’d be best to use a more robust tool such as Mailtrap to log your emails. Check the screenshot above, and you’ll see that each email sent through our SMTP has a Status – Delivered or Not Delivered.
12. WP password reset
In all frankness, this is more of a trick to check your configuration fast, rather than a proper way to test and log your outgoing emails. But it works and will show you if your WordPress website can send emails or not.
Go to the login page of your site – it’s usually something like yourbrand.com/wp-login.php. Then, select the “Lost your password?” link next to “Register”.
On the following page, type the email account address you use for the website, and hit the Get New Password button.

Note that you might not get the email immediately, it may take about 10 minutes for it to arrive. Should you wait longer than that, chances are your WP site is not sending emails at all.
But if you use a proper SMTP provider and tweak WP settings as explained in the previous sections, this scenario is highly unlikely.
- PHP script
This is a method for the tech-savvy, and there are a couple of ways to run the script below.
You can use SSH to log into your server and run the code directly with the command line. But a lot of hosts block the command line access for users without a dedicated server or a VPS. So, it might be better to create a .php file (e.g. test-php-mail.php) and run it locally.
Here’s the script. Note that it works both in the command line or as a separate .php file:
Should you choose to create a .php file, you need to save it, then run the script in your browser in the following format yourdomain.com/test-php-mail.php.
If there are any errors they’ll appear on the top of the page.
Generally, it’s relatively straightforward to test whether your WP website can send emails or not. But, there’s a chance that you might need to dig deeper and find the root cause of the problem. Plus, your emails could be going to spam, and that’s not something you can easily troubleshoot with the tests covered above.
Troubleshooting sending emails in WordPress
From faulty server configurations to plugin issues, there could be many different reasons WP isn’t sending emails at all or your emails land in spam. Here, you’ll find the most common problems and various tips and tricks to resolve them.
1.WP send emails failed
If your emails aren’t getting through at all, the issue could be with unavailable or disabled PHP functions. Or, maybe, the server you’re using is sending too many emails, and that’s what’s blocking the attempts.
Whatever the reason, reconfiguring your settings to use an SMTP should resolve this problem as your sending infrastructure won’t rely on PHP and hosting servers.
2.Emails landing in spam
Emails landing in spam may signal that your IP has been blacklisted. Or, the email itself has been poorly constructed, with unsupported or partially supported HTML.
How to check that?
You need a tool such as Mailtrap Sandbox to catch emails from staging and inspect the spam score, validate HTML/CSS, and see if your domain appears in any of the blacklists.

3.Incorrect server configuration
Assuming you’re using Mailtrap Email SMTP, there’s a confirmation popup that your test email has been successfully sent.
Then, you can inspect if the email indeed landed in the destination inbox. Note that even if the email lands in the junk or spam folders, it means that the server configuration is okay.
4.Contact form plugin problems
You might configure the plugin to automatically fill out the “From” field with the email address of the user who’s filling out the form. Since the email (or form) isn’t actually coming from the user, but your WP website, email providers might label the email as a spoof.
The plugins most affected by these issues include Gravity Forms, Ninja Forms, weForms, Contact Form 7, Happy Forms, etc. If you want to know how to fix the issue with any of the given contact forms, check out this article from our friends at Kinsta.
5.Plugins conflicts
A conflict between two plugins may happen due to their similarity. For example, SMTP and contact form plugins can get at odds with other similar plugins and basically block sending.
Unfortunately, there’s no easy way to fix this as you’ll need to deactivate all of them, then activate and test them one by one until you can send emails again.
May your emails fly with WordPress
When all is said and done, WordPress send email functionality doesn’t need to be a pain. There are two critical things to keep in mind – you need a reliable SMTP service and some tweaks to the PHPMailer class to make it all work.
But it’s not only about sending emails to their destination. You need to keep a close eye to ensure they’re delivered and how recipients respond to them. So it pays to invest in an email delivery platform that can provide that on top of a reliable SMTP.
Thank you for reading our guide! If you want to check out the original version, click here. :)
Share with your friends and followers
Start blogging about your favorite technologies, reach more readers and earn rewards!
Join other developers and claim your FAUN account now!


User Popularity
1k
Influence
129k
Total Hits
49
Posts

Read, Learn, Know, Teach
Hand curated newsletters for Developers, private Slack with like minded people, podcasts, job offers, news and more!

Only registered users can post comments. Please, login or signup.