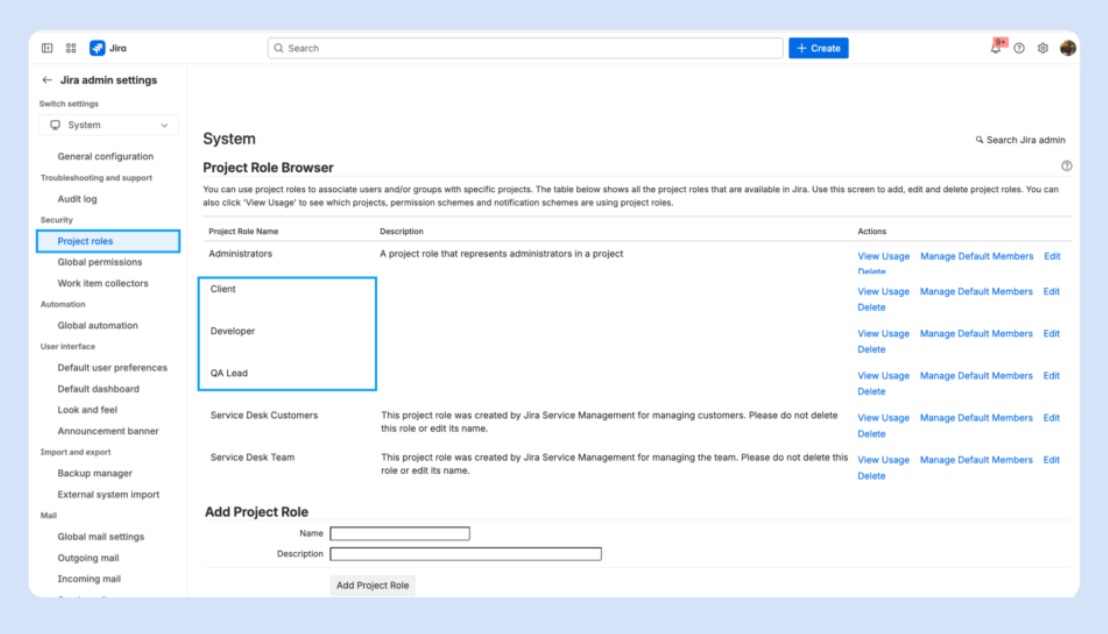
This lets you scale easily. When someone joins the QA team, just assign them to the QA Lead role; no need to adjust permissions.
Also, know the difference between a project administrator (who can manage settings, workflows, and users) and a project lead (used for notifications and defaults). They serve different purposes, and assigning both to the same person is common, but not required.
Avoid assigning permissions directly to individual users unless necessary. Role-based control is easier to manage and audit over time.
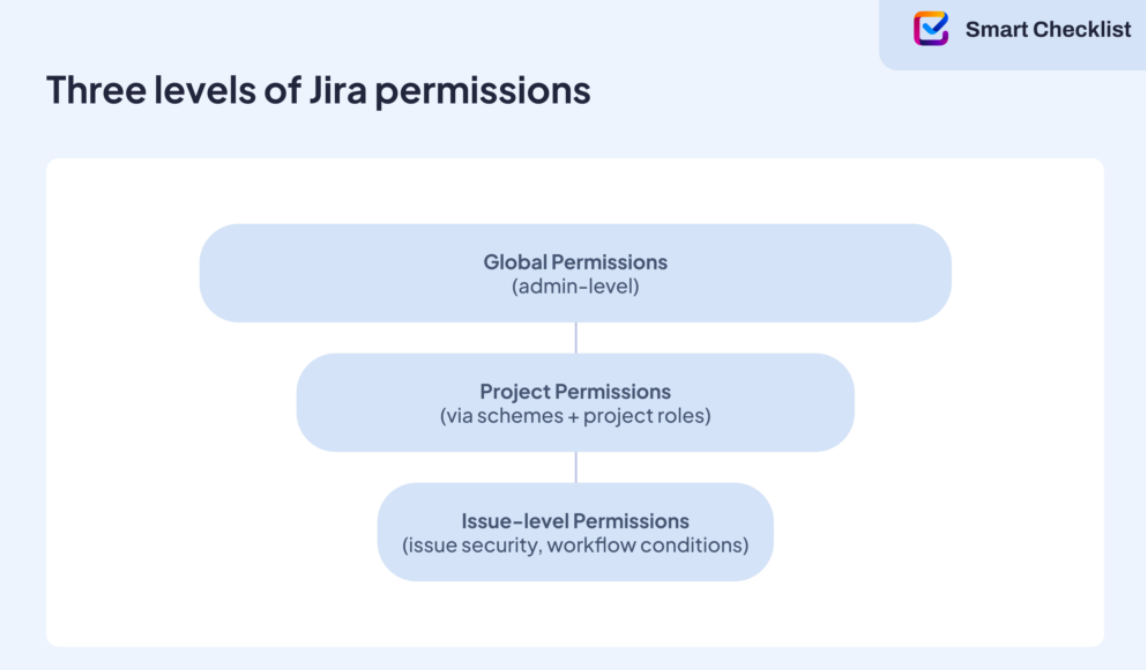
Global permissions, admin roles, and Jira-wide settings
Global permissions affect everything in Jira; reserve them for trusted admins.
- Know the difference between Jira Admin and System Admin, and be deliberate about who can change dashboards, groups, and users.
Global permissions give users access to the entire Jira instance. The two key roles here are Jira Administrator and Jira System Administrator. Atlassian describes the differences here, but in short: system admins can manage users, apps, and infrastructure settings, while Jira admins focus on projects and configurations.
Other global permissions include:
- Browse Users and Groups (affects assignee and mention functionality)
- Manage Group Filter Subscriptions (for shared dashboards and reporting)
- Share Dashboards and Filters (controls visibility across teams)
Integrations with tools like Confluence or Jira Service Management can be affected if global permissions aren’t aligned. Keep your list of global admins small, review it regularly, and rely on Atlassian’s documentation when assigning permissions.
Putting Jira permissions into practice
This is where it gets real. Permissions aren’t just about settings; they shape how teams collaborate.
- Workflow transitions: Maybe only QA leads should move an issue into “Ready for Release.” You can enforce that by adding a workflow condition that restricts that transition to the QA Lead role. That one rule prevents dozens of accidental releases.
- Subtask control: Say a designer is working inside a developer’s story. You might allow only the “Design” role to manage their subtasks, while the developer owns the main task.
- Automation: Jira’s rules can assign roles, trigger notifications, or change issue fields, all based on events like transitions or labels. Because automation respects permission schemes, it keeps your structure clean.
- Sprint permissions: For agile teams managing sprints, permissions define who can start, complete, or edit a sprint. If you’ve ever had a sprint closed early by mistake, you know how important this is.
- Troubleshooting access: If users ever say, “I can’t see the issue,” or “I can’t transition this ticket,” it’s usually a sign of misaligned permission schemes, unassigned project roles, or conflicts with issue security levels. Use the Permission Helper in Jira to quickly diagnose the cause and fix it.
When Jira permissions aren’t enough to guide the work
Jira gives you control over permissions, transitions, and workflows, but when teams need to follow repeatable steps inside an issue, it can fall short. You might need to enforce internal checklists, repeat onboarding tasks, or structure feature requests.
That’s where tools like Smart Checklist and Smart Templates become useful.
Smart Checklist lets you add structured, interactive checklists directly into Jira issues. Teams use it to standardize QA procedures, break down definitions of done, or document multi-step reviews, all without relying on subtasks or external docs. With Smart Checklist, you can set up custom permissions so only the right people can view, edit, or complete checklist items. This gives teams more flexibility and control without adding complexity.