


Magento is one of the most commonly used e-commerce platforms. You might not even realize it, but you’re probably buying from a few Magento-powered web stores on a regular basis. When thinking about selling stuff online from a developer perspective, one of the first things that might come to your mind is figuring out how to send emails in Magento 2 and later versions. As is often the case, there are several possible approaches. Let’s explore them one by one.
What types of emails are sent from Magento?
It’s hard to imagine buying any item online without the associated transactional emails. These can be related to:
- Account creation
- Password reset
- Order confirmation
- Successful or failed payment
- Order dispatched
- Invoice creation
- Review reminder
- Feedback request
- and many others…
Being a customer, you’ll feel uneasy if you don’t receive these emails and might even consider looking at other stores’ offers in the meantime. That’s why all these emails need to be in place and properly configured. If you would like to learn more about transactional emails and how to make them more effective, check out our intro to transactional emails.
How does Magento handle transactional emails by default?
Luckily for many, Magento has built-in and enabled by default a number of transactional templates. If you don’t require any customizations and the default offer is sufficient, you won’t need to write any code.
If you have Magento installed on your server, you’ll find each template in the respective folder, following this path: <module_dir>/view/<area>/email. As an example, the template for confirming a new order is nested under <Your_Magento_dir>/view/frontend/email/order_new.html.
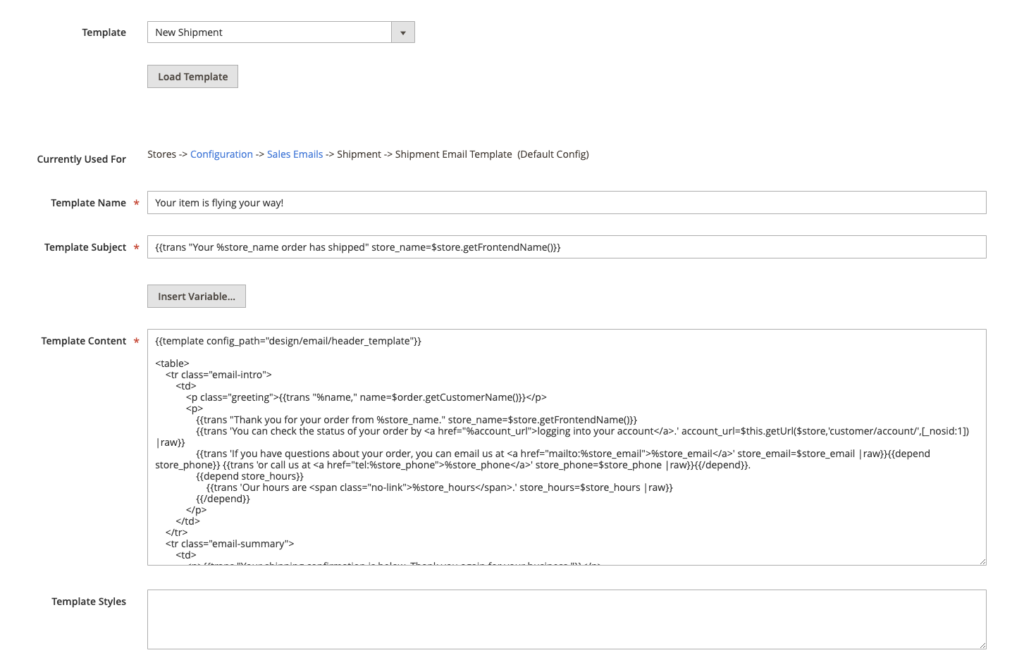
We strongly recommended against editing the default files. Instead, you can add a new template or customize an existing one by logging into your Magento backend and heading over to Marketing -> Email Templates menu. If you want to edit one, simply pick it from the list and click on ‘Load Template’. Edit the content and/or subject and optionally add styles. And then save.
(source)
You can then set or activate it at: Stores -> Configuration -> Sales -> Sales Emails. In there, find the right email type, tick off “use system value”, choose your newly-created template and save.

(source)
Don’t forget to test if it works as expected, more about this below!
Note that the paths above come from Magento 2.3 which we used for the purpose of this article. If you use an earlier or a later version, the path to reach the screens above might differ. Either way, they should be there somewhere!
Sending emails programmatically in Magento
There might be situations when the default triggers added in Magento won’t be sufficient for your needs. Actually, these situations might become quite frequent when you start building on top of default features, and adding new modules or integrations with external services. Or maybe you just want to send an email on customer registration and it’s just not possible from the ‘Sales emails’ menu. This is when you’ll need to look into programming emails.
To do so, you’ll first need to create a new template or edit one of the default ones. You’ll do it in exactly the same way as we discussed above – in Marketing -> Email Templates menu. Let’s use the default, boring contact form for recommending a product to a friend.

(source)
We named the template ‘Check this out’ so we’ll be referencing this name. First, let’s load the template:
As you can see above, the template contains two variables – product_name and product_url. Let’s create an array with both of them.
$vars = [‘user_name’ => $userName, ‘product_name’ => $productName];
And now let’s add the sender’s details. You can add them manually or pull them from your Magento system. If you haven’t added any contacts yet, head over to Stores -> Configuration again and there, open the Store Email Addresses menu under General. Now add your contacts.

(source)
We’ll use this method and type in the following code:
If you wish to preview the template before it’s sent, use the following:
$emailTemplate->getProcessedTemplate($vars);
And the following code to send a message to a chosen recipient. Naturally, you could also fetch these details for a recipient who is also registered on your platform.
$emailTemplate->send($receiveEmail, $receiveName, $vars);
Since Magento 2 is written with Zend Framework, you can use all the features of Zend Mail package. Check out its documentation here.
That’s all! Or is it? Well, your email was definitely sent but did it really arrive in the right inbox?
SMTP configuration for sending emails in Magento
By default, Magento uses the ‘mail’ PHP function to send transactional emails. Unfortunately, it frequently results in those being delivered to a spam folder or not leaving your mail server in the first place. It happens because servers try to prevent spam from going out or into their client’s inboxes and these emails are often the first suspects. What’s more, this function doesn’t incorporate any encryption, making your emails susceptible to spoofing and data breaches.
For those reasons, we recommend sending your emails over SMTP – for better security and improved deliverability. Sadly, it’s not available by default even with the latest Magento releases so you’ll need to utilize custom extensions. Many of them are available for free, though, and are really simple to add. The popular tools in this segment are, for example, Magepal’s Custom SMTP or Mageplaza’s SMTP Extension. Alternatively, you can consider choosing Landofcoder’s SMTP Pro or the extensions by Aitoc, Amasty, and other companies. By comparing offers and functionality, you can choose the most suitable one.
In our case, we’ve added the Magepal’s extension to our Magento to demonstrate the example SMTP configuration with the use of a Gmail account.
Configuring Gmail account for email sending
If you don’t have one or don’t want to use it, create a new free Gmail account or a paid account with Google Apps.
Go to the well-known already Stores -> Configuration. Then, follow the path: Advanced -> System. You see ‘Mail Sending Settings’ which you should leave intact and then ‘SMTP Configuration and Settings’ which is the menu for Custom SMTP extension.

(source)
Here you’ll need to add your Gmail server’s details as well as your login credentials. Luckily, the module gives several hints so you don’t need to do your own research.
Save the settings and open your Gmail account. Click on your profile in the top-right corner -> Google Account -> Security. Here, enable access to Less Secure Apps:

(source)
Note that this will only work if you don’t have two-step verification set up.
Go back to your profile, click on the gear icon to open Settings, then Forwarding and POP/IMAP. Here, enable POP and IMAP.

(source)
Save and you’re all set with a Gmail account ready to send your Magento emails.
As an alternative to using mail() function and SMTP extensions, you can also utilize a very popular PHPMailer. We’ve recently covered it in detail on our blog, check out our guide here.
Testing your Magento emails
We mentioned earlier in the article that you should definitely test your emails before they’re sent to customers, and we haven’t changed our minds ;-). Testing should follow any new email configured and any change in the code responsible for sending them. Otherwise, you risk sending invalid links, wrong order confirmations and failed payment notifications when things actually went through.
One of the best tools for email testing is Mailtrap. It’s a fake SMTP server that captures the emails sent from your Magento store so you can validate if they look and work as expected. You can preview each message and also get suggestions on how to avoid spam filters.
If everything looks fine, you can redirect the email client to send emails to real users again. At this point, you can utilize Mailtrap’s bcc feature that lets you bcc your email address and receive a copy of each email sent to users into your account. This way, you can keep a check on whether transactional emails are sent correctly and make necessary fixes on the go.
Debugging Magento’s transactional emails
Even if you spent a few days configuring your emails, likely something might have gone wrong. Maybe an order confirmation email was not sent to a customer? Or none of your carefully crafted messages are reaching the target inboxes?
This seems to be an issue mostly with the older versions of Magento. If possible, upgrade to the latest release. If you can’t or don’t want to, here are the most common fixes:
- Check if ‘Sales Representative’ email address set in Stores -> Configuration -> General -> Store Email Addresses is correct
- If you’re on Magento 2.2.4, 2.2.5 or 2.2.6, it’s a bug, try this fix.
- Head back to Stores -> Configuration -> Advanced -> System and make sure that ‘Disable Email Communications’ is disabled.
- In the same menu, go to Sales -> Sales Emails -> General and set ‘Asynchronous sending’ to Disable. Set also ‘Order’ tab’s ‘Enabled’ to ‘Yes’.
- If using mail() function, ensure the correct host and port are set. Consult your server provider when in doubt.
- Check if any additional module is not interfering with the email sending. For example, a custom payment gateway could be blocking the sending.
After making any changes, clear the cache and check if the sending works in your testing environment.
If you’re using the default PHP mail() function, check the PHP error log or Apache error log for more details.
If you’re using any SMTP extension as we described and none of the above helped, consult the developers of the module. Check also if your Gmail (or another email account) are properly configured, have IMAP and POP enabled.
Finally, visit https://magento.com/security for the latest on discovered vulnerabilities and the available patches. Best of luck!
Thank you for reading our guide on how to send transactional emails using Magento! The article was originally published in the Mailtrap blog by Piotr Malek.
Share with your friends and followers
Start blogging about your favorite technologies, reach more readers and earn rewards!
Join other developers and claim your FAUN account now!
Mailtrap
Email Sandbox Service


User Popularity
806
Influence
81k
Total Hits
25
Posts


Read, Learn, Know, Teach
Hand curated newsletters for Developers, private Slack with like minded people, podcasts, job offers, news and more!

Only registered users can post comments. Please, login or signup.