Long story before containerization arises, we tend to use VMs approach on deploying applications. Every machine will have their OS with its libraries, makes the apps size is pretty huge as its contains OS. The diagram is closely like below:


TL;DR:
Few explanations about Docker, differences between Image and Container and Overview of Kubernetes Concept

VM runs on top of Hypervisor, if you have heard of VMware, Virtual Box, Hyper-V that are some examples of hypervisor. Each app is isolated within VM alongside with the OS and this is similar to container, the fundamentals that must understand by developers nowadays.
Then, what is container?
Basic concept of container is similar to container in real life, which is the way you package everything into one. Like this cargo container below:
Cargo container. Source: wikipedia (source)
You might often hearing these questions from your colleagues:
My app works smoothly on your laptop, but why it doesn’t work on my machine?
Most likely they haven’t implemented containerization on their applications that forces them to do installations step by step every time they want to test the app in local machine. Moreover the installations of its dependencies are differ on each Operating Systems. Let’s say that when you install NodeJS in Windows has different steps when you install it on Linux.
But with container, we won’t get bother by doing such repetitive things that will save us much time and could focus on the development instead.
More specifically, container wraps and package the code, dependencies, configurations in one file and makes it isolate from each other and with the OS. Though they are isolated but they can communicate by networks which is the happy part of containerzation!
As we saw before that VMs run on top of Hypervisor meanwhile container runs on top of some sort of it we call it as container runtime. There are some container runtimes but the most popular is Docker.
In world of virtualization and container, actually the things discussed above is more considered as definition of Image. Then what’s the difference between image and container?
Image vs Container
To get easier on understanding both terms, we can use Object Oriented Programming analogy, think of Image as Class and container as Object. We can instantiate many Objects from a Class, and so does container. We could create and run many containers from an image.
Then in short we could say that actually containers is image that running.
Let’s move straight to Docker, one of container runtime that popular among developers.
Docker
There is a brief explanation from Wikipedia about Docker’s definition:
Docker is set of platform as a service products that use OS-level virtualization to deliver software in packages called containers.
Wikipedia (source)
With Docker, you can deliver your apps much easier despite what OS you used when development. Good things is Docker is available in Windows, Mac OS and Linux. This article won’t cover the installation step so if you insist to try on your machine, kindly follow these steps and choose based on your OS.

Just like containerized app diagram, Docker play its role as container runtime that manages the containers app and runs on top of Operating System.
Some key features when running container images in Docker — called as Docker Engine are:
- Standard: Docker created the industry standard for containers, so they could be portable anywhere
- Lightweight: Containers share the machine’s OS system kernel and therefore do not require an OS per application, driving higher server efficiencies and reducing server and licensing costs
- Secure: Applications are safer in containers and Docker provides the strongest default isolation capabilities in the industry
These are written on Official Docker’s page. That’s all about Docker and let’s go to practices section.
Pull Public Image
First of all, to interact with Docker we will use Docker CLI that are included on your Docker installation. To ensure that Docker has been installed successfully, check its version by executing docker --version on your terminal:

Then, we can try to pull images from docker hub , let’s take Postgres Official Image as an example. To pull the image, run docker pull postgres:13.5

If you haven’t pull the image, then it will download from docker hub then store it to your local image cache. To ensure that the image has been pulled successfully, execute docker images on your terminal:

As you might see there is postgresimage with tag 13.5, but you might be confused as well why there is another postgres image. If you looked at it more details, the other image has different tag that is 13-alpine .
Every docker image has tag, consider this tag as versioning system. So we could say that now we have postgres installed in our machine that acts as Image with version 13.5, fortunately Postgres provide us the docs that straight to version 13.5, kindly check here.
Run the Docker Image
In order to running system/app/program , simply just need to run the pulled image — called it by Docker Container with docker run command:
docker run --name <container-name> -e POSTGRES_PASSWORD=<pg-password> -d postgres:13.5
There are some parameters here:
--nameis argument that used to specify the container name when it's running. Good things, docker is excellent at recognizing each container by giving name that results from auto generate if we didn't specify the container name.-eis argument to specify environment variable that want to override when running the image. Postgres image does support some of environment variables, go check them here.-dis to run the image in detach, means that the container will run in background and you can do other stuffs while container is initiating and running.postgres:13.5is the image name, don't forget to specify the tag after colon symbol:otherwise it will recognize to uselatestimage tag which some of part we don't want that to happened.
docker run also has more than those options, check them here
Other Way: Create Container then Start It
What docker run actually did is create container from images then running them. For some purpose we could create the container only, and run them later by executing docker create command.
The definition of docker create from Docker Official Documentations
The docker create command creates a writeable container layer over the specified image and prepares it for running the specified command
Docker Official Documentation (source)
Then create the container from image with:
docker create --name <container-name> -t -i -e POSTGRES_PASSWORD=<pg-password> postgres:13.5

To learn more about doker create please go here.
After you executed the command it will return container ID as the STDOUT in your terminal. To ensure that the container has been created, use docker ps -a

You might see that the STATUS of container is Created means that the container has been created, but its not running yet. To run it, use docker start
docker start <container-name>|<container-id>
This command will instruct Docker server to run the created container into Up status, or Exited if there is error. Run docker ps again to check:

The postgres container state now changed from Created to Up for 6 minutes in this case, and the Ports is allocated as well.
We already know that the container has been running but how to see what’s the container doing back there? This is where logging play its role, Docker has provide us the command to see our container’s log by using docker logs
docker logs <container-name>|<container-id>
Here is the output would like:

Since we used Docker Image of Database tools, make sure the container logs showing that they are ready to accept connections before you did any transactions.

For some reason, you might want to stop the container as it uses your machine resource as long as the container is running. You can do it easily by docker stop
docker stop <container-name>|<container-id>
This will put the container into Exited status but still remains in container list when we execute docker ps -a, to completely remove it we can use docker rmcommand like below:
docker rm <container-name>|<container-id>
Note that you can’t remove the container unless you stop it first otherwise it will lead you to error:
Though it’s possible to force remove but it’s not kind of thing that’s recommend to do.
Run Command in Container
It’s also possible to execute a command inside running container to know what’s actually inside it. To do that, use docker exec
docker exec -it <container-name>|<container-id> <command>

To give you more understanding on this command, let’s try to explain some of its arguments:
-i is same as interactive that will help us to interact with the container as they provide STDIN to the user. If we remove the -i argument then we won't get any feedback as our STDIN can't be processed by the container.

-t in exec helps to produce pretty output to the user that interacts with the container. If we remove this argument then we will think that the container is hanging at first, while they are waiting for our input.

bash is one of common command that you can choose if you want to run bash script inside the container.
docker exec often helps us to understand what are things inside a container as we might having blurry of understanding what's container actually is. Also, we could interact with the running container as what we can do in UNIX terminal.
Refer here for docker execreference
Though there are still other topics related to Docker i.e Volume, Networking, Docker Compose but in this post I tried to give the basic things when we learning Docker for first time.
Kubernetes
Okay, so we already learned about Docker in introduction. It provides you easiness to deploy and deliver your apps without worrying of setup and installing libraries, however using Docker only ain’t scalable at all. And here comes Kubernetes to scale our apps!
From Kubernetes.io documentation, the definition is:
Kubernetes is a portable, extensible, open-source platform for managing containerized workloads and services, that facilitates both declarative configuration and automation
Kubernetes Official Documentation (source)
To put it simply, kubernetes is open source platform to managed containerized application. It’s also known as k8s because there are 8 letters between k and s.
So, how’s k8s works and its architecture?
(source)
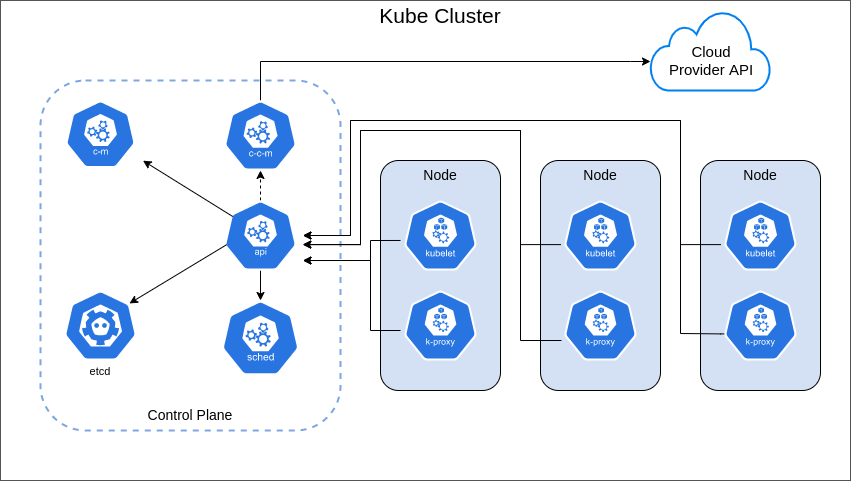
From architecture above, it gives us some terms that relates to k8s components, they are:
Cluster Components
- control plane: is part of k8s cluster which responsibles to manage nodes and pods, it also expose the kube api.
- api (kubeapi-server): it plays role as Front End for kube control plane. Simply say, to interact with kube cluster we will communicate through kube-apiserver.
- sched (kube scheduler): watches newly created pods with unassigned node, and then choose a node for pods to run on, since pods can’t run jobs without node.
- c-m (kube controller manager): to run controller process that watches state of our cluster. It will try to move the current cluster state to desired state.
- c-c-m (cloud controller manager): to link our cluster with cloud provider API (GCP, AWS), it only runs controller that specific to our cloud provider in which they won’t run AWS controller if we are using GCP, vice versa.
- etcd: key value storage uses for persistent store, it’s like k8s database.
Node Components
Node is actually a running virtual machine that resides in kube cluster, and we could scale the node vertically and horizontally. Vertical scaling means that we upgrade the specification of node i.e its CPU, memory, or storage but speaking the facts that horizontally scale has limit and at certain point it can’t be scale in horizontal way anymore. So, in the end it’s recommend to do horizontal scaling because it has no limit as long as we can afford the price. Horizontal scaling means that we spawn new nodes in the cluster to share the loads with another node, usually we face this case when there is high traffic or some data needs to be processed in parallel thus we need more nodes by using data processing concept like Map Reduce.
Speaking about node, it has some components that we need to know about:
- kubelet: agent that runs on each node to make sure containers running smoothly in a pod.
- kube-proxy: is a network proxy to maintain networking rules on nodes, and allowing communications to your pod from network session inside or outside of your cluster.
- container runtime/container manager: it’s a software that responsible for spawn & running containers. There are some of container runtimes such as Docker, containerd, CRI-O, and runC.
The first thing I noted when learning Kubernetes is about their hierarchial components and it’s helping me to have general understanding about k8s. I could say that:
In hierarchial, k8s has one or more cluster, each cluster has many nodes. Each node has one or more pods, each pod has one or more containers. Container terms in k8s has exactly same meaning with container in Docker that we discussed before, that’s why we need to understand first about container.
That’s all for introduction to Kubernetes, let’s put more focus on the hands on session.
When reading about k8s you might got a question in mind. Do we have to setup the cluster from scratch, or using cloud like Google Kubernetes Engineor Amazon Kubernetes Service for the sake of learning and exploring kube?Happily, we don’t need to do both. The community has developed “mini cluster” to facilitate us in terms of learning k8s in practical way.
There are some options and personally I didn’t have recommendation on which is best to use but I’m using minikube until this article is written, and this post will using minikube as our demo.
Minikube helps us to setup local cluster with single node and already supported in Windows, Linux, and macOS. To install it on your machine, take a look on their docs here.
Ensure that minikube has been installed by checking its version with minikube version

While minikube acts to spawning cluster with its node, we need a way to communicate to the cluster and that’s kubectl plays the part!
kubectl is tools developed by community to interact with kube-apiserver. Remember that kube-apiserver is k8s front end, it means that we can interact with kubernetes cluster using kubectl . If you haven’t install it on your machine, please follow this guide and install it based on your Operating System.
Once you have kubectl in your local, be sure to check it’s version by typing kubectl version in terminal.

We could see wo informations in the output:
- Client version states the kubectl version. kubectl acts as client.
- Server version states the kubernetes cluster version.
Now we have minikube and kubectl in our machine, what’s next? In kubernetes, there are some objects/resources that we need to configure using kubectl, actually you might not need to use all of them in your apps/projects but having knowledge on it surely will help you a lot and gives you reasoning on when we use certain object and why we use it instead of others.
To help you understand about kube objects, here I got some articles for you:
- https://kubernetes.io/docs/concepts/workloads/pods/
- https://kubernetes.io/docs/concepts/scheduling-eviction/assign-pod-node/
- https://kubernetes.io/docs/concepts/workloads/controllers/
- https://kubernetes.io/docs/concepts/storage/
- https://kubernetes.io/docs/concepts/services-networking/
- https://kubernetes.io/docs/concepts/configuration/
- https://kubernetes.io/docs/tasks/run-application/horizontal-pod-autoscale-walkthrough/
If you are looking for tutorial in Video version, I have some recommendations to take a look. Don’t forget to support their channel as well!
Indonesian Version
English Version
After you feel more familiar with kubectl and kube objects, I found cheatsheet provided by k8s docs that might be help you later
Finally we reached the end of this article, but don’t worry we will continue this with implementing Kubernetes case in Airflow in Part II!
Give a Pawfive to this post!
Share with your friends and followers
Start writing about what excites you in tech — connect with developers, grow your voice, and get rewarded.
Join other developers and claim your FAUN.dev() account now!


Developer Influence
51
Influence
5k
Total Hits
1
Posts


