Join us
@sasachde ・ Nov 26,2021 ・ 8 min read ・ 5k views ・ Originally posted on ssachdev-pros.medium.com


Use your company-specific domain names instead of default AWS assigned domain names for EC2 instances inside VPCs.
Today I want to talk about how we can use our company-specific domain names for the hostnames that are assigned to our EC2 instances inside our VPCs, rather than the default region-specific domain name that AWS uses by default when assigning hostnames to the EC2 instances.
Imagine that you have an existing corporate network on-premise that you now want to extend to AWS. You create a VPC in the region closest to your user base. You then connect your corporate network with your AWS VPC using VPN / Direct Connect. All your connected devices on your corporate network use a specific domain name, say the name of the company is ‘XYZ enterprise’ and so the company domain could be something like ‘xyz.com’. A connected computer that belongs to an employee named Andrew could have a hostname like ‘andrew-pc.xyz.com’.
Now, you want to reuse this same domain name for the EC2 instances that you are going to provision inside the AWS VPC. But, by default AWS VPCs use region-specific domain names for assigning the hostnames for the EC2 instances that are provisioned inside that VPC. How can you change this behaviour to assign the EC2 instance hostname using your own companies domain name? Continue reading to figure it out!
By default when we launch EC2 instances inside the default VPC or custom VPCs in our AWS accounts, they get assigned public DNS hostnames (if the ‘enableDnsHostname’ setting is turned on inside the VPC) and also private DNS hostnames which specifically are based on the default DHCP option sets that are assigned to the VPCs.
The public DNS name resolves to the public IP address of the EC2 instances when it is used from outside the VPC and the private DNS hostname resolves to the private IP address of the EC2 instance when used from inside the VPC. Inside the VPCs we need to turn on ‘enableDnsSupport’ and ‘enableDnsHostname’ settings for the domain names to get assigned to EC2 instances. By default, the EC2 instances are assigned private and public hostnames using the following pattern:
Internal:
External:
Every AWS VPC has 5 private IP addresses reserved for internal use, out of the full VPC CIDR block range - The first 4 IP addresses and the last IP address in that range. Out of these 5 reserved IP addresses, the base VPC IP address + 2 is reserved for the AWS DNS Server also called Route 53 DNS resolver.
When the AWS DNS Server receives any DNS lookup requests it first tries to resolve those requests using the public or private hosted zones inside the Route 53 services associated with the VPC. If it is not able to resolve the DNS lookup requests from those hosted zones it then forwards the requests to a public DNS server on the internet.
Now, how do the EC2 instances know what DNS server they are supposed to forward the name resolve requests to? They get to know this information, in addition to other related information, from something called the DHCP option sets. These DHCP option sets are assigned at each VPC.

VPC DNS Server and DHCP option set
The default DHCP option set that gets assigned to a newly created VPC looks something like the one in the below screenshot. It points to the Domain name server ‘AmazonProvidedDNS’ which points to the DNS server running at base VPC IP address + 2. As we can see in the above screenshot, if the base IP address of the VPC is 10.0.0.0 then the DNS Server IP address should be 10.0.0.2).
Also, as we can see in the below screenshot of the default DHCP option set that gets assigned to a VPC created inside the us-east-1 region, the default domain name for EC2 instances is ‘ec2.internal’.

Default DHCP option set
DHCP option sets are immutable, so if we want to have a custom domain name or a DNS server for our VPCs, we will need to create a new DHCP options set and assign it to our VPCs.
At a high level, the steps to follow to assign custom domain names for the EC2 instances inside a VPC are as follows:
Now, let’s see a demo of the complete process of creating a new VPC and associate it with our company domain name which in our case is ‘sanjaypsachdev.com’.

Create New VPC

Create a new VPC

DHCP optionSets

New DHCP Option Set

DHCP Option Sets List
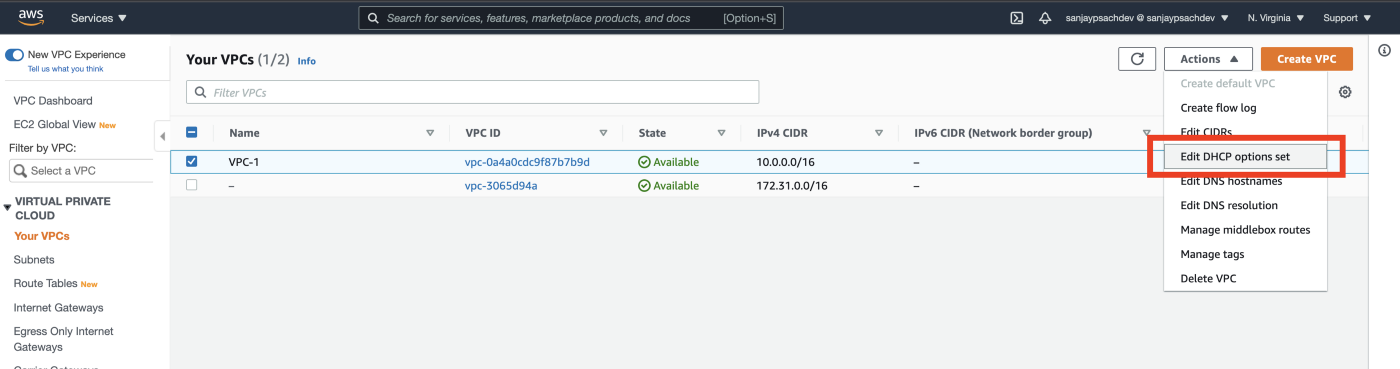
Edit DHCP option set

DHCP option set associated with VPC

First EC2 instance creation

Security Group

Second EC2 instance creation

Route 53 Dashboard

Create a private hosted zone

Route 53 hosted zones

Create Record

As we can see in the above screenshot the hostname follows the desired pattern:
Also, the search domain inside the ‘/etc/resolv.conf’ file is ‘sanjaypsachdev.com’ due to the custom DHCP option set that we have assigned to the VPC.
Now let's try pinging the other EC2 instance (EC2–2) from inside the first EC2 instance (EC2–1). As we can see in the below screenshots, we can use the fully qualified domain name of the EC2 instance (EC2.sanjaypsachdev.com) or just the hostname (EC2) to ping the other EC2 instance. In the second case, it automatically appends the search domain to the EC2 instance hostname. The IP address that is used in both cases is the private IP address of that EC2 instance.


Ping the Second EC2 instance from the first EC2 instance
Now, let’s try to run the nslookup command using the hostname of the other EC2 instance.
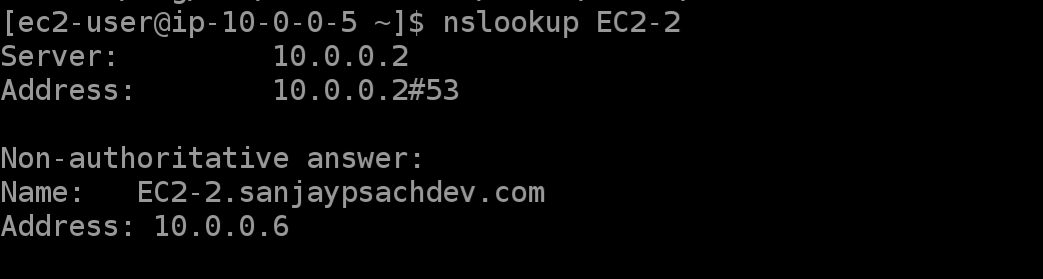
nslookup
As we can see in the above screenshot the DNS Server is located at the IP address that is the base VPC IP address + 2. Also, the IP address of ‘EC2–2' returned is the private IP address of that instance.
As we can see in the above demonstration, we can extend our corporate networks to AWS and reuse our corporate domain names for our EC2 instance hostnames, by creating custom DHCP option sets and also creating Route 53 hosted zones and associating them both with our VPCs. I hope this article has been useful and in case of any questions please reach out in the comments section. Thanks for reading.
Share with your friends and followers
Join other developers and claim your FAUN account now!
Influence
Total Hits
Posts

Hand curated newsletters for Developers, private Slack with like minded people, podcasts, job offers, news and more!


Only registered users can post comments. Please, login or signup.