Join us

How to Send Emails from Supabase using SMTP or Email API

Whether you’re confirming user signups, sending notifications, or automating workflows, Supabase makes it easy to integrate and send emails with SMTP or third-party APIs.

But, before we start, please make sure that you have:

Disclaimer: Every line of code in this article has been written and checked by our developers.

Send Emails Using Supabase Auth

Supabase Auth simplifies adding authentication and authorization to your app. With client SDKs and API endpoints, you can easily create and manage user accounts.

It supports a wide range of popular authentication methods, including password login, magic links, one-time passwords (OTP), social logins, and single sign-on (SSO).

Configure Custom SMTP

Let’s configure auth SMTP settings in the project dashboard. First, go to your Supabase Project. Navigate to AuthenticationEmailsSMTP Settings. Set your SMTP credentials (host, port, user, password).

As you open the page, select the SMTP Settings Tab, and as it opens, make sure to turn on Enable Custom SMTP.

In the opened tab, you need to fill all fields with your Mailtrap SMTP credentials. For the Sender details section, make sure to provide an email with a domain matching your Mailtrap Sending Domains configuration.

In the SMTP Provider Settings section, your filled properties should be the same as in the image below (except you will have a unique password).

Make sure to click Save changes. Supabase handles these system emails automatically (e.g., signup confirmations, password resets, etc.) once your SMTP is configured with your Mailtrap credentials.

Setup a React authentication form

To integrate Supabase Auth, let’s first initialize a React application and conveniently bootstrap it with Vite.

npm:

npm create vite@latest supabase-auth -- --template react
cd supabase-auth

yarn:

yarn create vite@latest supabase-auth -- --template react
cd supabase-auth

Now, let’s install the @supabase/supabase-js package that we will use in our application to handle authentication flows. To simplify styling, we’ll use Auth UI. It is a ready-made React component from Supabase, designed for user authentication. It offers customizable themes and flexible styling options to align with your tastes.

npm:

npm install @supabase/supabase-js @supabase/auth-ui-react @supabase/auth-ui-shared

yarn:

yarn add @supabase/supabase-js @supabase/auth-ui-react @supabase/auth-ui-shared

To store our keys safely, let’s create a .env file and specify the environment variables we’ll use when connecting to Supabase Auth. You can find your Project URL and public API (anon) key by following this link and selecting your project in the dashboard.

VITE_SUPABASE_URL=https://<your-project>.supabase.co
VITE_SUPABASE_ANON_KEY=your-anon-key

Important: Environment variables in Vite have to start with VITE_.

In the src folder, create a supabaseClient.js. We’ll use it to configure the supabase client, implementing Supabase Auth:

import { createClient } from "@supabase/supabase-js";
const supabase = createClient(
import.meta.env.VITE_SUPABASE_URL,
import.meta.env.VITE_SUPABASE_ANON_KEY
);
export { supabase };

Now, create an Auth.jsx file in the src folder. The file will have a simple setup.
import { useState, useEffect } from "react";
import { Auth as SupabaseAuth } from "@supabase/auth-ui-react";
import { ThemeSupa } from "@supabase/auth-ui-shared";

import { supabase } from "./supabaseClient";

export default function Auth() {
const [session, setSession] = useState(null);

useEffect(() => {
supabase.auth.getSession().then(({ data: { session } }) => {
setSession(session);
});
const {
data: { subscription },
} = supabase.auth.onAuthStateChange((_event, session) => {
setSession(session);
});

return () => subscription.unsubscribe();
}, []);

if (!session) {
return (
<SupabaseAuth
supabaseClient={supabase}
appearance={{ theme: ThemeSupa }}
/>
);
} else {
return <div>Logged in</div>;
}
}

Code breakdown:

  • session state tracks the user session and updates UI on any changes.
  • useEffect checks if a user already has an active session and subscribes for any session changes to update the session state accordingly.
  • We display a form for authentication or Logged in if the user is logged in.

In your src/App.jsx file, replace the code to render our created Auth component.

import Auth from "./Auth";

import "./App.css";

function App() {
return (
<div className="App">
<Auth />
</div>
);
}

export default App;

In App.css, let’s include some basic styling for the form to be positioned and sized correctly:

.App {
width: 300px;
}

Now, let’s run the app and verify that everything works correctly.

npm:

npm run dev

yarn:

yarn dev

When users enter their email and hit the button, Supabase will send a login link to their inbox using your SMTP settings. At the bottom of the form click Sign up and enter your email and a password (has to be at least 6 characters) you want to create an account with.

As you click Sign up, a confirmation link will be sent to your email via configured Custom SMTP (with Mailtrap credentials that we used). Check the inbox of the email you provided.

Also, the confirmation email will be listed in the Email Logs section for your configured domain. Let’s click Confirm your email

The page will refresh and will display Logged In, meaning we just logged into our application via Supabase Auth, using Mailtrap as our Custom SMTP solution to handle emails via the Mailtrap Dashboard.

Additionally, you can see and manage all the authenticated users in your Supabase dashboard.

For other authentication methods like Magic Link or OTP, I recommend checking the official documentation.

Configure Email Templates

You can personalize the email messages used in authentication flows by editing the following templates.

  • Confirm Sign-Up
  • Invite User
  • Magic Link
  • Change Email Address
  • Reset Password

Also, Supabase Auth utilizes Go Templates, allowing you to conditionally render content based on available template properties. We’ll perform simple edits in the Confirm Sign-Up Email template. Meanwhile, you can find more information on the template properties here

First, let’s open a Supabase Dashboard tab featuring Email Templates by opening this link. Then, select your project in an opened tab:

Next, select the template you want to edit. In our case, it’s the Confirm signup template. You can specify the subject heading as well as edit the message body. You can edit your template in any way you want, we’ll update the Subject heading and Message body to specify that the email has been handled by Mailtrap.

Subject heading:

Confirm Your Signup | Email From Mailtrap

Message body:

<h2>Confirm your signup</h2>

<p>Follow this link to confirm your sign up:</p>
<p><a href="{{ .ConfirmationURL }}">Confirm your mail</a></p>
<p style="color:#50C878;">This email is handled by Mailtrap</p>

Let’s click Save changes to make sure our changes are successfully applied. From now on, users who will try to perform a Sign up, will receive an updated email.

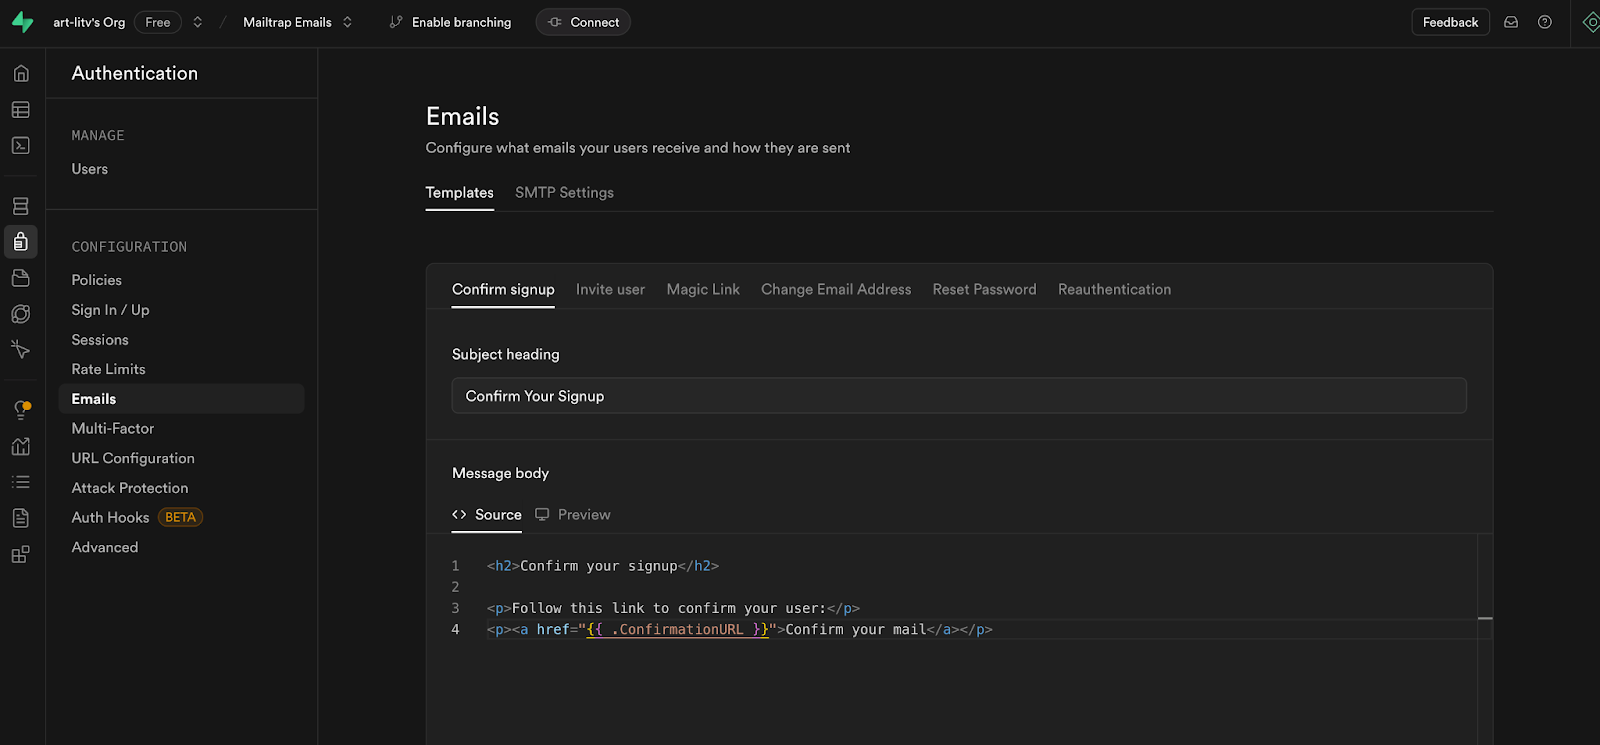
Additionally, you can edit and deploy your Email Templates locally.

Security considerations of using Supabase Auth

First, let’s talk about passwords. A strong password is more secure because it’s harder to guess or crack through brute-force attacks. Generally, longer passwords and those that use a wider variety of characters are more difficult to compromise.

Detailed control

Supabase Auth gives you detailed control over password strength for your project. For example, you can:

  • Configure the minimum password length (e.g., avoid anything under 8 characters)
  • Enforce the use of digits, lowercase and uppercase letters, and symbols for stronger passwords.

Integrations

Also, Supabase Auth integrates with the open-source HaveIBeenPwned.org Pwned Passwords API to block known compromised passwords.

Multi-Factor Authentication (MFA)

Beyond configuring secure password rules, encourage users to use a password manager to generate and store passwords, avoid reusing passwords across different platforms, steer clear of using personal information in passwords, and enable Multi-Factor Authentication (MFA) for added security. You can read more about password security in the official documentation. 🔐

Rate limits

Supabase Auth also provides rate limits to protect our app from abuse. For Sign up confirmation, we get a 60 seconds window before a new request is allowed. For other authentication methods, you can check the official documentation.

CAPTCHA

Also, Supabase offers protection from bots using CAPTCHA. Supabase supports hCaptcha and Turnstile providers; you can find more information about how to enable CAPTCHA for your project in the official documentation.

Row Level Security (RLS)

Supabase makes it easy and secure to access data directly from the browser (like in our React form example), provided that Row Level Security (RLS) is enabled. RLS must always be enabled on any tables within an exposed schema (typically the public schema by default). When you create tables using the Table Editor in the Supabase dashboard, RLS is enabled automatically. However, if you’re creating tables using raw SQL or the SQL Editor, you’ll need to manually enable it.

alter table <schema_name>.<table_name>
enable row level security;

RLS is a powerful and flexible Postgres feature that lets you define complex SQL rules tailored to your business logic. Combined with Supabase Auth, RLS ensures full end-to-end user-level data security, from the client to the database. 

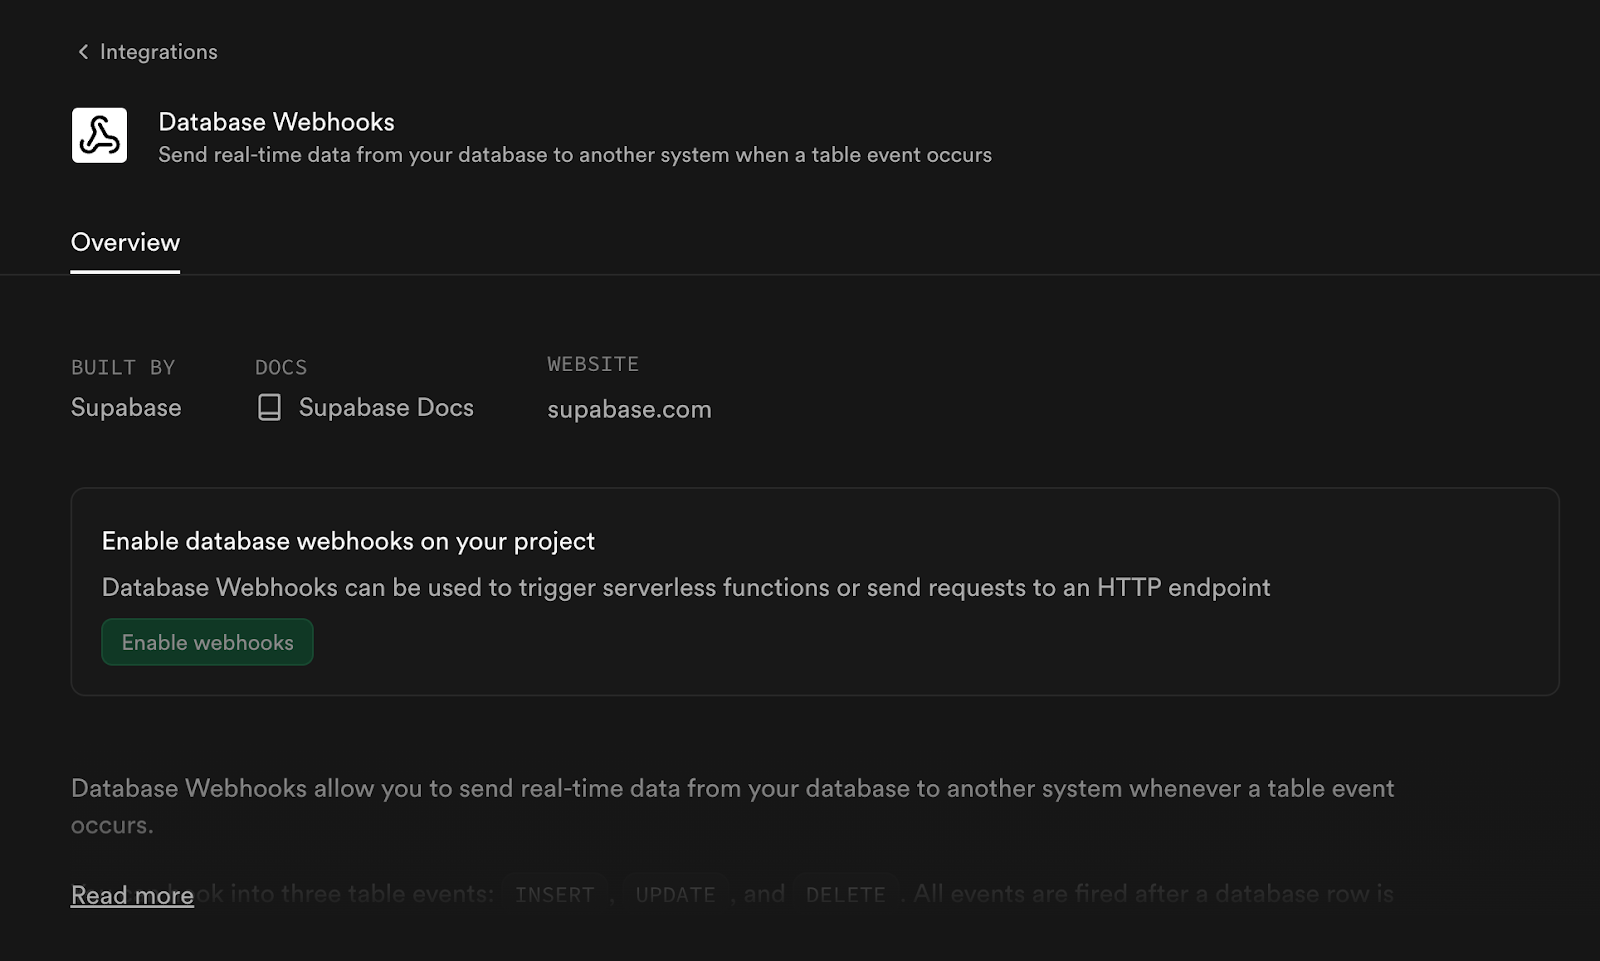
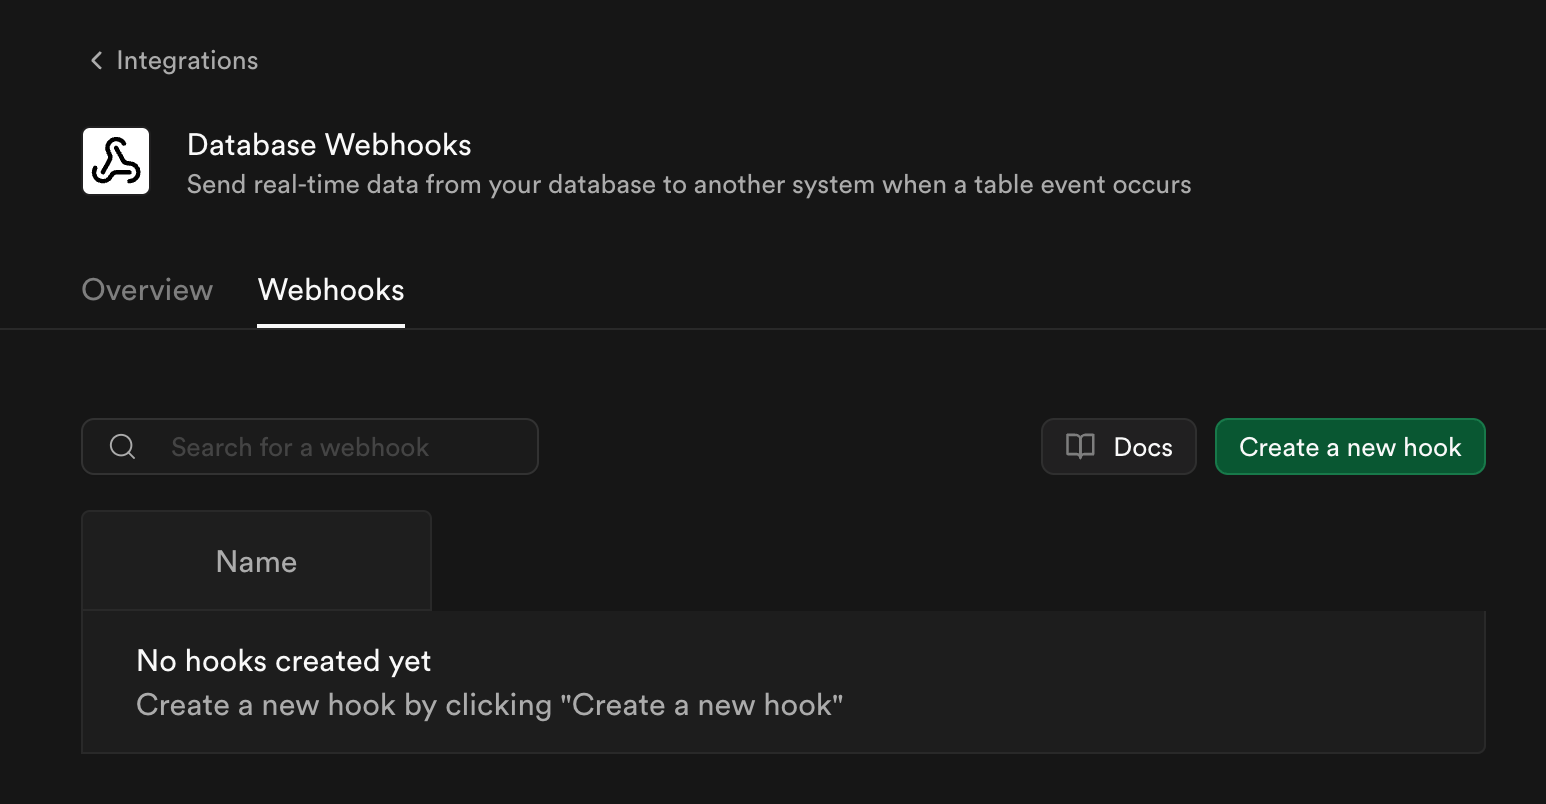
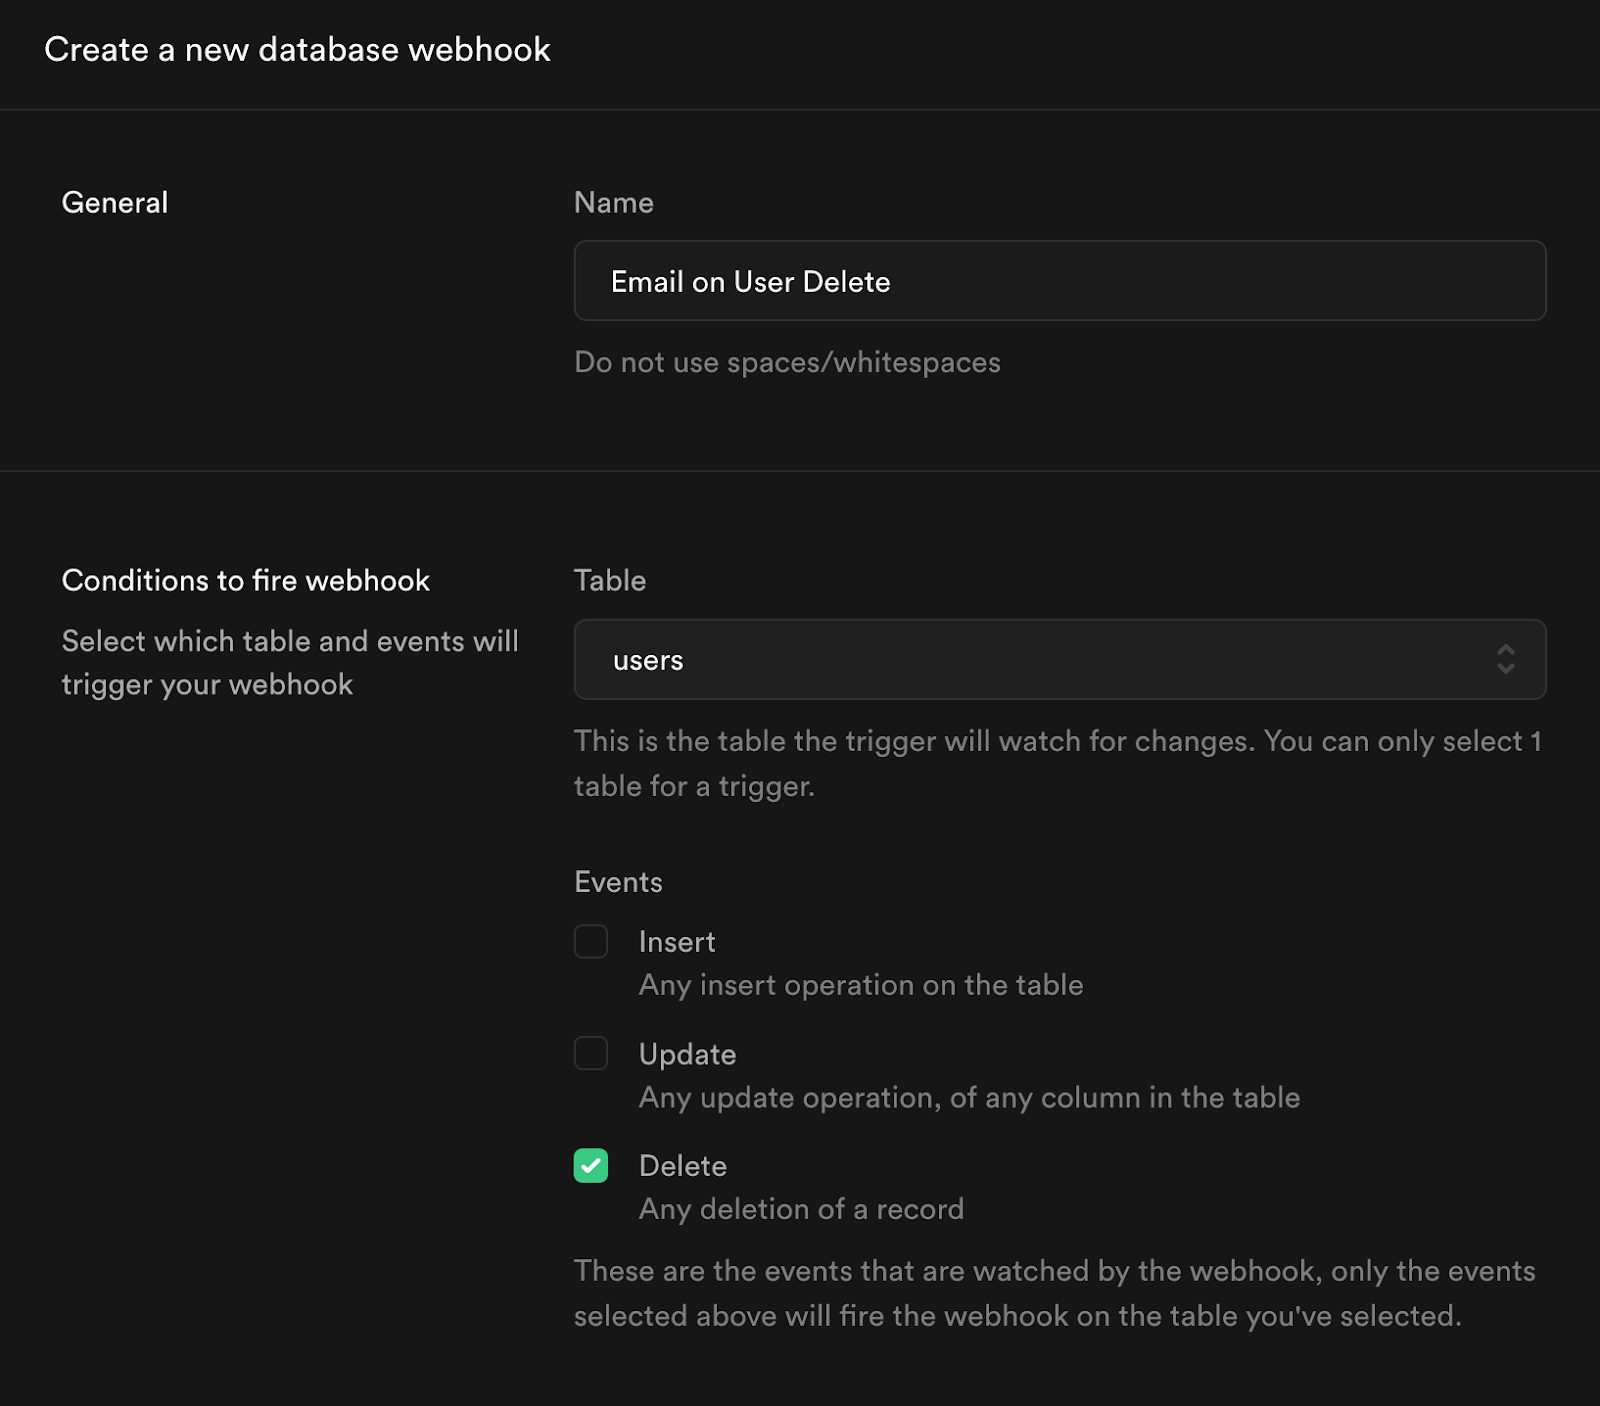
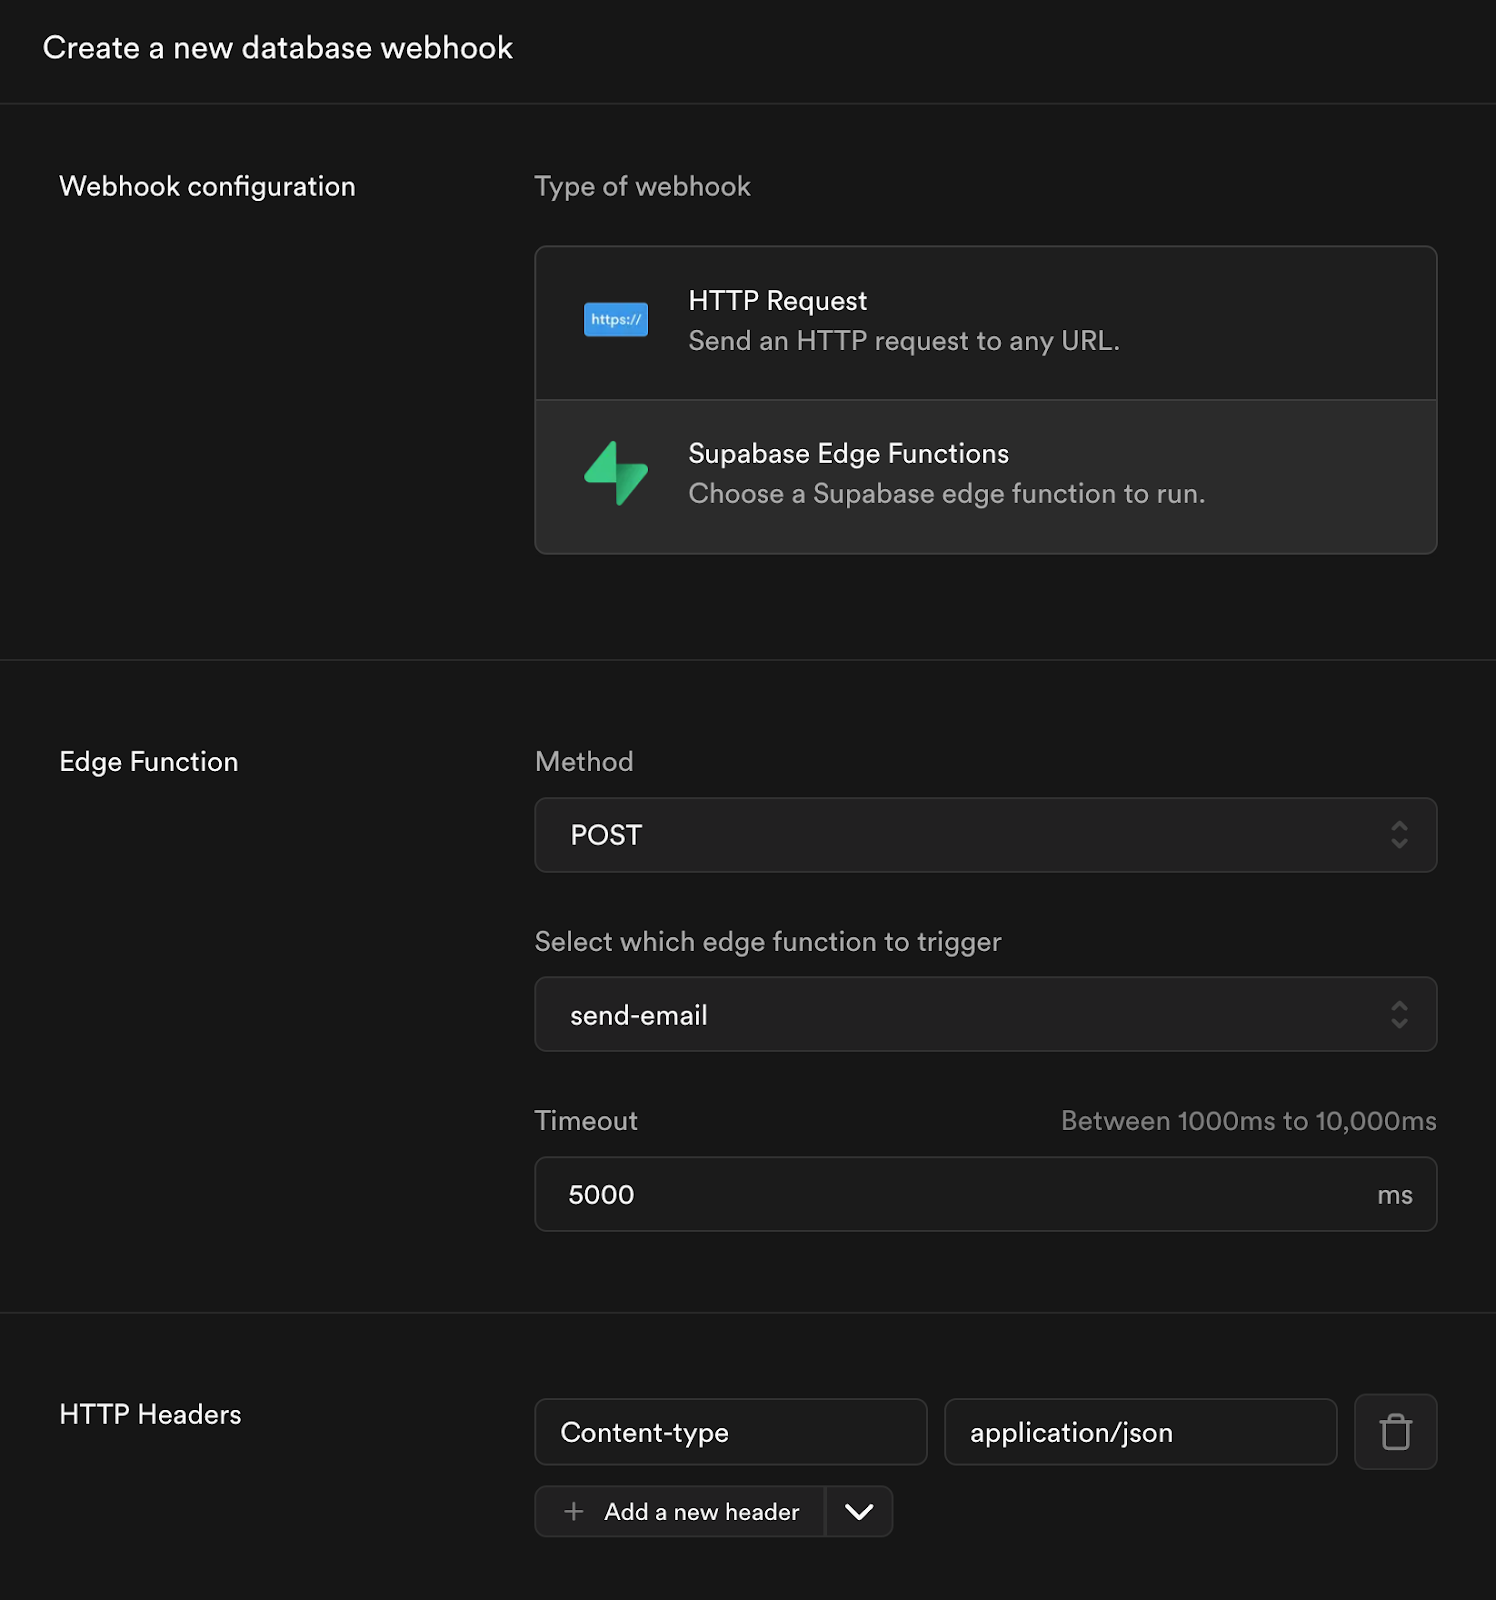
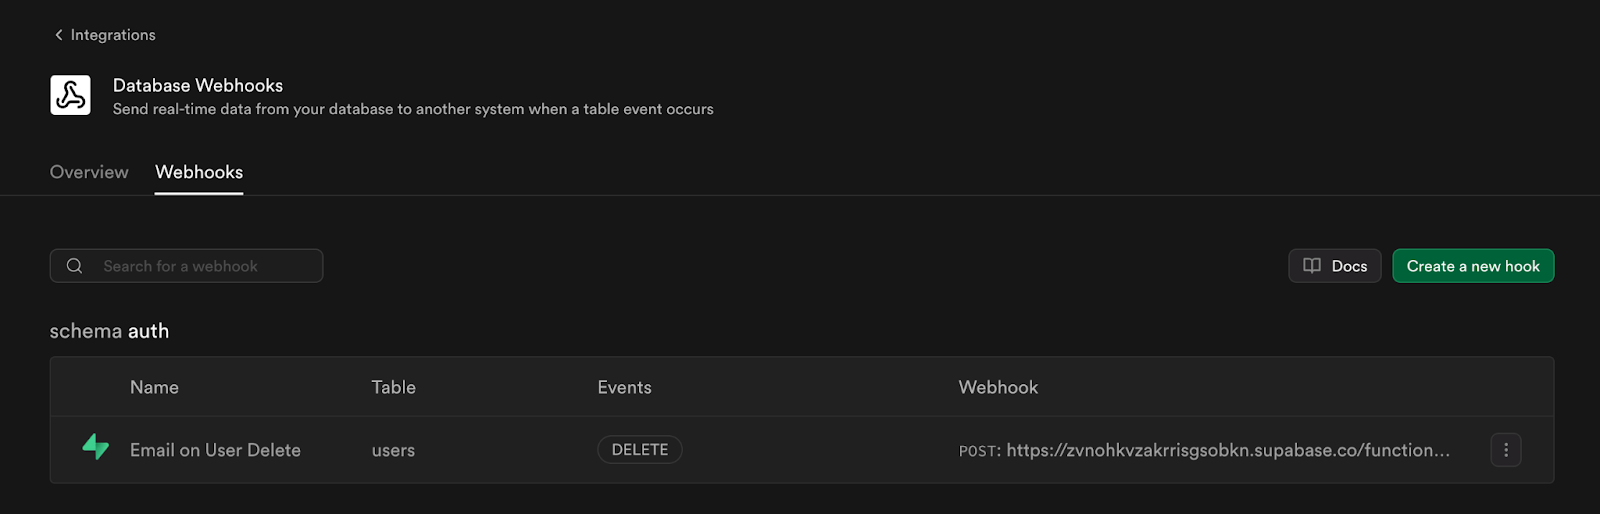
Configure Supabase Edge Functions and Database Webhooks

Edge Functions are server-side TypeScript functions deployed globally at the edge, close to your users, providing ultra-low latency. They’re ideal for handling webhooks or connecting your Supabase project with third-party services like Stripe. 

Built with Deno, Edge Functions offer several advantages, like the ability to run them locally or on any Deno-compatible (even self-hosted) platform. 

They can also be used to send emails efficiently, which I will cover further in the article.

Set up and deploy Supabase Edge Function

Now, let’s use the same project from the previous example to implement Supabase Edge Functions (or, alternatively, you could create a new project in a similar way).

First, make sure to install Supabase CLI to use it in the local environment.

npm:

npm install supabase --save-dev

yarn:

yarn add supabase --dev

Having set up Supabase CLI, let’s create our first Edge Function. You can do that by using the supabase functions new function-name command. This will create a new folder supabase/functions/send-email with a TypeScript starter file.

npm:

npx supabase functions new send-email

yarn:

yarn supabase functions new send-email

If you open the supabase/functions/send-email/index.ts file, your code should look like this:

// Follow this setup guide to integrate the Deno language server with your editor:
// https://deno.land/manual/getting_started/setup_your_environment
// This enables autocomplete, go to definition, etc.

// Setup type definitions for built-in Supabase Runtime APIs
import "jsr:@supabase/functions-js/edge-runtime.d.ts";

console.log("Hello from Functions!");

Deno.serve(async (req) => {
const { name } = await req.json();
const data = {
message: `Hello ${name}!`,
};

return new Response(JSON.stringify(data), {
headers: { "Content-Type": "application/json" },
});
});

/* To invoke locally:

1. Run `supabase start` (see: https://supabase.com/docs/reference/cli/supabase-start)
2. Make an HTTP request:

curl -i --location --request POST 'http://127.0.0.1:54321/functions/v1/send-email' \
--header 'Authorization: Bearer eyJhbGciOiJIUzI1NiIsInR5cCI6IkpXVCJ9.eyJpc3MiOiJzdXBhYmFzZS1kZW1vIiwicm9sZSI6ImFub24iLCJleHAiOjE5ODM4MTI5OTZ9.CRXP1A7WOeoJeXxjNni43kdQwgnWNReilDMblYTn_I0' \
--header 'Content-Type: application/json' \
--data '{"name":"Functions"}'

*/

Code breakdown:

  • The first import statement is related to supabase internal configurations for Supabase Runtime APIs.
  • When the Edge Function file is executed, it will print “Hello from Functions!” in the console before initializing the Edge Function.
  • We call Deno.serve to set up the actual Edge Function. In the example implementation, that allows us to send a greeting for the specified name when we call the Edge Function.

Before deploying your Edge Function to Supabase, make sure to link your project using your Project ID, which is a part of your Public URL (https://<project-id>.supabase.co). Before you link, you can get a list of your Project IDs by running the projects list command. 

npm:

npx supabase projects list
npx supabase link --project-ref <project-id>

yarn:

yarn supabase projects list
yarn supabase link --project-ref <project-id>

Important: If you get asked to enter your database password, you can skip by pressing enter.

Now, let’s deploy the Edge Function to Supabase so that we can interact with it. By default, Edge Functions require a valid JWT in the authorization header. Since we want to use Edge Functions without Authorization checks, let’s pass --no-verify-jwt flag when deploying.

Before deploying, please make sure that you have installed Docker Desktop as I’ve mentioned in the beginning of the article, and then run one of the following commands:

npm:

npx supabase functions deploy send-email --no-verify-jwt

yarn:

yarn supabase functions deploy send-email --no-verify-jwt

You should see the following message in your code editor:

And, as your Edge Function is deployed, it will appear in the Supabase Dashboard by the link mentioned in the logs in the terminal.

Set up Database Webhook for deployed Edge Function

Database Webhooks let you automatically send real-time data from your database to external systems whenever specific table events occur.

You can listen for three types of events: INSERT, UPDATE, and DELETE. Each event is triggered after a row in the table has been modified.

While similar to traditional database triggers, Webhooks are a more convenient abstraction built on top of the pg_net extension. Unlike standard triggers, pg_net operates asynchronously, so it won’t block or delay your database operations, even when making long-running network requests.

To set them up, first, you need to enable Database Hooks in your Supabase Dashboard:

Then, select the Webhooks tab and click Create a new hook:

In the opened window, let’s set up a basic webhook, which will trigger whenever a User gets deleted from the system. Then, choose a name, select users in Table, and under Events check Delete. ✅

In Webhook configuration, select Supabase Edge Functions, and leave other options the same as provided by default.

In the end, click Create webhook.

As you can see, the webhook has been successfully created and configured to work with our Edge Function.

To test that our webhook has been configured correctly, let’s open the Users table in the Authentication tab and try to delete a user. 

Then, go to the Edge Function logs page. A new Edge Function call should be registered in the logs, which means we have successfully linked the webhook with our Edge Function.

Send emails using SMTP
On Mailtrap Blog we discussed further how to send email with Supabase, we encourage you to go check it out!


Let's keep in touch!

Stay updated with my latest posts and news. I share insights, updates, and exclusive content.

By subscribing, you share your email with @idjuric660 and accept our Terms & Privacy. Unsubscribe anytime.

Give a Pawfive to this post!


Only registered users can post comments. Please, login or signup.

Start blogging about your favorite technologies, reach more readers and earn rewards!

Join other developers and claim your FAUN.dev account now!

Avatar

Ivan Djuric

Technical Content Writer, Mailtrap

@idjuric660
As a Technical Content Writer with 5 years of experience, I specialize in covering email-related topics, collaborating closely with software engineers and email marketers. My goal is to provide you with insights on email sending and testing.
Developer Influence
251

Influence

24k

Total Hits

36

Posts