Join us
@adrianamvillela ・ Jan 30,2022 ・ 22 min read ・ 1547 views ・ Originally posted on adri-v.medium.com
Let’s face it — Kubernetes gets ALL the love. Although Nomad is a GREAT product, it has a much, much smaller user base. As a result, there are fewer tools geared toward supporting it.
Can we get some Nomad Love Here?
Let’s face it — Kubernetes gets ALL the love. Although Nomad is a GREAT product, it has a much, much smaller user base. As a result, there are fewer tools geared toward supporting it.
One thing that is lacking in the Nomad ecosystem is tooling for managing Nomad deployments.
Believe me…I spent a looooong time time Googling far and wide, using search terms like “GitOps for Nomad”, “Tool like ArgoCD for Nomad”, “CD tools for Nomad”, and so on. I stumbled upon a post in this discussion which points to a list of CI/CD tools which integrate with Nomad. Unfortunately, the tools listed on there didn’t really fit the bill.
Having spent several months in late 2020/early 2021 neck-deep in Kubernetes and developing a deployment strategy around ArgoCD (I have a whole series of blog posts just on ArgoCD), I understand the importance of having a good deployment management (also known as Continuous Delivery or CD) tool for your container orchestrator. This is ESPECIALLY important when you’ve got an SRE team whose job includes overseeing the health of dozens and dozens of microservices deployed to your container orchestrator cluster(s) across multiple regions. IT. ADDS. UP. A deployment management tool like ArgoCD gives you that holistic system view, and a holistic way to manage your deployments.
At the end of the day, as far as I can tell, the only two big-ish commercial deployment management tool offerings for Nomad are:
I was personally drawn to Waypoint, because, as a HashiCorp product, it means that it plays nice with other HashiCorp products. Most importantly, it can run natively on Nomad, as a Nomad job, just like ArgoCD runs natively on Kubernetes! Spinnaker, on the other hand, cannot run natively on Nomad.
Fun fact: Waypoint can also manage deployments to Kubernetes, and can run natively in Kubernetes. I think the Kubernetes features for Waypoint came out before the Nomad features.
Now, keep in mind that Waypoint is pretty new. It was first launched on October 15, 2020. The latest version of Waypoint, v0.7.0, was launched on January 13th, 2022. That’s pretty fresh.
So, is Waypoint up to snuff? Well, let’s find out, as we explore the ins and outs of Waypoint!
Objective
In today’s tutorial, we will:
Assumptions
Before we move on, I am assuming that you have a basic understanding of:
Pre-Requisites
In order to run the example in this tutorial, you’ll need the following:
Tutorial Repo
I will be using a Modified HashiQube Repo (fork of servian/hashiqube
) for today’s tutorial.
Waypoint Installation Overview
In this section, I’ll explain how to install Waypoint. But don’t worry yet about trying these steps right away, because in the next section, Running the Waypoint Example on HashiQube, you’ll get to do it as I run through the steps of booting up your HashiQube VM and deploying your app bundle to Nomad using Waypoint.
During the Vagrant VM provisioning process on HashiQube, Waypoint is installed by way of the waypoint.sh
file.
At the time of this writing, the latest version of Waypoint is v0.7.0. Please note that the Waypoint provisioning scripts in this example will always pull whatever the latest version is. If you want to lock that down, please update line 14 of waypoint.sh to:
With the Waypoint binary in hand, it’s time to install. This happens on line 23:
The above line will install the Waypoint server on Nomad (so that it runs natively as Nomad job). Since Waypoint needs a database to keep track of deployments, we must create a host volume in Nomad. I’m using MySQL as the host volume.
Note: You can use either a Container Storage Interface (CSI) Volume or a Host Volume to store the Waypoint Server’s DB. More details here.
We need to have a DB in place before running the Waypoint server installation, otherwise the install will barf out. This means that I had to deploy the MySQL DB during the Nomad provisioning process. During the Nomad provisioning process, I had to do 2 things.
First, I configured the host volume in the Nomad server.conf
file. This happened in lines 40–43 in nomad.sh
:
Note how my host volume is named mysql
. This is the same volume name referenced in the nomad-host-volume
flag of the waypoint install
command:
I also had to deploy the MySQL database to Nomad. This happens at the end of the Nomad provisioning process, in line 140 of nomad.sh
:
The Nomad jobspec for MySQL can be found here.
After installing the Waypoint server, you can see the job running on Nomad (http://localhost:4646
):
Note: You can see that the mysql-server
job is also running. Remember that this was deployed during the Nomad provisioning step.
You can also check to see that the waypoint-server
is running using Nomad CLI:
Sample output:
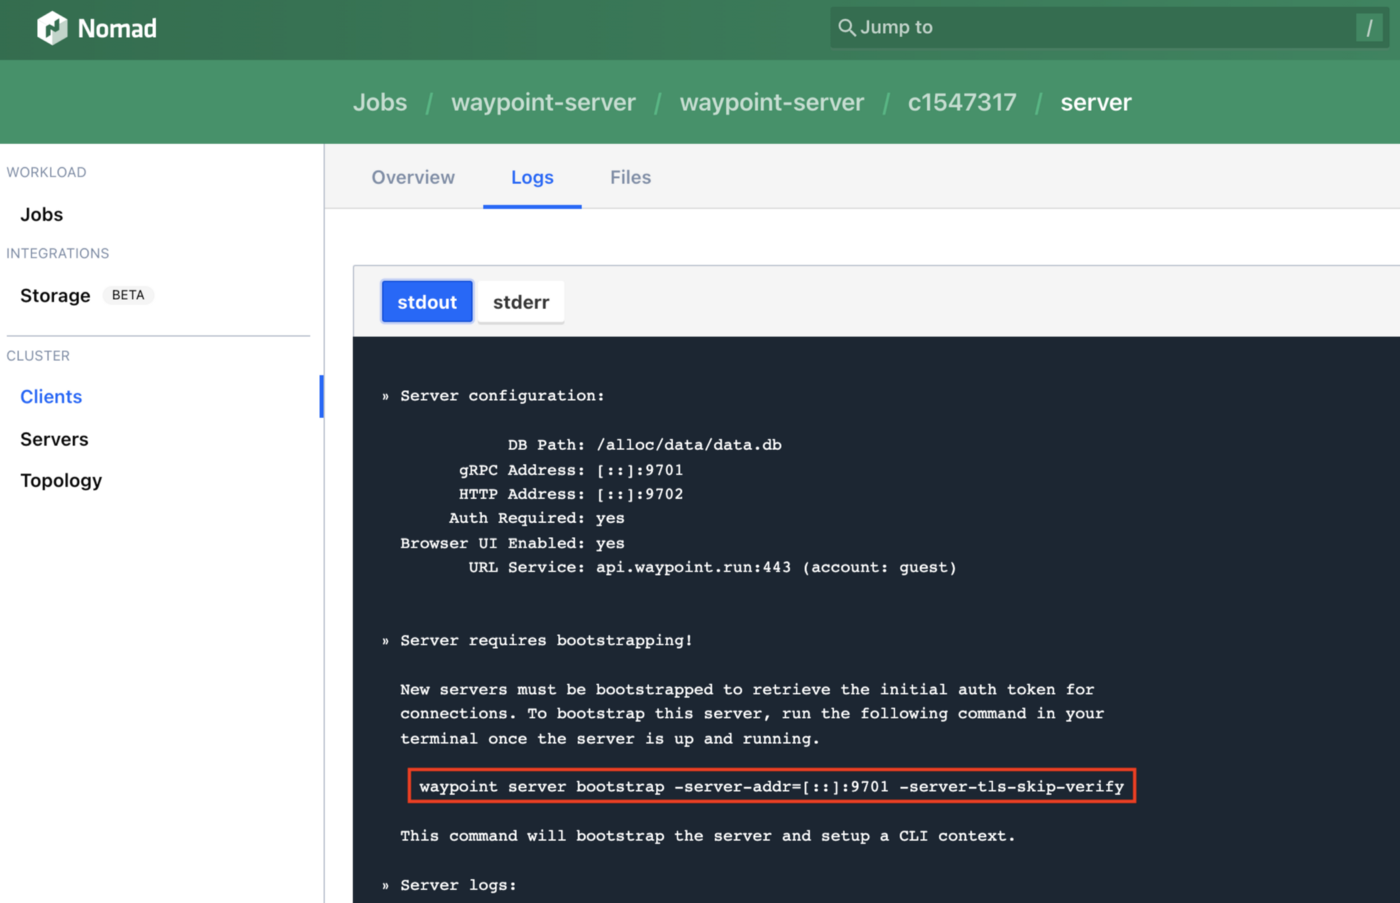
But we’re not done yet — we need to bootstrap the server. This happens on line 24 of waypoint.sh.
This is technically supposed to happen automagically, but for some reason it doesn’t (haven’t figured out why yet, so any suggestions are welcome). I found out about the above command from looking in the server logs of the Waypoint server job running on Nomad. Hope this saves you a ton of grief if you run into a similar situation!! 😊
Again, if you prefer the Nomad CLI (make sure you have jq
installed):
Sample output:
Now that we understand how Waypoint is installed, let’s actually install it, shall we?
Running the Waypoint Example on HashiQube
Time to put things into practice by standing up our environment using HashiQube!
As a reminder, we will be using the tutorial repo for this example. It is a fork of the servian/hashiqube
repo, and includes the following modifications:
Let’s get started!
Note: If you wish to skip this configuration, simply comment out lines 46–52 and lines 74–87 in nomad.sh
.
The nomad.sh
file has some additional configuration which enables you to pull Docker images from a private GitHub repo. This is enabled in lines 46–52 in the docker
stanza, telling it to pull your Docker repo secrets from /etc/docker/docker.cfg
, which is configured in lines 74–87.
Line 79 expects a GitHub auth token, which is made up of your GitHub username and GitHub PAT. It pulls that information from a file called secret.sh
, located at vagrant/hashicorp/nomad
in the guest machine.
For your convenience, you can create secret.sh
on your host machine like this:
Be sure to replace <your_gh_username>
with your own GitHub username and <your_gh_pat>
with your own GitHub PAT.
3- Install & configure up dnsmasq
Note: You only need to do this configuration once, and then you’re golden for all subsequent times that you bring up HashiQube.
I’m running all of my Nomad jobs locally (i.e. on localhost
) on HashiQube. I’m also using the Traefik Host rule to configure my Nomad jobs. In a nutshell, this maps to a nice URL (*.localhost
) running on port 80, regardless of what port the underlying service uses.
For example, the Traefik endpoint will be traefik.localhost
, and (spoiler alert) the OTel Collector’s endpoint will be otel-collector-http.localhost
.
Unfortunately, during my experimentation, after I initially set all this up, I couldn’t hit http://traefik.localhost
. I kept running into this error:
What added to my confusion is that I could hit that endpoint on Chrome, Brave, and Waterfox, but not on Safari. This became a real problem when I tried to get my sample OTel tracing program to hit the OTel Collector endpoint and it kept giving me that dreaded Could not resolve host
error. A deep panic set in. 😱
Fortunately, The Google saved the day, and I found the solution, by way of installing a tool called dnsmasq
. For your reference, the post that saved me can be found here .I’m on a Mac, and the steps below saved my bacon:
a) Install dnsmasq
b) Configure
Copy the sample config file to /usr/local/etc/dnsmasq.conf
, and add address=/localhost/127.0.0.1
to it
Restart dnsmasq
services
Add a resolver to allow OS X to resolve requests from *.localhost
c) Test
Even though foo.localhost
doesn’t exist, we should now be able to ping it, since it will map to 127.0.0.1
, as per our configs above.
Result:
Now we’re ready to boot up our HashiQube environment. Make sure that you’re in the repo root folder (hashiqube
), and run the following command:
Now wait patiently for Vagrant to provision and configure your VM.
Once everything is up and running (this will take several minutes, by the way), you’ll see this in the tail-end of the startup sequence, to indicate that you are good to go:
You can now the services below:
If you look at the Waypoint URL above, you’ll notice two things:
https
, not http
. This is because the Waypoint UI only runs on https
.localhost
, because it doesn’t work with https://localhost:9702
(even though we exposed port 9702 in the Vagrantfile. My guess is that it has something to do with the fact that the Waypoint UI is using https
. Anyone else have any thoughts on this?Note: If your Vagrant VM starts up properly, but you find yourself unable to access the Waypoint UI, it might be due to an IP address collision with another device on your network. This happened to me. I was happily using 192.168.56.100
, and then suddenly, it wasn’t working anymore. I had to switch my Vagrantfile to use 192.168.56.192
(I randomly picked it and prayed it would work 😅), and then it was all good.
When you hit the UI, you’ll see a bunch of security warnings. Once you bypass all the warnings, you’ll see this:
Isn’t it pretty? 😃
Note: In a production environment, you will want to set up TLS and all that good stuff. This is outside of the scope of this discussion. But if you want some guidance on how to do this, DM
David Alfonzo, who got this working with TLS + Traefik.
If your Host machine (i.e. the non-VM) is a Mac, you can install the Waypoint CLI via Homebrew like this:
While not needed for the purposes of this tutorial, you can also install the Vault and Nomad CLIs if it tickles your fancy:
If you’re not on a Mac, you can find your OS-specific instructions for installing Waypoint, Vault, and Nomad CLIs. Note that these are the binary installs for the apps themselves, and they also contain the CLIs.
Now that the Waypoint CLI is installed, we need to configure it so that it knows to talk to the Waypoint server running on HashiQube. How do we do that?
During the Waypoint provisioning process of our Vagrant VM, in line 64 of waypoint.sh
, we generate a Waypoint token:
And save it to a text file, per line 66:
This file is also accessible to the host machine at <repo_root>/hashicorp/waypoint/waypoint_user_token.txt
. I’ve gitignored
the file so that you don’t accidentally push it to version control. You’re welcome. 😉
Armed with a user token, we can login to our newly-provisioned Waypoint server via the CLI on your host machine. Remember that you must be in the hashiqube
repo root in order for the line below to work.
Note: VAGRANT_IP
refers to the IP address of your Vagrant VM (see line 26 in the Vagrantfile
.
Sample output:
Logging into Waypoint for the first time creates a Context. A Waypoint Context is similar in concept to a Kubernetes Context — it represents a Waypoint server that you’re connecting to. If you need to connect to another Waypoint server, you’d simply switch the context before running any operations against that server via the CLI.
And in case you’re wondering how you can view your list of current contexts:
Sample output:
As you can see from the output above, the context name is bootstrap-1642044178
. This name was auto-generated, courtesy of Waypoint.
If you want to use a specific context, you would run:
Where <context_name>
is the name of the context you want to change to — i.e. one of the NAME
values output from running waypoint context list
.
If you wanted to create a context, you would run:
Where <waypoint_token>
is your Waypoint token, and <context_name>
is the name that you want to give your new context (it can be whatever you want).
In case you’re wondering where Waypoint stores your context, you can find out by running:
Sample output:
If I poke around at the config path listed above, I see a few files in there:
_default.hcl
(points to your default Waypoint Context — it’s a symlink)bootstrap-1642044178.hcl
(yours will be named the same as your Context name)You may see more files in there than what I have — one per Context you’ve configured, plus _default.hcl
.
Now that you’ve logged into Waypoint via the UI, you can also do this:
This automagically auto-authenticates you into the Waypoint UI. Again, remember to bypass all the security warnings so that you can get to the UI:
Woo hoo! You’re in!
We are now ready to run a Waypoint example! If you’ve been following along in my blog posts, you know that I use my trusty 2048-game example. So of course I will use this app in the example here. Since Waypoint gives you the ability to deploy multiple related apps at the same time, I will demonstrate how to deploy two apps under a single Waypoint project. As you may have guessed, a project is a group of one or more related applications.
Note: Although the two apps in the example are not at all related, I’ve schlepped them together into to illustrate the concept of deploying two apps in the same project.
To run the example, let’s navigate to our examples directory (assuming you’re starting from the repo root, hashiqube
):
The waypoint init
command looks for a waypoint.hcl
in the directory from which you run waypoint init
. In our case, we were in hashicorp/waypoint/examples/sample-app
, so Waypoint looked for (and found) our waypoint.hcl
there. If Waypoint finds a waypoint.hcl
file, it validates it to make sure that your HCL is well-formed and that you’re not trying to do anything funky and non-Waypoint-y.
If Waypoint doesn’t find a waypoint.hcl
, it will scaffold a waypoint.hcl
for you, which you can fill out to your heart’s content.
The waypoint init
command also creates a .waypoint
directory in the directory where your waypoint.hcl
is located (make sure that you gitignore
that directory, as I did in the example repo.
Here is our waypoint.hcl
:
The waypoint.hcl
file starts with a project
definition. Per line 1 above, our project is aptly named sample-proj
.
In the file above, we are defining two applications:
2048-game
(lines 26–43)otel-collector
(lines 45–61)The label you use for the app
stanza can be whatever you want — you can use uss-enterprise
and battlestar-gallactica
, if you want. Obviously, the more descriptive (with regards to what the app actually does), the better. 😁
In our example, each app
definition has two sections: build
, and deploy
. We define how we want to build and how we want to deploy by using plugins. Waypoint has a bunch of canned plugins that you can use. You can also define your own. For what we want to do, we can use the existing canned plugins.
Let’s start with the build
stanza.
The build
stanza can do one of two things:
Dockerfile
and publish it to a given Docker registryDockerfile
from a given Docker registryI don’t particularly find the first use case all that useful to me. In my opinion, building a Docker image and publishing it to a registry should be left to a CI tool like Jenkins, CircleCI, or GitHub Actions. A deployment management tool like Waypoint should pull an existing Docker image and deploy it to whatever target(s) I specify. Build once, deploy many.
Note: The CI tools listed above can also deploy to Nomad, Kubernetes, etc. That said, they aren’t well-suited for giving you a holistic view of your app deployments across multiple environments and clusters, like a deployment management tool would.
So, keeping in mind that we want to grab an existing Docker image to deploy to a specific Nomad environment, we use the docker-pull
plugin, which includes the info you need to pull the specified Docker image and tag from a given Docker registry.
To deploy each app, I use the deploy
stanza with the nomad-jobspec
plugin. Waypoint supports two Nomad-native ways to deploy to Nomad: using the nomad
plugin, and the nomad-jobspec
plugin. The nomad
plugin basically creates a Nomad jobspec on-the-fly based on a bunch of parameters that you set. Unfortunately, if you want to do anything more advanced (like using Traefik for load-balancing), you’re kinda screwed. Lucky for us, the nomad-jobspec
plugin gives us more flexibility. This plugin lets you feed an existing Nomad jobspec file into Waypoint. YUM. That’s what we see in line 37–39 and line 56–58 of our waypoint.hcl
.
Let’s look at the nomad-jobpsec
config for the 2048-game
app:
The above snippet says that we’re using a templatefile
called 2048-game.nomad.tpl
located at ${path.app}
. The Waypoint variable ${path.app}
is your working directory (i.e. where waypoint.hcl
is located). The template file, 2048-game.nomad.tpl
could very well have been called 2048-game.nomad
, or 2048-game.hcl
. The .tpl
extension is just a convention indicating that it is a template file (i.e. we’re passing in some parameterized to that file).
So what parameters are we sending over to 2048-game.nomad.tpl
above? It looks like we’re sending a parameter called docker_artifact
, and that it’s getting its value from something called var.game_2048_docker
, an object made up of an image
field and a tag
field.
If we look up at lines 3–12 of waypoint.hcl
, we can see that it’s game_2048_docker
is defined there:
This particular variable is of type object
(i.e. a map), but you can also define variables of type string
and number
. More info here.
When we pass it to the template specified in the nomad-jobspec
plugin, we reference it as ${var.game_2048_docker}
, where var
tells us that it’s a Waypoint variable. And we’re assigning it to docker_artifact
as we pass it it into our template, 2048-game.nomad.tpl
. If you look at line 37 of 2048-game.nomad.tpl
, we reference docker_artifact
like this:
Since docker_artifact
is made up of an image
field and a tag
field, we reference the fields as docker_artifact.image
and docker_artifact.tag
, respectively.
Note: waypoint.hcl
also supports a release
stanza, but as far as I can tell, the deploy
stanza takes care of the release part for us, since the Nomad jobspec takes care of the stuff that the release stanza is supposed to do, so it’s moot as far as our example is concerned. Please feel free to correct me if I’m wrong.
Now that we know what’s going on…let’s deploy the project:
Note: It’s typically a good idea to always run waypoint init
followed by waypoint up
every time you make a change to your waypoint.hcl
. That way, Waypoint can catch any boo-boos in the waypoint.hcl
file.
Sample output:
If we mozy on over to our Waypoint UI by way of waypoint ui -authenticate
, we’ll see a new project called sample-proj
:
If we drill down (by clicking on sample-proj
), we’ll see that it’s deployed both apps in our bundle — 2048-game
and otel-collector
:
And if you click on 2048-game
, you’ll see this:
According to Waypoint, the app has been deployed to Nomad! Let’s check Nomad to make sure that that’s the case by going to http://localhost:4646
:
Unfortunately, if something goes caca with the Nomad deployment, Waypoint doesn’t tell you, which honestly sucks. When I compare to the fact that my beloved ArgoCD does that and more, it makes me sad. 😢
If you wish to delete the apps deployed under your project, you can do so by running:
Sample output:
This nukes all apps in our project, so it means that the otel-collector
and 2048-game
apps are gonzo from Nomad. The Waypoint UI is not so great at showing destroyed deployments:
This section probably needs a little more love.
Thoughts on Waypoint
If you’re part of an SRE organization, you need a tool to manage your deploymens. Why? Because you need to have a holistic view of all the apps deployed across all of your container orchestrators — whether it’s Kubernetes, Nomad, Docker Swarm, or whatever else. Deployment management tools answer the following questions:
So does Waypoint fit the bill?
Waypoint is a GREAT first step at a deployment management tool for Nomad. There aren’t too many such tools available for Nomad, and it’s nice to see that HashiCorp is throwing its hat into the ring and giving its own container orchestrator some much-needed love. ❤️
Having spent a chunk of 2020 and 2021 digging deep into ArgoCD, I’ve definitely been spoiled by its vast capabilities, and unfortunately, I don’t see many of the features I’ve grown to love from ArgoCD in Waypoint…yet.
As an SRE, here is my Waypoint wish list:
waypoint.hcl
. To be honest, forcing me include a build
stanza all the time doesn’t make a whole lot of sense to me, because I deploy to Nomad using the nomad-jobspec
plugin for the deploy
phase, and as far as I can tell, in the Nomad deploy phase, it pulls the image from the Docker registry all over again. (Please correct me if I’m wrong.) Unfortunately, when I tried to purposely exclude the build
stanza from the waypoint.hcl
, it caused Waypoint to err out on waypoint init
and waypoint up
with the error 'build' stanza required;
.waypoint.hcl
file and a full Nomad jobspec in the nomad-jobspec
example, for instance.Conclusion
We have covered a lot today, so give yourself a pat on the back! You survived my long-ass blog post! Here are the highlighs:
Waypoint is a great first step by HashiCorp to provide a Nomad-native tool that manages deployments to Nomad. Heck — there are no other Nomad-native tools that even do this. While Spinnaker has a Nomad plugin which enables you to deploy apps to Nomad, it doesn’t run natively on Nomad. I can’t, however, speak for how Spinnaker compares to managing Nomad deployments, as I haven’t had a chance to play with it (yet).
Waypoint has a lot of potential to be a kick-ass deployment management tool. Will it give your SRE team the super-holistic view of app deployments? Not at the moment. The pickings are slim in the deployment management space for Nomad. It’s nice to see that HashiCorp is investing in this space for its own container orchestrator (Nomad), and not just in Kubernetes. Seeing how much work that HashiCorp has put into growing this product since its initial release in 2020, I’d say that the future is promising. I’m excited to see what the next release of Waypoint holds in store!
I will now reward you with a photo of a snowy yak.
Peace, love, and code.
Related Reading
Be sure to check out my other articles in the Just-in-Time Nomad series!
https://adri-v.medium.com/just-in-time-nomad-80f57cd403ca
https://adri-v.medium.com/just-in-time-nomad-running-traefik-on-hashiqube-7d6dfd8ef9d8
Acknowledgements
Big thanks to the following folks for your continued support:
References
Join other developers and claim your FAUN account now!
Influence
Total Hits
Posts
Only registered users can post comments. Please, login or signup.