Join us
@che_adrian ・ Jun 01,2022 ・ 6 min read・ 2k views ・ Originally posted on faun.pub


You might have a small business or simply want to automate your way of controlling your home through Facebook Messenger and Node-RED is a great tool to start creating a chatbot as you can automate many things, including sending and receiving emails, creating an interface, and so on which can help you to automate responses to your customers, control your machines at home or workplace and, create specific messages using a database.
First, search and install “node-red-contrib-chatbot” from the Node-RED palette. Here you can see more details about loading RedBot and installing Node-RED: “Install the RedBot plugin in the Node-RED”.
Ngrok or port forwarding with SSL certificate
To use Facebook Messenger API, you need a valid non-self-signed certificate to use your link to the Node-RED as a webhook.
You don’t need to do this if you use the IBM Cloud or Heroku, for example, because you probably already have access to Node-RED through https://.
For the sake of simplicity, I will show you how to set up NgrOK on Raspberry Pi as the alternative is to use certbot and port forwarding.
If you already connect to your Node-RED through https://, skip to here.
1. Create an account to ngrok using the sign-up page.
2. Install ngrok using Snapcraft or manually:
Using your console or terminal to the Raspberry Pi.
3. Connect your ngrok client to the account:

Setup ngrok authentication token

Setup ngrok authentication token
4. Now you have to edit the ngrok config 🟧 file created above:
Nano — paste with right-click, save and exit: CTRL + S then CTRL + X.

Modify ngrok configuration to tunnel 1880 port of Node-RED
5. Create a systemd service to start ngrok at boot:
Replace “pi” from “User=” and “Group=” if your Raspberry Pi has a different username (use whoami command).

Create a systemd service for ngrok
6. Next enable service to start at boot:
7. Start the service in order to check if it works:
8. You should be able to see inside the “Endpoints” menu the URL 🟨 which you can use to connect to your Node-RED over the internet:
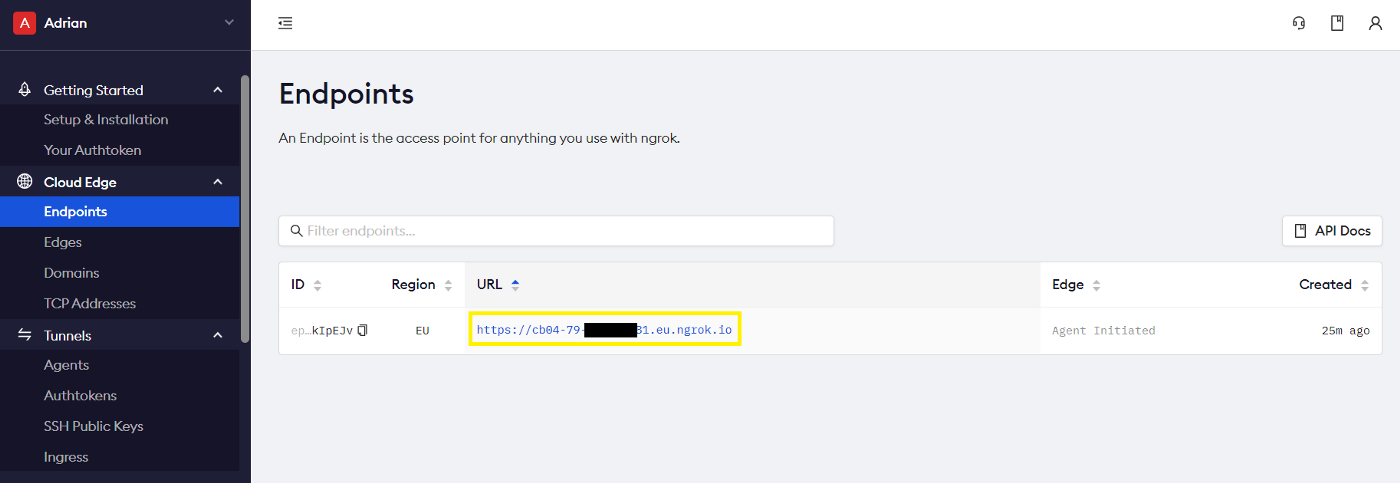
Get your tunnel URL which let you access Node-RED through the internet
Good, now you are ready to set up a webhook for the Messenger API.
Remember this ngrok URL as it is used in the configuration below.
If you don’t already have a Facebook Page, you need to create one in order to use the Messenger API.
Create a new page using this link.
After you install the RedBot plugin, in order to use the nodes you need to generate an API key from Facebook.
1. Navigate to “META for Developers” and 🟦 create a new app of type 🟩 “None”:

Configure a new Facebook app of type “None”

Configure a new Facebook app of type “None”
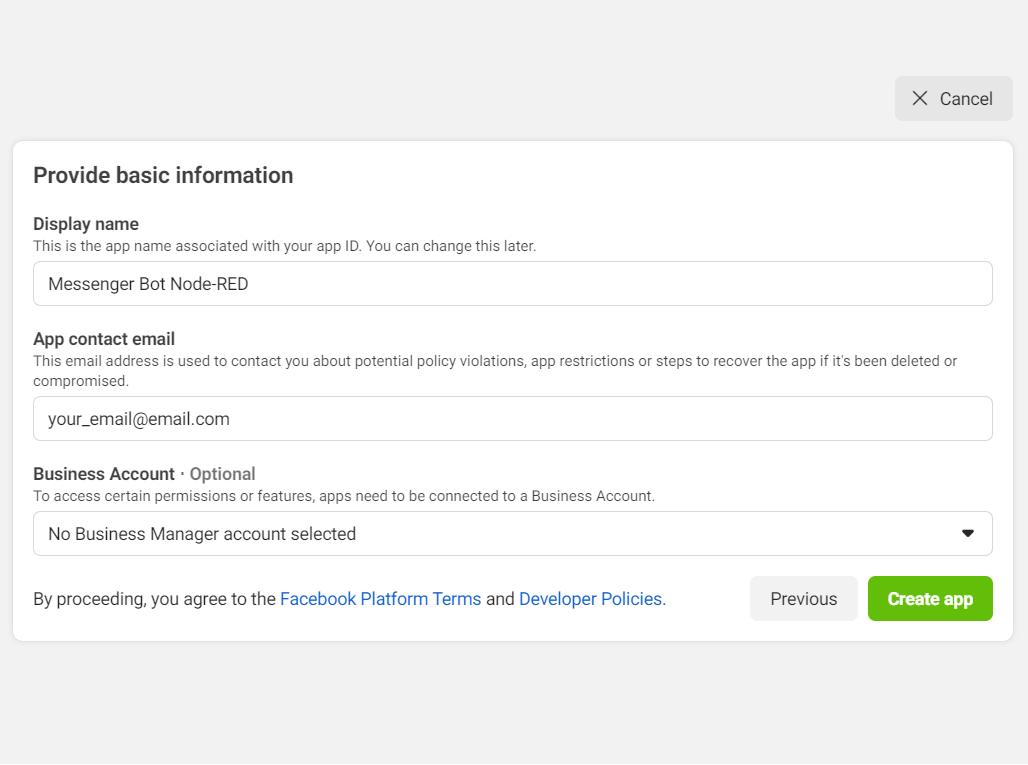
Configure a new Facebook app of type “None”
2. Set up a new 🟥 “product” of type “Messenger”:

Set up Messenger inside the app
3. Select your Facebook page to be linked with your app from the 🟧 “Access Tokens” tab, then press 🟨 “Done”:
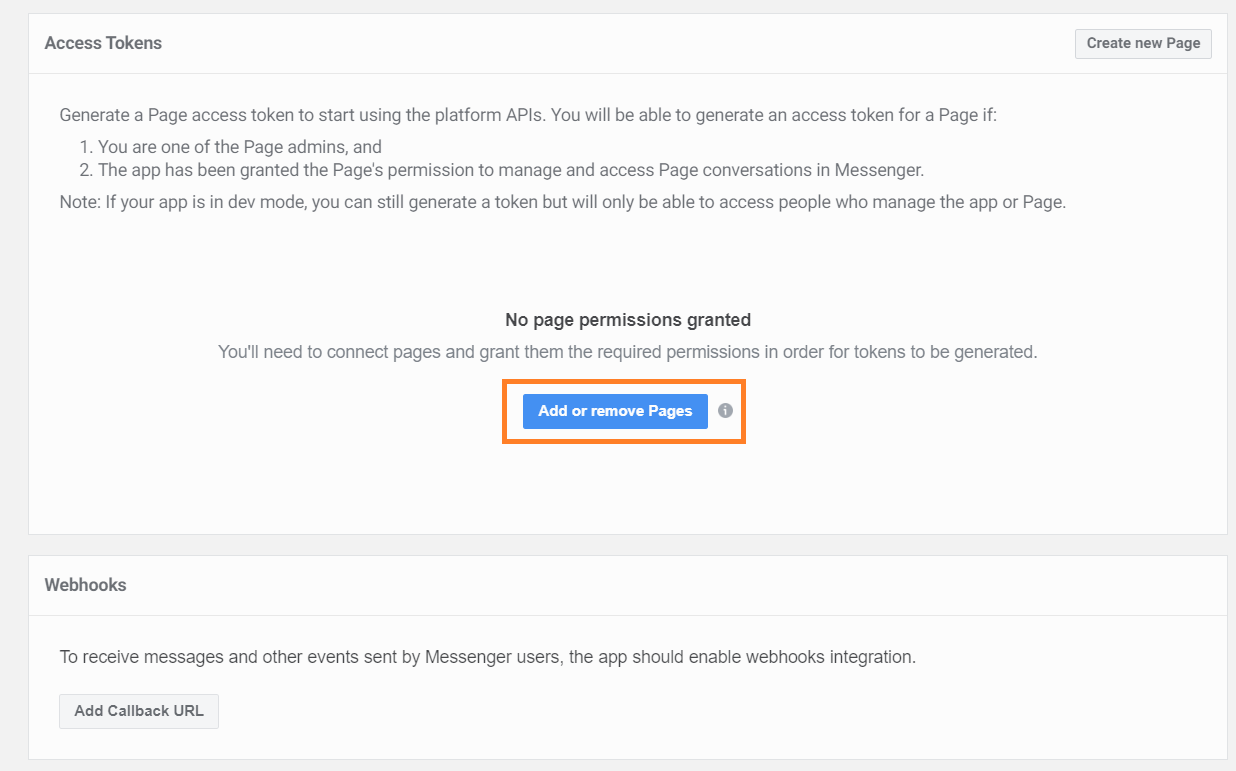
Connect a Facebook Page to the app

Connect a Facebook Page to the app

Connect a Facebook Page to the app
4. Generate a token 🟦 and save it 🟩 as will be used later:

Generate a token and save it to bind the RedBot with the app

Generate a token and save it to bind the RedBot with the app
Don’t close this page yet, you still need to configure the “Webhooks”.
5.Create a configuration inside Node-RED:
In order to validate the webhook from the next step, we need to create a simple configuration inside the Node-RED.
Connect to the Node-RED web interface by accessing your Raspberry IP and append :1880, e.g.: http://192.168.0.156:1880, http://raspberrypi.local:1880/ like here or by using ngrok URL.

Flow created before finishing Facebook App set up

Set up your token and create a random one for the webhook
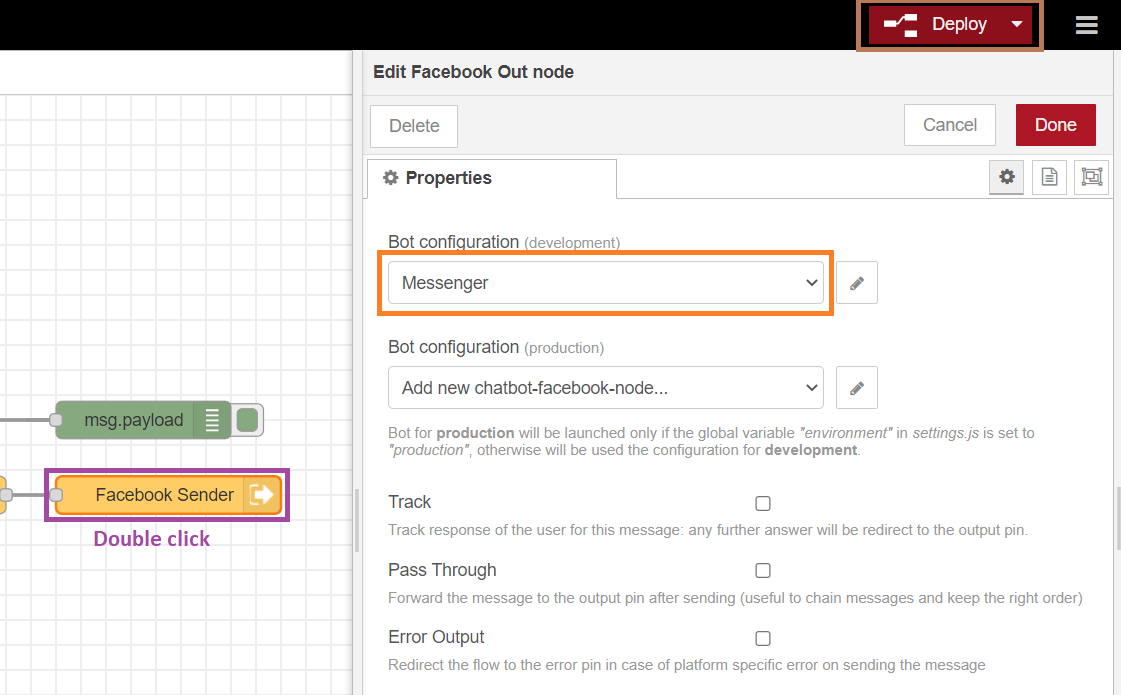
Select “Messenger” bot configuration for the “Facebook Sender” node also
6. Go back to the app set up and 🟪 “Add Callback URL” from the “Webhooks” tab:
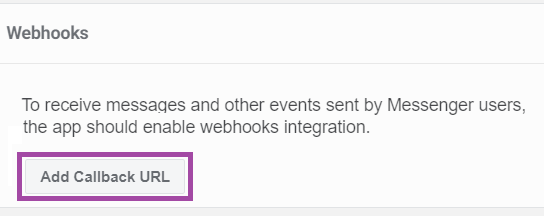
Create a webhook for the Messenger bot and use the token you pick above
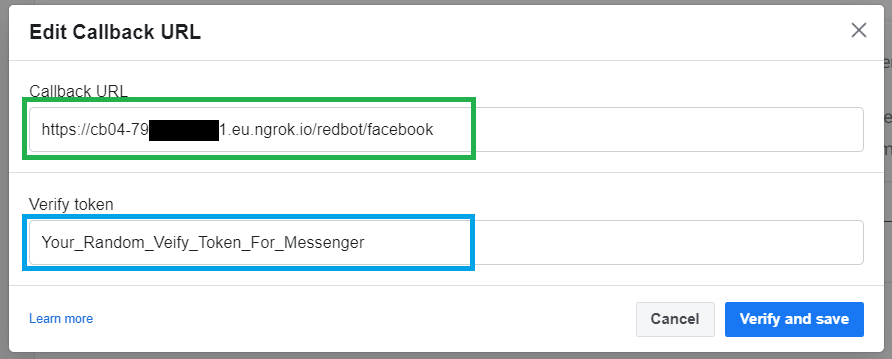
Create a webhook for the Messenger bot and use the token you pick above
7. 🟥 “Add subscriptions” to the webhook you just created of type 🟧 “messages” and “save”:

“Add subscription” to the webhook which will call it when what you pick happens e.g. receive “messages”

“Add subscription” to the webhook which will call it when what you pick happens e.g. receive “messages”
You finished the default setup for the Messenger API, now it’s time to go back to the Node-RED and put a simple text message.
You already have a simple flow for your Facebook Messenger bot, now let’s add a simple text message to make it usable.
1. Modify the 🟪 “Conversation” node to use created Messenger 🟩“Bot Configuration”:

Set “Conversation” node “Bot Configuration” as the bot configuration “Messenger”
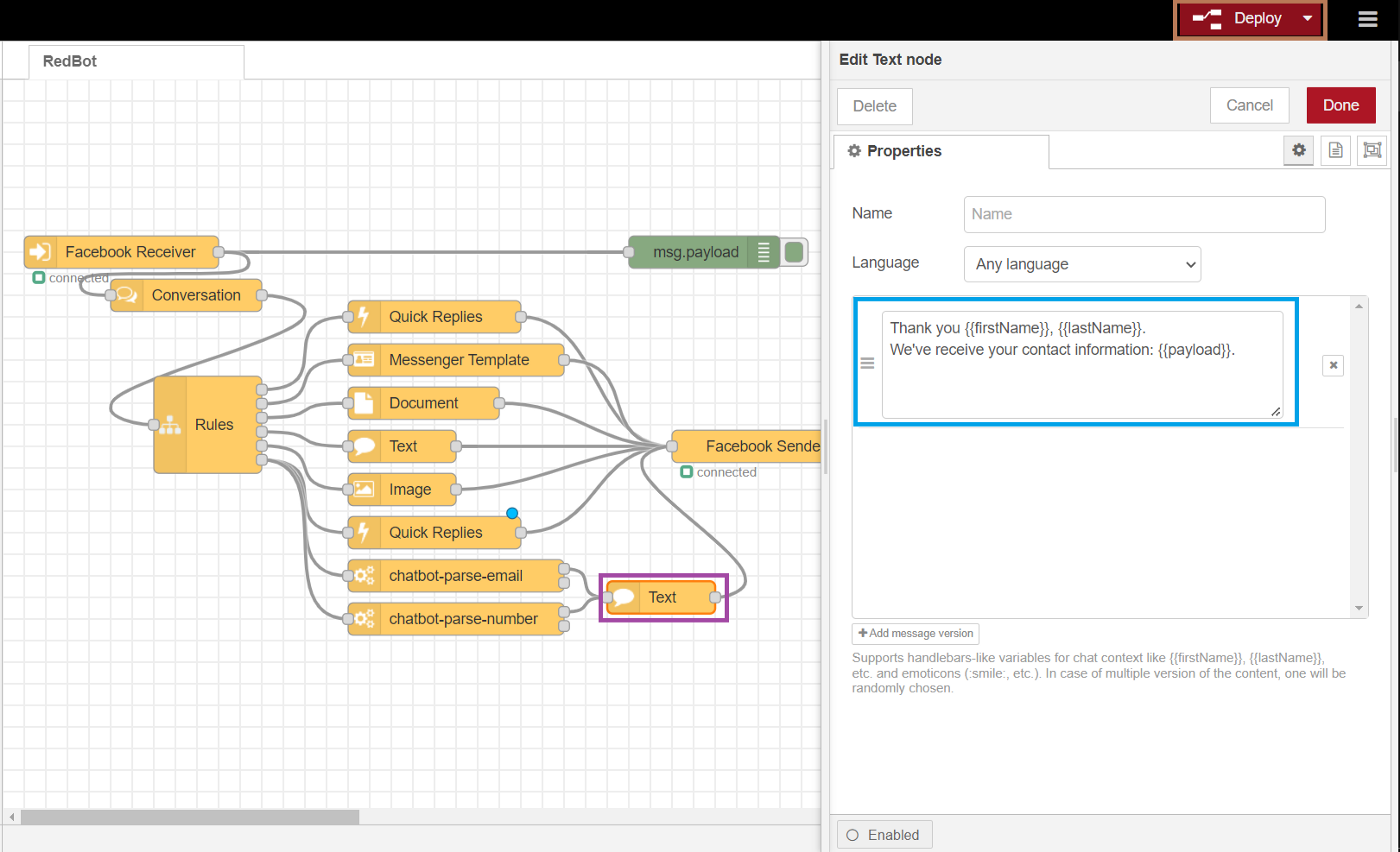
2. Add a message 🟦 you want to see as a replay inside the 🟪 “Text” node then 🟫 “Deploy”:

Edit the “Text” node to send a replay message for the test
3. Test if your bot works:

Example of test for the Facebook Messenger bot

Example of test for the Facebook Messenger bot
You can see the bot has replayed 🟩 the message we’ve picked.
Also, the message is shown inside Node-RED 🟥 debug window through the “debug” node. You can access the content through “msg.payload.content”.
Probably you want your users to make some operations easier, like sending phone, email and responding with an image, selecting from a precompiled response list, etc. .

Example of a quick menu added to the Facebook Messenger bot
I’ll show you how to make some of these with a few clicks using RedBot.
1.Modify flow to use the “Rules” node:

Add multiple nodes and “Rules” to the flow to make the bot a bit more complex

Add multiple nodes and “Rules” to the flow to make the bot a bit more complex
As you can see, the “Rules” node creates multiple outputs for each command you put in, in the same order.
2. Modify the settings of each new node in accordance to:
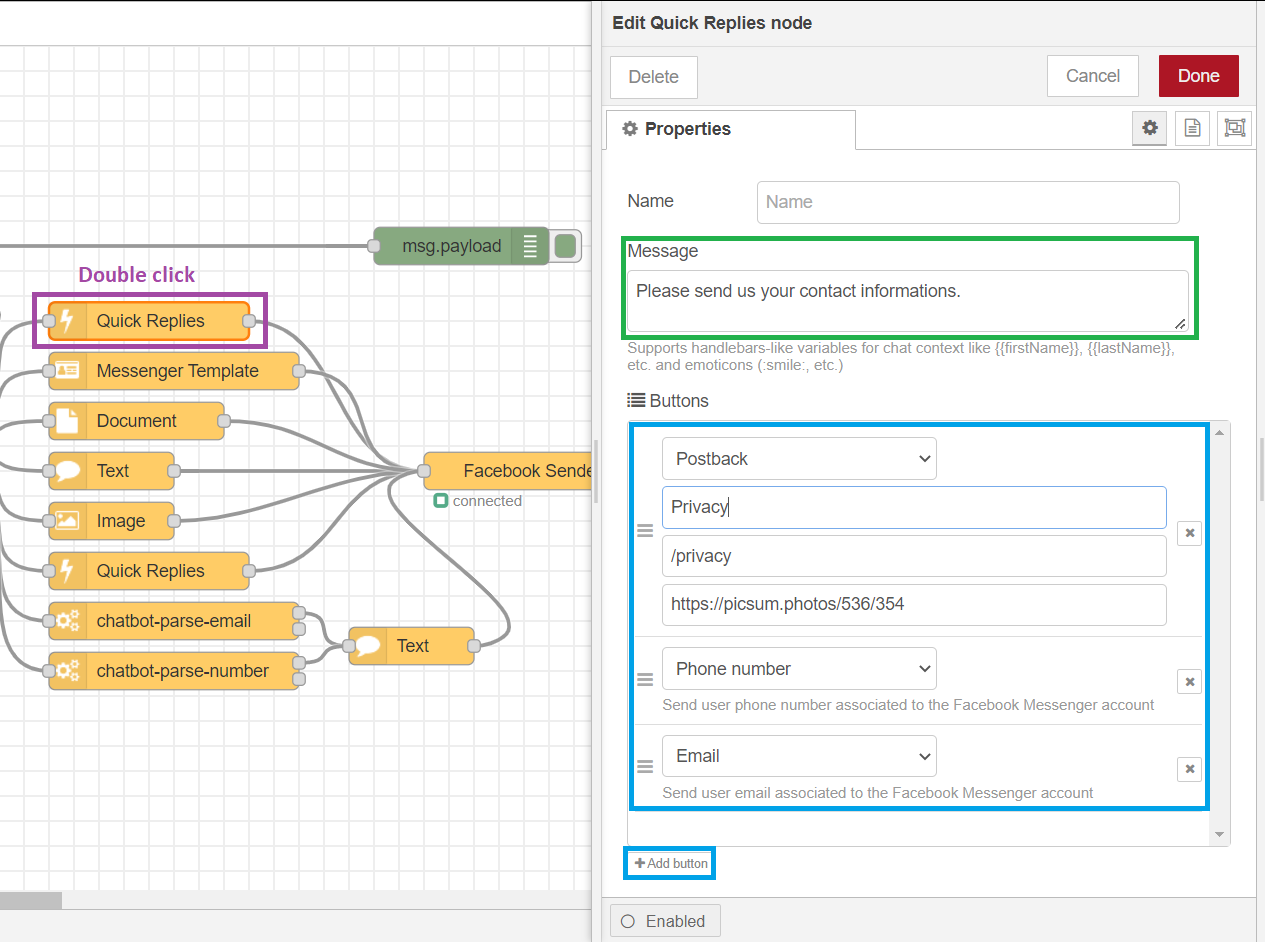
Add options to the first “Quick Replies” node

Create a template to respond when asking for a product

Use a random “Document” URL to send through Messenger
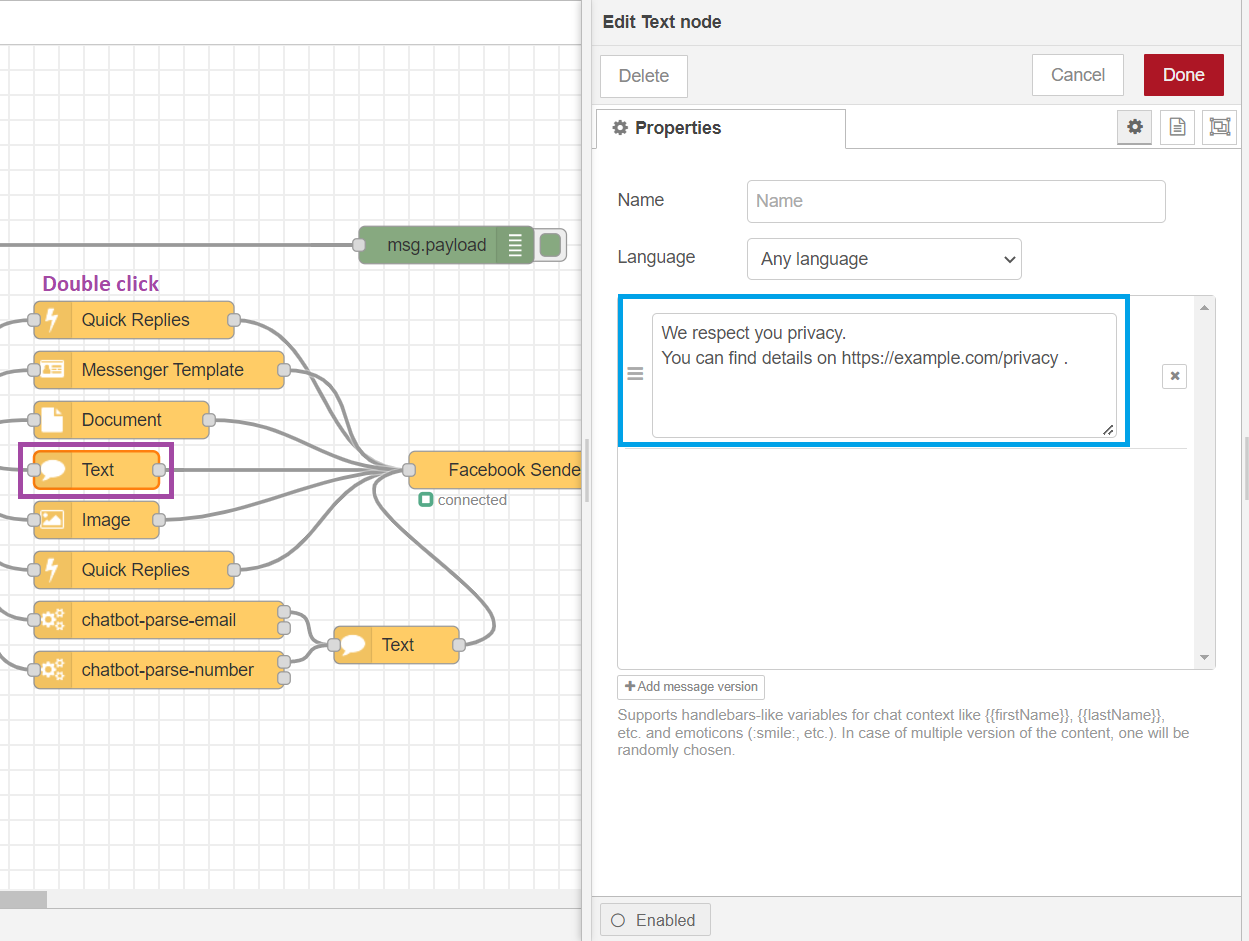
“Text” replay when asking for privacy information

“Image” replay when asking for a random image

“Quick Replies” commands when you send any random message

Parse for email and phone number

Parse for email and phone number
Send a replay “Text” confirmation message with an email or phone number received
Great, now let’s make some tests to see how it looks 😀.
Send a message and you should see a list of 🟩 “Quick Replies” options inside the Messenger:

How “Quick Replies” looks inside Messenger conversation
Let’s see what each option outputs:

Example of replays for “Contact” option

“View a product” would give you a replay of an image, text, URL, and call button

Example replay of “Document” node
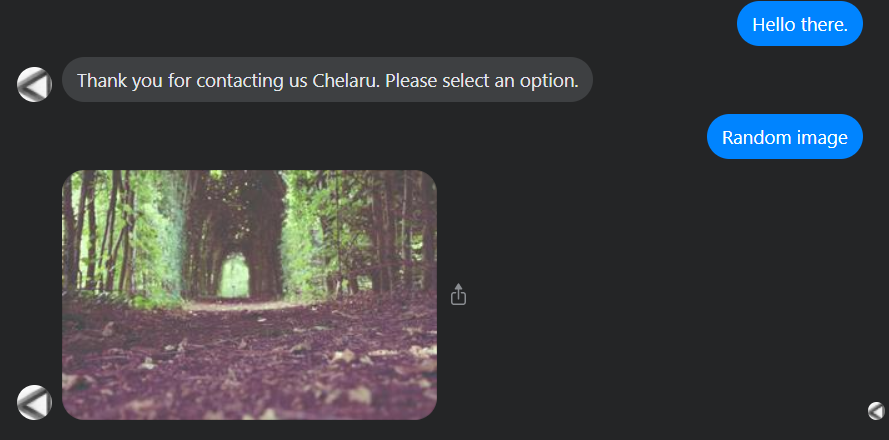
“Random image” output
Each time you select an option, you should receive the “Postback” button content value in the backend, at Node-RED, inside “msg.payload.content”:

In the backend, Node-RED would receive the postback (buttons) value you set, not the text you see in Messenger
You can also connect RedBot with many things like a database, firebase, send and receive emails, and so on to make it interactive and user-specific.
This is not the subject of the article, but if you want to see a custom way of using this bot, let me know in a comment and I’ll try to respond or create a specific article about anything you need.
You just created your first Facebook Messenger bot.
Stay tuned to see how you can improve it and make some complex functions work.
Check out here for a complete list of more Node-RED articles made by me:
Share with your friends and followers
Join other developers and claim your FAUN account now!
Influence
Total Hits
Posts

Hand curated newsletters for Developers, private Slack with like minded people, podcasts, job offers, news and more!


