


Using Sonatype Nexus 3 as a NuGet artifacts repository
For some time, I wanted to write about remote package management in C#. So, I chose to start with this topic, by sharing my experience with setting up private, or local, NuGet repositories. To be able to follow the topic, basic C# knowledge is required, along with basic docker and Linux knowledge.
Package management is one of those mechanisms that developers take for granted. For the most part, development teams don’t argue about it or discuss it. Its beauty is the simplicity of the concept, coupled with the objectivity of its purpose, which is to provide extended functionality in an easy plug-in/plug-out sort of way. In OOP, package management is very helpful and without it, in most cases, one would not survive.
History behind package management
Looking back at the origins, the package management concept was first successfully applied by Linux, and its purpose was the same - install third party software. You can read some of the history behind package managers here - imagine the boredom behind having to restore dependencies from an FTP server, or browsing available software on it.
This was where developers saw they could easily add value. By having a readily available package manager that would sit beside the system package manager itself, most of the compatibility problems would be, in theory, easily approached, and could be solved before the distribution itself, by extensive testing and validation.
The C# use case
In this specific case, using .NET, I’m writing about the NuGet package manager, which has been the sideload of C# dependencies for a long time. This additional compatibility layer (if I may call it that) does a lot of the heavy lifting for the developer, without evident effort.
If the way packages are distributed internally could be customized inside a specific project, with hybrid sort of public and private hosting, to make it accessible and easily shareable across different solutions, by specific team members, this would — in theory — enable developers to produce and maintain a set of locally stored packages, which could then be interchangeably used by other colleagues.
Pre-requisites
To follow this segment, you will need to install on your machine:
- Docker;
- Sonatype Nexus Repository Manager 3 (docker Image);
- .NET SDK (includes runtime)
- Visual Studio (Code or 2017/2019/2022)
Setting up Sonatype Nexus 3
Open a command prompt and use docker image pull sonatype/nexus3 to retrieve the latest version of the docker image that will be used to launch the remote repository platform. When the image’s download is concluded, go ahead and create the volume that will be used to store data for the repository. If you don’t know what a data volume is, be sure to read about it on docker official documentation. This can be done with docker volume create --name nexus-data. By creating a volume, the application’s data will be persisted, even if the container is deleted. As per the official documentation on docker’s Sonatype Nexus 3’s official repository, the dedicated data path is /nexus-data:

Image retrieved from Sonatype Nexus 3 docker repository
On the next step, things should be all set up to launch the Sonatype Nexus 3 container. A couple of remarks though, since a port number is needed, to be able to launch the container, as well as some other arguments. For the port number -p 8081 will be used and, for the container name, --name nexus is the most verbose label one can assign to it. The docker volume created, along with the filesystem path where the data is stored onto is also needed, so you must mount that volume to the designated path. At last, the name of the image, which was downloaded in the first step, is also required.
The complete command should be something like docker run -d -p 8081:8081 --name nexus -v nexus-data:/nexus-data sonatype/nexus3. Hit enter and give a couple of minutes for the application to initialize. You can browse it at http://localhost:8081, where the application should prompt you for a secret token:
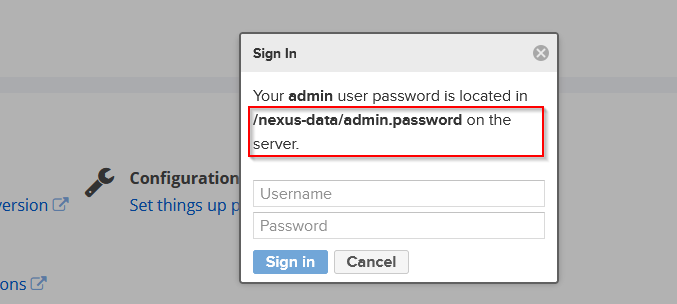
Login prompt to sign into the repository
As the sign in prompt displays, the token must be retrieved from the specified filepath. This will require you to hop into the container to be able to retrieve it. The docker command to use for opening a bash terminal inside the container is docker exec -it nexus /bin/bash. You can find more information about this command here.
Now comes a stage where basic Linux knowledge gets into play. Once inside the container, use cat /nexus-data/admin.password to retrieve the token that you will use to sign in. This file contains a guid, which will be used for the first login. After that, a prompt will ask you to change the default password. Addtionally, the prompt will ask to authorize if anonymous users are allowed to access the application or not, and to share data about the application’s usage. For the sake of the principle of least priviledge, I always deny access from anonymous users. This will be especially important if you intend to use the private repository on a shared network, where it can be accessed by a lot of people.
Looking at the available repositories, by default, four repositories for Maven and three repositories for NuGet should already be present. Delete the Maven repositories, since they aren’t needed. The following couple of steps are very important so that requests can be made to the remote repository’s API.
First, go the Security tab and find the Realms option. Then be sure to add the NuGet API Key Realm to the active realms.
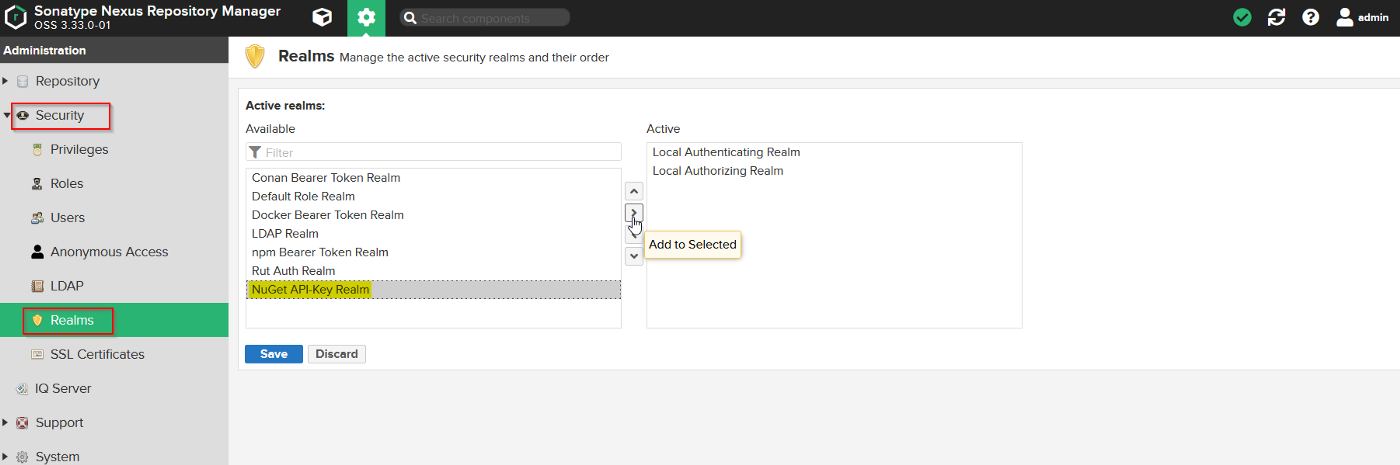
Descriptive image
Second, be sure to retrieve the API key from the admin tab. The API key can be found there, and there can also be found a Reset API key option, which may be needed if you want to reset the API Key.

Descriptive image
The last step of the configuration is adding the nuget-group repository to the NuGet sources. This can easily be made by using the .NET CLI but, before that, I want to have a look at the current schematics, and compare it with the changes which will be introduced to the package management infrastructure.
Below can be seen an overly-simplified visual representation of the NuGet V3 API, as well as its relation with the Integrated Development Environment:
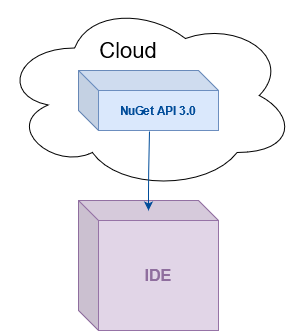
IDE package manager hosted publicly on the cloud
The goal is to setup a local private repo, named nuget-hosted, which does not share the packages I create with the cloud, but also provides all the packages that are already available on the cloud, through the nuget-proxy repository. This nuget.org-proxy repository, as the name suggests, is used to connect to the NuGet V3 API . These two repositories will be coupled into a nuget-group, which will abstract the differences between one another. Visually, this could be something like the following:

IDE package manager hosted both privately and publicly
There are two different ways of adding the nuget-group repository to the package sources; Via command line, or via GUI.
Adding them via GUI is fairly simple, and doesn’t require much effort. So I’ll be explaining how to do it via the command line. The dotnet nuget add source command will be very useful to do so. The arguments needed are the URL of the repository, the name of the package source (for VS/NuGet interpretation purposes), the username, and the password. These are the same credentials which are used to access the Sonatype Nexus Repository Manage’s GUI. Something like dotnet nuget add source "http://localhost:8081/repository/nuget-group/index.json" -n <source-name> -u <username> -p <your-password>.

dotnet nuget add source example
The configuration should be concluded.
Packaging and pushing a library to the remote repository
Packaging and pushing .NET libraries to this remote repository will require some code to convert into a package. By using the pack command, dotnet pack, one can easily convert some functionalities into a NuGet package. This works by creating a file of type .nupkg which will later be placed into the nuget-hosted repository by using the push command, dotnet nuget push. The logic is quite simple but, evidently, I have no package to demonstrate how to do that. It will be addressed in the next steps.
Create a new project, of type class library, using .NET 6. Here follow some of the tags that can be added to the project (.csproj) so that it can be packed into a NuGet package:
— <IsPackable>true</IsPackable> or <GeneratePackageOnBuild>true</GeneratePackageOnBuild>;
— <Version>major.minor.version</Version>;
— <Description>choose your description</Description>;
The first tag will make the use of the dotnet pack command available when you need to run it manually. Alternatively, the second tag, <GeneratePackageOnBuild>, will automatically run dotnet pack every time the application is built. More information about customization options can be found on microsoft’s official documentation. After adding the tags, the .csproj file should be like this:
Following this, create a class named Calculator.cs. Below is displayed a simple code block, of a small calculator module, which can be used to perform addition, subtraction, multiplication, or division operations between two numbers. You can use whatever code you want, keep in mind that the goal is to push these functionalities to the remote storage unit, so that they can be restored as a dependency, and reused into some other application, like a Web API, for demonstrative purposes.
After having your code built, the project can be packed into the .nupkg file. As mentioned, the dotnet pack <project-filepath.csproj>, will be used to generate the file. By default, the package will be stored on the bin\Debug\ folder. In my case, it was created under the path ~\source\repos\MySimpleCalculator\MySimpleCalculator\bin\Debug\:

Path of the NuGet package
After that, use dotnet nuget push <nuget-file.nupkg> -k <api-key> -s <source-repository>. It’s important to mention that the packages must be pushed to the nuget-hosted repository. The full command should look something like the following:

dotnet nuget push example
Validate that the package is present on the remote repository by browsing the contents of nuget-hosted. A module with the name of the package will be present if every step was performed accordingly:

Browsing nuget-hosted repository
Retrieving the package and reusing it
For the last stage, first be sure that the nuget-group repository is the only active package source your IDE:

NuGet sources list
Create a simple REST API, to view the product of your feature in action. On the controller, be sure to add MySimpleCalculator package, which can be found on your NuGet packages:

NuGet package manager
To finish, create a new example method to multiply two numbers, and instantiate a new calculator object. Below is a snippet with some example code:
Build the application, run it and test it. The source code for the calculator package is available at: https://github.com/olevezinho/ModelClasses/blob/master/src/Dissertacao/ModelClasses/Calculator.cs
The source code for the REST API is available at: https://github.com/olevezinho/CalculatorWebApi/tree/master/src/mycalculatorwebapp/mycalculatorwebapp
Conclusion
This sort of analogy might or might not be useful for a team working for a common goal. For sure, it loses a bit of its purpose when developers are working alone, unless there are a lot of packages being handled, and there’s a need to manage package versions. This is a fundamental change in the approach teams adopt when developing software, and change is not always seen with good eyes. Either way, its good for a developer to be able to easily launch a service that can provide this utility, and its fundamental to know how to do it if the needs demand so.
In my opinion, the strong point of this analogy, is being able to have a private NuGet source with packages which only I, or a set of people, can access. There are also some other advantages to that when using docker, which is one of the go-to virtualization tools for microservices development. Project’s dependencies can easily be managed on Dockerfiles, even when using sources different from the default NuGet V3 API. This means that applications can be run, and tested, and infrastructure can be managed inexpensively.
Share with your friends and followers
Start blogging about your favorite technologies, reach more readers and earn rewards!
Join other developers and claim your FAUN account now!

luis costa brochado
Software developer, MerkleDACH
@luiscosta_brochado


User Popularity
51
Influence
5k
Total Hits
1
Posts

Read, Learn, Know, Teach
Hand curated newsletters for Developers, private Slack with like minded people, podcasts, job offers, news and more!

Only registered users can post comments. Please, login or signup.