Join us

How to Handle Email Verification in Laravel

When a new user clicks on the Sign up button of an app, he or she usually gets a confirmation email with an activation link (see examples here). This is needed to make sure that the user owns the email address entered during the sign-up. After the click on the activation link, the user is authenticated for the app.

From the user’s standpoint, the email verification process is quite simple. From the developer’s perspective, things are much trickier unless your app is built with Laravel. Those who use Laravel 5.7+ have the user email verification available out-of-the-box. For earlier releases of the framework, you can use a dedicated package to add email verification to your project. In this article, we’ll touch upon each solution you can choose. 

Basic project to be used as an example

Since email verification requires one to send emails in Laravel, let’s create a basic project with all the stuff needed for that. Here is the first command to begin with:

composer create-project --prefer-dist laravel/laravel app

Now, let’s create a database using the mysql client and then configure the .env file thereupon:

DB_CONNECTION=mysql
DB_HOST=127.0.0.1
DB_PORT=3306
DB_DATABASE=DB-laravel
DB_USERNAME=root
DB_PASSWORD=root

Run the migratecommand to create tables for users, password resets, and failed jobs:

php artisan migrate

Since our Laravel app will send a confirmation email, we need to set up the email configuration in the .env file.

For email testing purposes, we’ll use Mailtrap Email Sandbox, which captures SMTP traffic from staging and allows developers to debug emails without the risk of spamming users.

The Email Sandbox is one of the SMTP drivers in Laravel. All you need to do is sign up and add your credentials to .env, as follows:

MAIL_MAILER=smtp
MAIL_HOST=smtp.mailtrap.io
MAIL_PORT=2525
MAIL_USERNAME=<********> //Your Mailtrap username
MAIL_PASSWORD=<********> //Your Mailtrap password
MAIL_ENCRYPTION=tls

For more on Mailtrap features and functions, read the Mailtrap Getting Started Guide.

Scaffold UI

In Laravel, you can scaffold the UI for registration, login, and forgot password using the php artisan make:auth command. However, it was removed from Laravel 6. In the latest releases of the framework, a separate package called laravel/ui is responsible for the login and registration scaffolding with React, Vue, jQuery and Bootstrap layouts. After you install the package, you can use the php artisan ui vue --auth command to scaffold UI with Vue, for example.


Set up email verification in Laravel 5.7+ using the MustVerifyEmail contract

The Must Verify Email contract is a feature that allows you to send email verification in Laravel by adding a few lines of code to the following files:

App/User.php:

Implement the MustVerifyEmail contract in the User model:

<?php
namespace App;
use Illuminate\Notifications\Notifiable;
use Illuminate\Contracts\Auth\MustVerifyEmail;
use Illuminate\Foundation\Auth\User as Authenticatable;
class User extends Authenticatable implements MustVerifyEmail
{
use Notifiable;
protected $fillable = [
'name', 'email', 'password',
];
protected $hidden = [
'password', 'remember_token',
];
}


routes/web.php

Add such routes as email/verify and email/resend to the app:

Route::get('/', function () {
return view('welcome');
});
Auth::routes(['verify' => true]);
Route::get('/home', 'HomeController@index')->name('home');


app/Http/Controllers/HomeController.php

Add the verified and auth middlewares:

<?php
namespace App\Http\Controllers;
use Illuminate\Http\Request;
class HomeController extends Controller
{
public function __construct()
{
$this->middleware(['auth','verified']);
}
public function index()
{
return view('home');
}
}

Now you can test the app. 

And that’s what you’ll see in the Mailtrap Demo inbox:

Customization

On screenshots above, the default name of the app, Laravel, is used as a sender’s name. You can update the name in the .env file:

APP_NAME=<Name of your app>

To customize notifications, you need to override the sendEmailVerificationNotification method of the App\User class. It is a default method, which calls the notify method to notify the user after the sign-up.

For more on sending notifications in Laravel, read our dedicated blog post. 

To override sendEmailVerificationNotification, create a custom Notification and pass it as a parameter to $this->notify() within sendEmailVerificationNotification in the User Model, as follows:

public function sendEmailVerificationNotification()
{
$this->notify(new \App\Notifications\CustomVerifyEmail);
}

Now, in the created Notification, CustomVerifyEmail, define the way to handle the verification. For example, you can use a custom route to send the email. 


How can I manually verify users?

The MustVerifyEmail class is a great thing to use. However, you may need to take over the control and manually verify email addresses without sending emails. Why would anyone do so? Reasons may include a need to create and add system users that have no accessible email addresses, import a list of email addresses (verified) to a migrated app, and others. 

So, each manually created user will see the following message when signing in:

The problem lies in the timestamp in the Email Verification Column (email_verified_at) of the user table. When creating users manually, you need to validate them by setting a valid timestamp. In this case, there will be no email verification requests. Here is how you can do this:

markEmailAsVerified()

The markEmailAsVerified() method allows you to verify the user after it’s been created. Check out the following example:

$user = User::create([
'name' => 'John Doe',
'email' => 'john.doe@example.com',
'password' => Hash::make('password')
]);
$user->markEmailAsVerified();

forceCreate()

The forceCreate() method can do the same but in a slightly different way:

$user = User::forceCreate([
'name' => 'John Doe',
'email' => john.doe@example.com',
'password' => Hash::make('password'),
'email_verified_at' => now() //Carbon instance
]);

Manually set a valid timestamp

The most obvious way is to set a valid timestamp in the email_verified_at column. To do this, you need to add the column to the $fillable array in the user model. For example, like this:

protected $fillable = [
'name', 'email', 'password', 'email_verified_at',
];

After that, you can use the email_verified_at value within the create method when creating a user:

$user = User::create([
'name' => 'John Doe',
'email' => john.doe@example.com',
'password' => Hash::make('password'),
'email_verified_at' => now() //Carbon instance
]);

Laravel queuing for email verification

The idea of queuing is to dispatch the processing of particular tasks, in our case, email sending, until a later time. This can speed up processing if your app sends large amounts of emails. It would be useful to implement email queues for the built-in Laravel email verification feature. The simplest way to do that is as follows:

  • Create a new notification, e.g., CustomVerifyEmailQueued, which extends the existing one, VerifyEmail. Also, the new notification should implement the ShouldQueue contract. This will enable queuing. Here is how it looks:

namespace App\Notifications;
use Illuminate\Bus\Queueable;
use Illuminate\Contracts\Queue\ShouldQueue;
use Illuminate\Auth\Notifications\VerifyEmail;
class CustomVerifyEmailQueued extends VerifyEmail implements ShouldQueue
{
use Queueable;
}

public function sendEmailVerificationNotification()
{
$this->notify(new \App\Notifications\CustomVerifyEmailQueued);
}

We did not touch upon configuration of the queue driver here, which is “sync” by default without actual queuing. If you need some insight on that, check out this Guide to Laravel Email Queues.

Set up email verification in Laravel using the laravel-confirm-email package 

The laravel-confirm-email package is an alternative way to set up email verification in 5.8 and older versions of Laravel. It works, however, also for the newest releases. You’re likely to go with it if you’re looking for Laravel to customize verification of emails. For example, the package allows you to set up your own confirmation messages and change all possible redirect routes. Let’s see how it works.

Installation

Install the laravel-confirm-email package, as follows:

composer require beyondcode/laravel-confirm-email

You also need to add two fields to your users table: confirmed_at and confirmation_code. For this, publish the migration and the configuration file, as follows:

php artisan vendor:publish --provider="BeyondCode\EmailConfirmation\EmailConfirmationServiceProvider"

Run the migrations after:

php artisan migrate

Setting up

We need to replace the default traits with those provided by laravel-confirm-email in the following files:

app\Http\Controllers\Auth\LoginController.php

  • Default trait

use Illuminate\Foundation\Auth\AuthenticatesUsers;

  • laravel-confirm-email trait

use BeyondCode\EmailConfirmation\Traits\AuthenticatesUsers;

app\Http\Controllers\Auth\RegisterController.php

  • Default trait

use Illuminate\Foundation\Auth\RegistersUsers;

  • laravel-confirm-email trait

use BeyondCode\EmailConfirmation\Traits\RegistersUsers;

app\Http\Controllers\Auth\ForgotPasswordController.php

  • Default trait

use Illuminate\Foundation\Auth\SendsPasswordResetEmails;

  • laravel-confirm-email trait

use BeyondCode\EmailConfirmation\Traits\SendsPasswordResetEmails;

Add the routes to app/routes/web.php:

Route::name('auth.resend_confirmation')->get('/register/confirm/resend', 'Auth\RegisterController@resendConfirmation');
Route::name('auth.confirm')->get('/register/confirm/{confirmation_code}', 'Auth\RegisterController@confirm');

Error/confirmation messages 

To set up flash messages that show up after a user clicks on the verification link, append the code to the following files:

resources\views\auth\login.blade.php

@if (session('confirmation'))
<div class="alert alert-info" role="alert">
{!! session('confirmation') !!}
</div>
@endif
@if ($errors->has('confirmation') > 0 )
<div class="alert alert-danger" role="alert">
{!! $errors->first('confirmation') !!}
</div>
@endif

resources\views\auth\passwords\email.blade.php

@if ($errors->has('confirmation') > 0 )
<div class="alert alert-danger" role="alert">
{!! $errors->first('confirmation') !!}
</div>
@endif

Customization

Updated the resources/lang/vendor/confirmation/en/confirmation.php file if you want to use custom error/confirmation messages:

<?php
return [
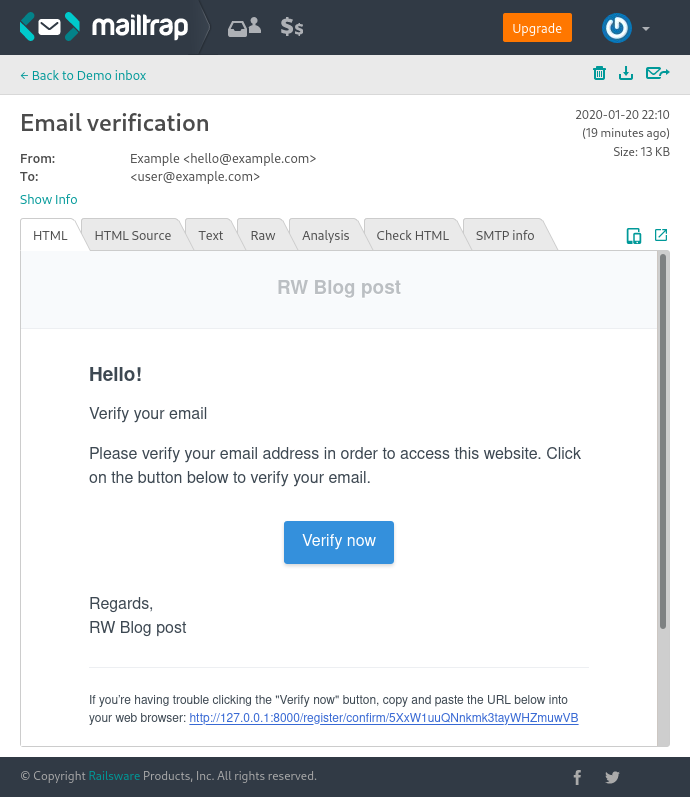
'confirmation_subject' => 'Email verification',
'confirmation_subject_title' => 'Verify your email',
'confirmation_body' => 'Please verify your email address in order to access this website. Click on the button below to verify your email.',
'confirmation_button' => 'Verify now',
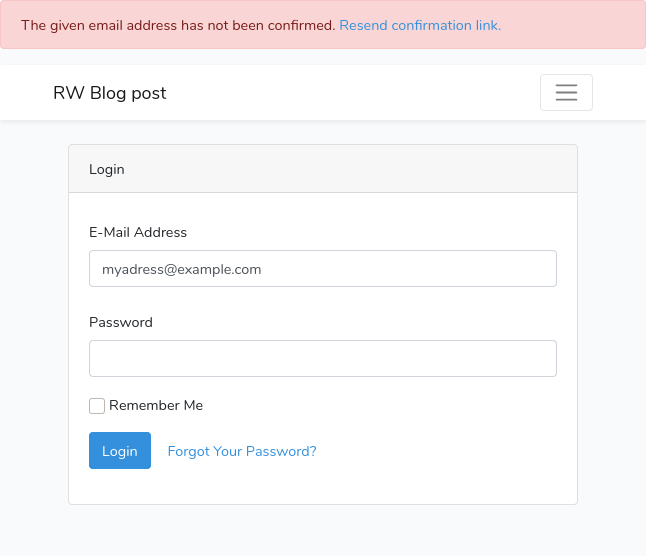
'not_confirmed' => 'The given email address has not been confirmed. <a href=":resend_link">Resend confirmation link.</a>',
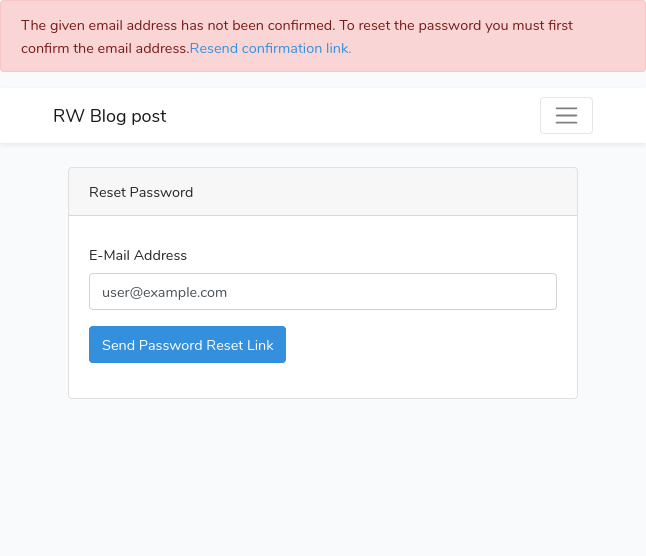
'not_confirmed_reset_password' => 'The given email address has not been confirmed. To reset the password you must first confirm the email address. <a href=":resend_link">Resend confirmation link.</a>',
'confirmation_successful' => 'You successfully confirmed your email address. Please log in.',
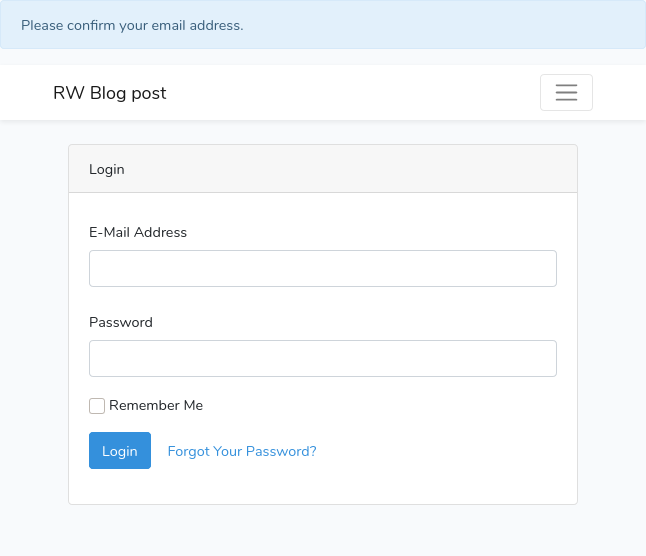
'confirmation_info' => 'Please confirm your email address.',
'confirmation_resent' => 'We sent you another confirmation email. You should receive it shortly.',
];

You can modify all possible redirect routes (the default value is route('login')) in the registration controller. Keeping in mind that the app was automatically bootstrapped, the registration controller is at app/Http/Controllers/Auth/RegisterController.php. Just include the following values either as properties or as methods returning the route/URL string:

  • redirectConfirmationTo – is opened after the user completed the confirmation (opened the link from the email)
  • redirectAfterRegistrationTo – is opened after the user submitted the registration form (it’s the one where “Go and verify your email now”)
  • redirectAfterResendConfirmationTo – is opened when you ask to resend the email

By redefining the redirect routes you can change not only the flash message but also the status page which you show to the user.

Set up email verification in Laravel 5.4-5.6 using the laravel-email-verification package

The laravel-email-verification package has been deemed an obsolete solution due to the release of MustVerifyEmail. Nevertheless, you can still use the package to handle email verification in older Laravel versions (starting from 5.4). 

Installation 

Install the package, as follows:

composer require josiasmontag/laravel-email-verification

Register the service provider in the configuration file (config/app.php):

'providers' => [
Lunaweb\EmailVerification\Providers\EmailVerificationServiceProvider::class,
],

In Laravel 5.5, this should have been done automatically, but it did not work for us (version 5.5.48).

You need to update the users table with a verified column. For this, you can publish the migration:

php artisan migrate --path="/vendor/josiasmontag/laravel-email-verification/database/migrations"

If you want to customize the migration, use the following command:

php artisan vendor:publish --provider="Lunaweb\EmailVerification\Providers\EmailVerificationServiceProvider" --tag="migrations"

And run the migrations after:

php artisan migrate

Setting up

Traits

CanVerifyEmail is a trait to be implemented in the User Model. You can customize this trait to change the activation email address.

use Illuminate\Foundation\Auth\User as Authenticatable;
use Lunaweb\EmailVerification\Traits\CanVerifyEmail;
use Lunaweb\EmailVerification\Contracts\CanVerifyEmail as CanVerifyEmailContract;
class User extends Authenticatable implements CanVerifyEmailContract
{
use CanVerifyEmail;
// ...
}

VerifiesEmail is a trait for RegisterController. To let the authenticated users access the verify routes, update the middleware exception: 

use Lunaweb\EmailVerification\Traits\VerifiesEmail;
class RegisterController extends Controller
{
use RegistersUsers, VerifiesEmail;
public function __construct()
{
$this->middleware('guest', ['except' => ['verify', 'showResendVerificationEmailForm', 'resendVerificationEmail']]);
$this->middleware('auth', ['only' => ['showResendVerificationEmailForm', 'resendVerificationEmail']]);
}
// ...
}

The package listens for the Illuminate\Auth\Events\Registered event and sends the verification email. Therefore, you don’t have to override register(). If you want to disable this behavior, use the listen_registered_event setting.

Middleware

Add the IsEmailVerified middleware to the app/Http/Kernel.php:

protected $routeMiddleware = [
// …
'isEmailVerified' => \Lunaweb\EmailVerification\Middleware\IsEmailVerified::class,

And apply it in routes/web.php:

<?php
Route::group(['middleware' => ['web', 'auth', 'isEmailVerified']], function () {
// Verification
Route::get('register/verify', 'App\Http\Controllers\Auth\RegisterController@verify')->name('verifyEmailLink');
Route::get('register/verify/resend', 'App\Http\Controllers\Auth\RegisterController@showResendVerificationEmailForm')->name('showResendVerificationEmailForm');
Route::post('register/verify/resend', 'App\Http\Controllers\Auth\RegisterController@resendVerificationEmail')->name('resendVerificationEmail')->middleware('throttle:2,1');
});

Customization

To customize the verification email, override sendEmailVerificationNotification() of the User model. For example:

class User implements CanVerifyEmailContract
{
use CanVerifyEmail;
/**
* Send the email verification notification.
*
* @param string $token The verification mail reset token.
* @param int $expiration The verification mail expiration date.
* @return void
*/
public function sendEmailVerificationNotification($token, $expiration)
{
$this->notify(new MyEmailVerificationNotification($token, $expiration));
}
}

To customize the resend form, use the following command:

php artisan vendor:publish --provider="Lunaweb\EmailVerification\Providers\EmailVerificationServiceProvider" --tag="views"

Path to the template: resources/views/vendor/emailverification/resend.blade.php

To customize messages and the language used, use the following command:

php artisan vendor:publish --provider="Lunaweb\EmailVerification\Providers\EmailVerificationServiceProvider" --tag="translations"

Path to the files: resources/lang/

To wrap up

Sending a verification email is the most reliable way to check the validity of an email address. The tutorials above will help you implement this feature in your Laravel app. At the same time, if you need to validate a large number of existing addresses, you do not have to send a test email to each of them. There are plenty of online email validators that will do the job for you. In the most extreme case, you can validate an email address manually with mailbox pinging. For more on this, read How to Verify Email Address Without Sending an Email.

This guide on how to add email verification in Laravel was initially written by Aleksandr Varnin for the Mailtrap blog.


Only registered users can post comments. Please, login or signup.

Start blogging about your favorite technologies, reach more readers and earn rewards!

Join other developers and claim your FAUN account now!

Mailtrap

Email Sandbox Service

User Popularity
415

Influence

40k

Total Hits

25

Posts

Mentioned tools